7

Azure Kubernetes Service Error – LoadBalancer type service external IP stays pending

Last week I was working on my Azure Kubernetes Service cluster when I ran into a rather odd issue. I’d created a service with a type of LoadBalancer in order to get an external IP to connect to SQL Server running in a pod from my local machine.

I’ve done this quite a few times at this point so wasn’t expecting anything out of the ordinary.

However, my service never got it’s external IP address. It remained in a state of pending: –

N.B. – The images in this post are taken after the issue was resolved as I didn’t think at the time to screen shot everything 😦

I knew something was wrong after about 20 minutes as the IP should have definitely come up by then.

So I delved into the service by running: –

kubectl describe service sqlserver-service

And was greeted with the following: –

Error creating load balancer (will retry): failed to ensure load balancer for service default/sqlserver-service: azure.BearerAuthorizer#WithAuthorization: Failed to refresh the Token for request to https://management.azure.com/subscriptions/subscriptionID/resourceGroups/MC_containers1_SQLK8sCluster1_eastus/providers/Microsoft.Network/loadBalancers?api-version=2017-09-01: StatusCode=0 — Original Error: adal: Refresh request failed. Status Code = ‘401’. Response body: {“error”:”invalid_client”,”error_description”:”AADSTS70002: Error validating credentials. AADSTS50012: Invalid client secret is provided.\r\nTrace ID: 17d1f0ce-6c11-4f8e-895d-29194d973900\r\nCorrelation ID: 3e11d85c-77bf-4041-a41d-267bfd5f066c\r\nTimestamp: 2019-01-23 18:58:59Z”,”error_codes”:[70002,50012],”timestamp”:”2019-01-23 18:58:59Z”,”trace_id”:”17d1f0ce-6c11-4f8e-895d-29194d973900″,”correlation_id”:”3e11d85c-77bf-4041-a41d-267bfd5f066c”}

Yikes! What’s happened there?

I logged a case with MS Support and when they came back to me, they advised that the service principal that is spun up in the background had expired. This service principal is required to allow the cluster to interact with the Azure APIs in order to create other Azure resources.

When a service is created within AKS with a type of LoadBalancer, a Load Balancer is created in the background which provides the external IP I was waiting on to allow me to connect to the cluster.

Because this principal had expired, the cluster was unable to create the Load Balancer and the external IP of the service remained in the pending state.

So I needed to update the service principal so that it was no longer expired. In order to update the service principal I needed two pieces of information. The clientId of the cluster and a secret used for the service principal password. This wasn’t the easiest process in the world so I’ll run through how to do it here.

First, log into Azure:-

az login

Then get the clientId of your cluster: –

az aks show --resource-group RESOURCEGROUPNAME --name CLUSTERNAME --query "servicePrincipalProfile.clientId" --output tsv

To confirm that the principal is expired: –

az ad sp credential list --id CLIENTID
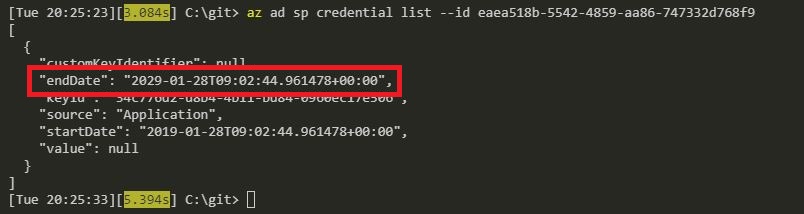
Check the endDate value highlighted above. If it’s past the current date, that’s your issue!

You may have noticed that mine is set 10 years from now. This is because I’m running these commands to get screenshots after I’ve fixed the issue…I figured 10 years should be long enough 🙂

The way I got the secret was to ssh onto one of the nodes in my cluster. This is a little involved but I’ll go through it step-by-step.

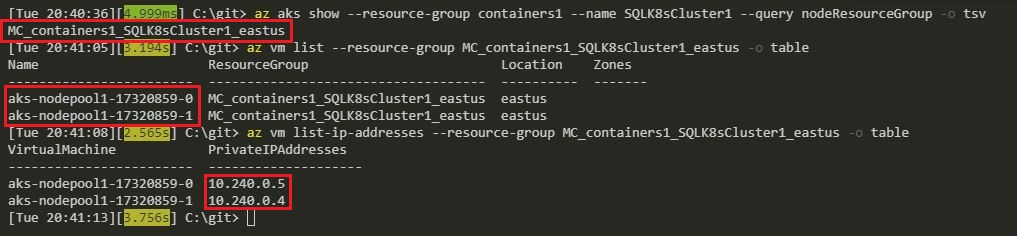
Resources for an AKS cluster are created in a separate resource group (for….reasons). To get that resource group name run: –

az aks show --resource-group RESOURCEGROUPNAME --name CLUSTERNAME --query nodeResourceGroup -o tsv

Then grab the nodes in the cluster (RESOURCEGROUPNAME2 is the output of the above command): –

az vm list --resource-group RESOURCEGROUPNAME2 -o table

And then get the IP address of each node: –

az vm list-ip-addresses --resource-group RESOURCEGROUPNAME2 -o table
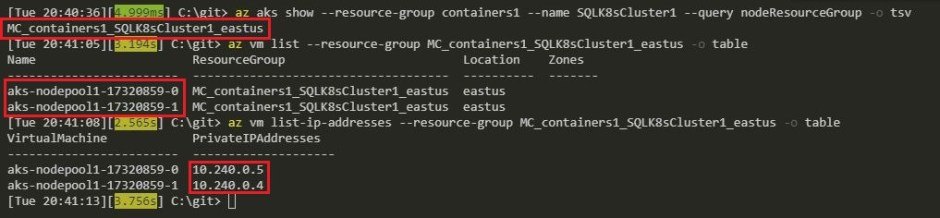
OK, now that I had the node details I could copy my SSH public key into one of them.

The ssh keys were generated when I created the cluster using the –generate-ssh-keys flag. If you didn’t specify this you’ll need to generate the keys before continuing on.

So I copied my public key into one of the nodes: –

az vm user update \
  --resource-group RESOURCEGROUPNAME2 \
  --name NODENAME \
  --username azureuser \
  --ssh-key-value id_rsa.pub

N.B. – I found it easiest to navigate to the directory that held my ssh keys before running this script

Then I spun up a pod with openssh-client installed so that I could ssh into one of the nodes from within the cluster (the nodes aren’t accessible externally).

To do this I created a docker image from the Alpine:latest image and installed the client. Pushed it to the Docker Hub and then ran: –

kubectl run -it --rm aks-ssh --image=dbafromthecold/alpine_ssh:latest

N.B. – the dbafromthecold/alpine_ssh:latest image is public so this will work for you as well

In a separate command prompt I got the name of the pod:-

kubectl get pods

And then copied my private ssh key into the pod:-

kubectl cp id_rsa PODNAME:/id_rsa

Once the key was copied in, I closed that window and went back to the original window where I had run the pod and changed the permissions on the private key: –

chmod 0600 id_rsa

And then I was able to ssh into one of the nodes:-

ssh -i id_rsa azureuser@NODEIPADDRESS

The secret is contained in a json file (as aadClientSecret). To grab it I ran: –

sudo cat /etc/kubernetes/azure.json

Once I had that information I could exit the node, then the pod, and update the service principal: –

az ad sp credential reset --name CLIENTID--password SECRET --years 10

I confirmed that the service principal had been updated: –

az ad sp credential list --id CLIENTID

And was then able to deploy a loadbalancer type service, and get an external IP!

kubectl get services

Phew 🙂

Hope that helps anyone who runs into the same issue!

0

Deploying SQL Server to Kubernetes using Helm

In previous posts I’ve run through how to deploy sql server to Kubernetes using yaml files. That’s a great way to deploy but is there possibly an easier way?

Enter Helm. A package manager for Kubernetes.

Helm packages are called charts and wouldn’t you know it? There’s a chart for SQL Server!

Helm comes in two parts. Helm itself is the client side tool, and tiller, which is the server side component. Details of what each part does can be found here.

So the first thing to do is install Helm. Now you can download the installers from the website here but I found the easiest way to install Helm locally was to install the Kubernetes extension for VS Code. Installing that extension will ask if you want to install other tools, one of which being helm. Nice and easy!

Now install tiller on your cluster (if you don’t have a cluster setup, I have a guide to building one in AKS here): –

helm init

Now search for the mssql-linux package: –

helm search stable/mssql-linux

And deploy!

helm install --name sql-server stable/mssql-linux --set acceptEula.value=Y --set sapassword=Testing1122 --set edition.value=Developer

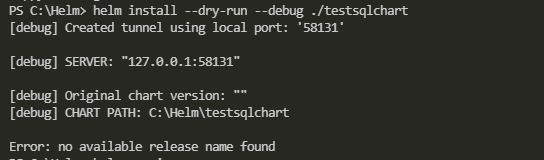
N.B. – If you get the following error: –

Error: release sql-server failed: namespaces “default” is forbidden:
User “system:serviceaccount:kube-system:default” cannot get namespaces in the namespace “default”

Run the following and then retry the deployment: –

kubectl create clusterrolebinding permissive-binding --clusterrole=cluster-admin --user=admin --user=kubelet --group=system:serviceaccounts;

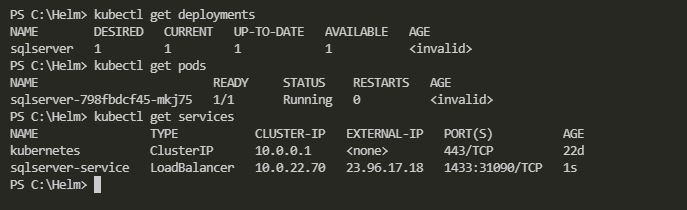
You can check the progress of the deployment by running the following: –

kubectl get deployments

kubectl get pods

kubectl get services

You may have noticed that the service does not have an external IP. So we can’t connect externally to the SQL instance running in the pod. In order to connect, let’s spin up another pod which has sqlcmd installed and enter a bash session: –

kubectl run sqltools --image=microsoft/mssql-tools -ti --restart=Never --rm=true -- /bin/bash

Now we can connect using sqlcmd: –

sqlcmd -S sql-server-mssql-linux -U sa

And now run a test query: –

SELECT @@VERSION;
GO

And that’s how to deploy SQL Server to Kubernetes using Helm! Pretty cool imho.

Finally to delete the deployment: –

helm delete sql-server

Thanks for reading!

0

A shell for working with Kubernetes

I’m always a fan of tools that can make my life easier.

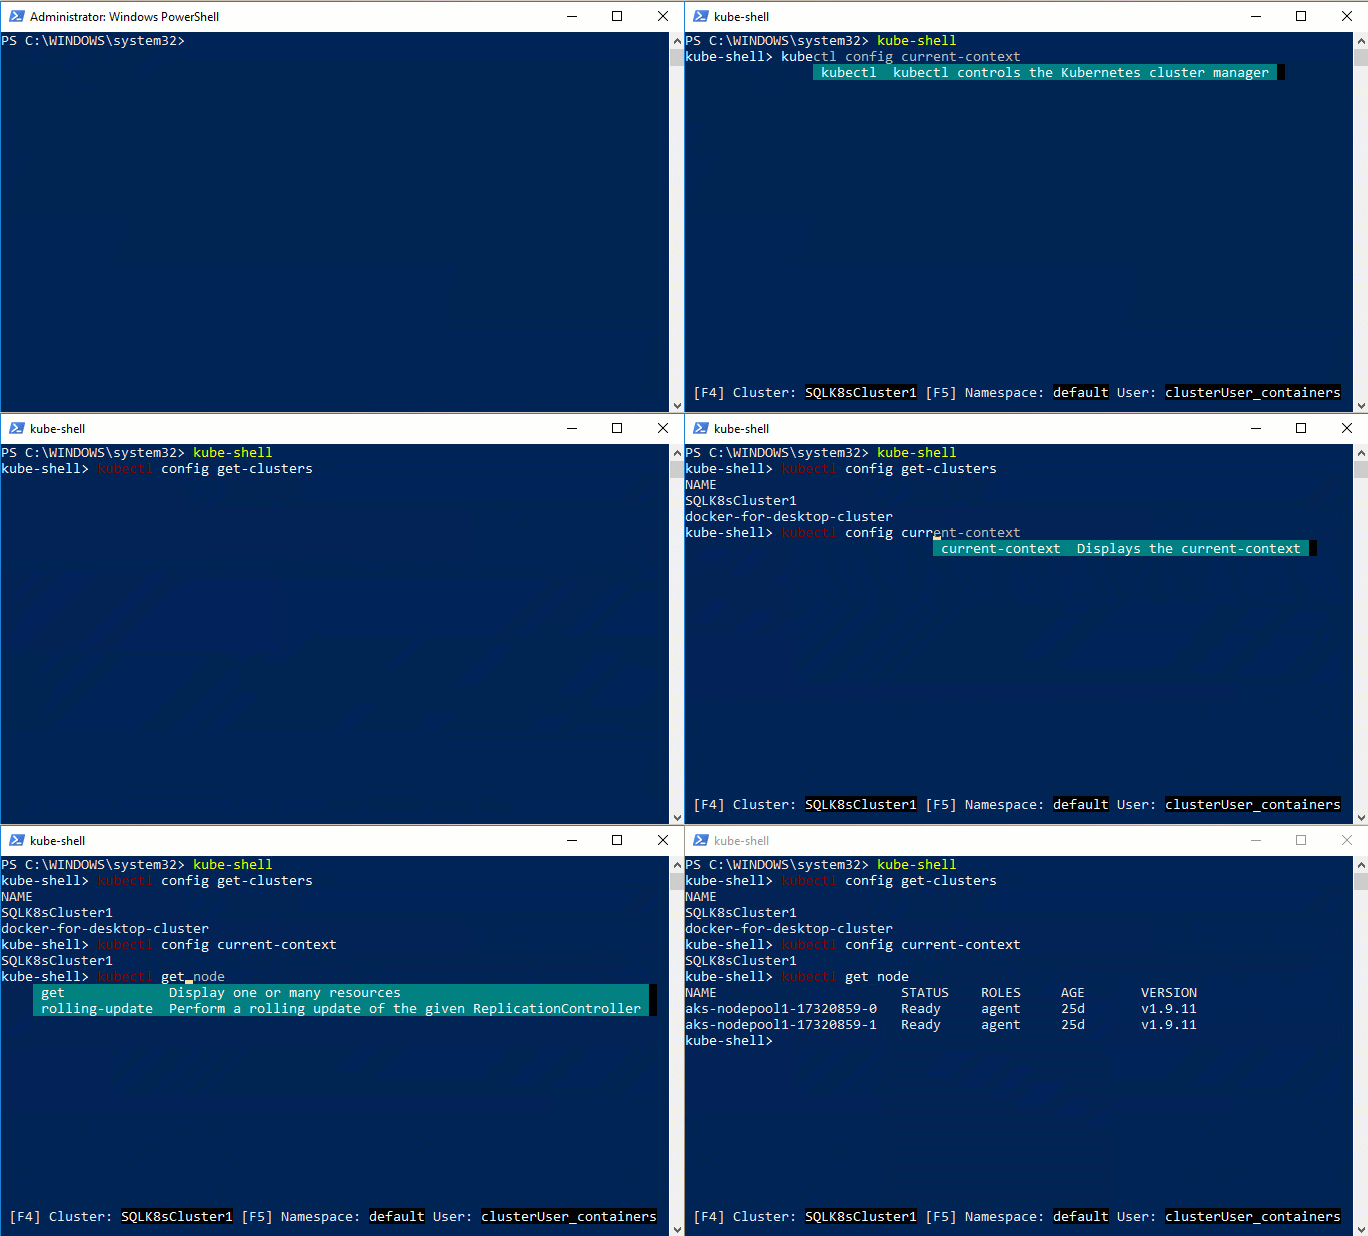
One tool that I’ve recently come across is kube-shell, an integrated shell for working with Kubernetes. What’s great about it is that it’s cross-platform and has intellisense for kubectl.

Installation is a cinch! The prerequisites are python and pip, which can be downloaded from here.

N.B. – python and pip are also prerequisites for mssql-cli which I also highly recommend you check out.

Make sure that python is added to your path environment variable and then you’re good to go and install kube-shell: –

pip install kube-shell

Once installed, typing kube-shell takes you into the shell…and you’re off!

How cool is that?

Thanks for reading!

8

Setting up SQL Server replication in containers

Last week I saw a thread on twitter about how to get replication setup for SQL Server running in a container. Now I know very little about replication, it’s not an area of SQL that I’ve had a lot of exposure to but I’m always up for figuring stuff out (especially when it comes to SQL in containers).

So let’s run through how to set it up here.

First, create a dockerfile to build an image from the SQL Server 2019 CTP 2.2 image with the SQL Server Agent enabled: –

FROM mcr.microsoft.com/mssql/server:2019-CTP2.2-ubuntu

RUN /opt/mssql/bin/mssql-conf set sqlagent.enabled true 

CMD /opt/mssql/bin/sqlservr

Now build the image: –

docker build -t sqlreplication .

The next step is to create a custom docker network: –

docker network create repnet

Confirm the network has been created: –

docker network ls

This stage is the key, containers running on the same network can communicate with each other by container name or IP address. More information about docker networking can be found here.

Once the network is created, run two containers using the network: –

docker run -d -p 15111:1433 `
    --env ACCEPT_EULA=Y --env SA_PASSWORD=Testing1122 `
        --net repnet `
            --name container1 `
                sqlreplication 

docker run -d -p 15222:1433 `
    --env ACCEPT_EULA=Y --env SA_PASSWORD=Testing1122 `
        --net repnet `
            --name container2 `
                sqlreplication 

The last (docker) step is to create a directory within container1 for the replication data: –

docker exec -it container1 mkdir /var/opt/mssql/data/ReplData/

And that’s it docker-wise! We can now setup replication within SQL itself. The steps below are taken from the Microsoft documentation here that goes through how to setup replication for SQL on Linux (slightly modified but not by much).

So let’s run through and see it in action!

Connect to container1 and create the database, table, and insert data that we want to replicate: –

USE [master];
GO

CREATE DATABASE [Sales];
GO

USE [SALES];
GO
 
CREATE TABLE CUSTOMER([CustomerID] [int] NOT NULL, [SalesAmount] [decimal] NOT NULL);
GO
 
INSERT INTO CUSTOMER (CustomerID, SalesAmount) VALUES (1,100),(2,200),(3,300);
GO

Connect to container2 and create (just) the database to receive the replicated data: –

USE [master];
GO

CREATE DATABASE [Sales];
GO

Connect back to container1 and configure the distributor (following the MS example the publisher will also be the distributor): –

USE [master];
GO
 
DECLARE @distributor AS SYSNAME;
DECLARE @distributorlogin AS SYSNAME;
DECLARE @distributorpassword AS SYSNAME;
DECLARE @Server SYSNAME;
 
SELECT @Server = @@servername;
 
SET @distributor = @Server;
SET @distributorlogin = N'sa';
SET @distributorpassword = N'Testing1122';
 
EXEC sp_adddistributor @distributor = @distributor;
 
EXEC sp_adddistributiondb @database = N'distribution'
    ,@log_file_size = 2
    ,@deletebatchsize_xact = 5000
    ,@deletebatchsize_cmd = 2000
    ,@security_mode = 0
    ,@login = @distributorlogin
    ,@password = @distributorpassword;
GO

USE [distribution];
GO
 
DECLARE @snapshotdirectory AS NVARCHAR(500);
 
SET @snapshotdirectory = N'/var/opt/mssql/data/ReplData/';
 
IF (NOT EXISTS (SELECT * FROM sysobjects WHERE name = 'UIProperties' AND type = 'U '))
    CREATE TABLE UIProperties (id INT);
 
IF (EXISTS (SELECT * FROM::fn_listextendedproperty('SnapshotFolder', 'user', 'dbo', 'table', 'UIProperties', NULL, NULL)))
    EXEC sp_updateextendedproperty N'SnapshotFolder'
        ,@snapshotdirectory
        ,'user'
        ,dbo
        ,'table'
        ,'UIProperties'
ELSE
    EXEC sp_addextendedproperty N'SnapshotFolder'
        ,@snapshotdirectory
        ,'user'
        ,dbo
        ,'table'
        ,'UIProperties';
GO

Configure the publisher: –

USE [distribution];
GO

DECLARE @publisher AS SYSNAME;
DECLARE @distributorlogin AS SYSNAME;
DECLARE @distributorpassword AS SYSNAME;
DECLARE @Server SYSNAME;

SELECT @Server = @@servername;

SET @publisher = @Server;
SET @distributorlogin = N'sa';
SET @distributorpassword = N'Testing1122';

EXEC sp_adddistpublisher @publisher = @publisher
	,@distribution_db = N'distribution'
	,@security_mode = 0
	,@login = @distributorlogin
	,@password = @distributorpassword
	,@working_directory = N'/var/opt/mssql/data/ReplData'
	,@trusted = N'false'
	,@thirdparty_flag = 0
	,@publisher_type = N'MSSQLSERVER';
GO

Configure the publication job run: –

USE [Sales];
GO

DECLARE @replicationdb AS SYSNAME;
DECLARE @publisherlogin AS SYSNAME;
DECLARE @publisherpassword AS SYSNAME;

SET @replicationdb = N'Sales';
SET @publisherlogin = N'sa';
SET @publisherpassword = N'Testing1122';

EXEC sp_replicationdboption @dbname = N'Sales'
	,@optname = N'publish'
	,@value = N'true';

EXEC sp_addpublication @publication = N'SnapshotRepl'
	,@description = N'Snapshot publication of database ''Sales'' from Publisher ''''.'
	,@retention = 0
	,@allow_push = N'true'
	,@repl_freq = N'snapshot'
	,@status = N'active'
	,@independent_agent = N'true';

EXEC sp_addpublication_snapshot @publication = N'SnapshotRepl'
	,@frequency_type = 1
	,@frequency_interval = 1
	,@frequency_relative_interval = 1
	,@frequency_recurrence_factor = 0
	,@frequency_subday = 8
	,@frequency_subday_interval = 1
	,@active_start_time_of_day = 0
	,@active_end_time_of_day = 235959
	,@active_start_date = 0
	,@active_end_date = 0
	,@publisher_security_mode = 0
	,@publisher_login = @publisherlogin
	,@publisher_password = @publisherpassword;
GO

Create the articles: –

USE [Sales];
GO

EXEC sp_addarticle @publication = N'SnapshotRepl'
	,@article = N'customer'
	,@source_owner = N'dbo'
	,@source_object = N'customer'
	,@type = N'logbased'
	,@description = NULL
	,@creation_script = NULL
	,@pre_creation_cmd = N'drop'
	,@schema_option = 0x000000000803509D
	,@identityrangemanagementoption = N'manual'
	,@destination_table = N'customer'
	,@destination_owner = N'dbo'
	,@vertical_partition = N'false';
GO

Configure the subscription run, note the name of the subscriber (it’s the name of the second container): –

USE [Sales];
GO

DECLARE @subscriber AS SYSNAME
DECLARE @subscriber_db AS SYSNAME
DECLARE @subscriberLogin AS SYSNAME
DECLARE @subscriberPassword AS SYSNAME

SET @subscriber = N'container2'
SET @subscriber_db = N'Sales'
SET @subscriberLogin = N'sa'
SET @subscriberPassword = N'Testing1122'

EXEC sp_addsubscription @publication = N'SnapshotRepl'
	,@subscriber = @subscriber
	,@destination_db = @subscriber_db
	,@subscription_type = N'Push'
	,@sync_type = N'automatic'
	,@article = N'all'
	,@update_mode = N'read only'
	,@subscriber_type = 0;

EXEC sp_addpushsubscription_agent @publication = N'SnapshotRepl'
	,@subscriber = @subscriber
	,@subscriber_db = @subscriber_db
	,@subscriber_security_mode = 0
	,@subscriber_login = @subscriberLogin
	,@subscriber_password = @subscriberPassword
	,@frequency_type = 1
	,@frequency_interval = 0
	,@frequency_relative_interval = 0
	,@frequency_recurrence_factor = 0
	,@frequency_subday = 0
	,@frequency_subday_interval = 0
	,@active_start_time_of_day = 0
	,@active_end_time_of_day = 0
	,@active_start_date = 0
	,@active_end_date = 19950101;
GO

Cool! Now we can run the Agent jobs: –

USE [msdb]; 
GO

DECLARE @job1 SYSNAME;

SELECT @job1 = name FROM msdb.dbo.sysjobs
WHERE name LIKE '%-Sales-SnapshotRepl-1'

EXEC dbo.sp_start_job @job1
GO


USE [msdb];
GO

DECLARE @job2 SYSNAME;

SELECT @job2 = name FROM msdb.dbo.sysjobs
WHERE name LIKE '%-Sales-SnapshotRepl-CONTAINER2-1'
 
EXEC dbo.sp_start_job @job2
GO

Awesome stuff, let’s check the data over on container2: –

SELECT * from [Sales].[dbo].[CUSTOMER]

Great stuff! We have data being replicated from a SQL instance in one container to a SQL instance in another container 🙂

Thanks for reading!

2

Attaching databases via a dockerfile – UPDATE

This has been bugging me for a while but I just haven’t had a chance to get around to revisiting it…you can read the original post I wrote here

In that post I came up with a way to attach databases to SQL running in a linux container. There’s an environment variable you can use in windows containers (attach_dbs) that provides the ability to attach database data and log files to a SQL instance running within a container.

Sadly this doesn’t exist for linux containers so the what I came up with was: –

HEALTHCHECK --interval=10s  \
    CMD /opt/mssql-tools/bin/sqlcmd -S . -U sa -P Testing11@@ \
        -Q "CREATE DATABASE [DatabaseA] ON (FILENAME = '/var/opt/sqlserver/DatabaseA.mdf'),(FILENAME = '/var/opt/sqlserver/DatabaseA_log.ldf') FOR ATTACH"

Now this works a treat. It waits ten seconds for the SQL instance to come up within the container and then runs the sqlcmd script below.

The problem with this is, it’s a bit of a hack. The HEALTHCHECK command isn’t designed to run once, it’ll carry on running every 10 seconds once the container comes up…not great.

So, what’s the better way of doing it?

I sat down this weekend and started to write scripts to run the SQL statement above. However I ran into a bit of an issue, each time I ran a script like thus: –

sleep 10s

/opt/mssql-tools/bin/sqlcmd -S . -U sa -P Testing11@@ \
-Q "CREATE DATABASE [DatabaseA] ON (FILENAME = '/var/opt/sqlserver/DatabaseA.mdf'),(FILENAME = '/var/opt/sqlserver/DatabaseA_log.ldf') FOR ATTACH"

The script would error out or I would end up with a dead container. I tried a few alternatives, for example retrying the sql statement until I got a exit code of 0, but no dice.

So what was the fix? Well I was flipping through Bob Ward’s (t) excellent Pro SQL Server on Linux one evening and there was the answer!

The trick is to create two scripts called entrypoint.sh and attach-db.sh

attach-db.sh looks like this: –

sleep 15s

/opt/mssql-tools/bin/sqlcmd -S . -U sa -P Testing1122 \
-Q "CREATE DATABASE [DatabaseA] ON (FILENAME = '/var/opt/sqlserver/DatabaseA.mdf'),(FILENAME = '/var/opt/sqlserver/DatabaseA_log.ldf') FOR ATTACH"

Pretty standard right? Wait 15 seconds and then run the CREATE DATABASE statement.

But the real trick is in the entrypoint.sh script: –

/var/opt/sqlserver/attach-db.sh & /opt/mssql/bin/sqlservr

Huh? The attach-db.sh script is called before the SQL binary??

Yep, even though it’s a bit counter-initiative (well for me anyway), what’s happening here is that the attach-db.sh script is called, starts waiting, and then SQL is spun up. Then once SQL is up and running, the CREATE DATABASE statement is executed.

Containers need a process to be running in order for them to stay up, so without the SQL binary being called after the attach-db.sh script the container will shut down. That’s the issue that I was having (amongst others).

I’ve been playing around with this and ended up with the following dockerfile: –

So the docker looks like this: –

# base this image of the SQL 2017 latest image
FROM microsoft/mssql-server-linux:latest

# make a directory within the container
RUN mkdir /var/opt/sqlserver

# copy attach-db.sh into container
COPY attach-db.sh /var/opt/sqlserver

# copy database files into container
COPY DatabaseA.mdf /var/opt/sqlserver
COPY DatabaseA_log.ldf /var/opt/sqlserver

# use the ENTRYPOINT command to execute the script and start SQL Server
ENTRYPOINT /var/opt/sqlserver/attach-db.sh & /opt/mssql/bin/sqlservr

I’ve removed the entrypoint.sh script and replaced it with ENTRYPOINT command within the dockerfile. The ENTRYPOINT command specifies what will run when the container starts up, so in this case the attach-db.sh script and then SQL Server.

Boom! Once the image is created from the dockerfile, a container can be spun up, and there will be the database!

Thanks for reading!