Using Github as a repository for SQL Server Helm Charts

In a previous post I ran through how to create a custom SQL Server Helm chart.

Now that the chart has been created, we need somewhere to store it.

We could keep it locally but what if we wanted to use our own Helm chart repository? That way we wouldn’t have to worry about deleting the chart on our local machine.

I use Github to store all my code to guard against accidentally deleting it (I’ve done that more than once) so why not use Github to store my Helm charts?

Let’s run through setting up a Github repo to store our Helm charts.

First thing to do is create a new Github repo: –

Clone the new repo down:-

git clone https://github.com/dbafromthecold/SqlServerHelmCharts.git

Navigate to the repo:-

cd C:\git\dbafromthecold\SqlServerHelmCharts

And now package the SQL Server Helm chart and copy it to the cloned, empty repo:-

helm package C:\Helm\testsqlchart \

Now create the index.yaml file in the repo (this is what we’ll link to in order to identify the repo locally):-

helm repo index .

Commit the changes and push to GitHub:-

git add .
git commit -m 'Added testsqlchart to repo'
git push

Go back to the Github repo and view the raw index.yaml file: –

Grab the HTTPS address (removing the index.yaml from the end) and drop it into the helm repo add statement:-

helm repo add dbafromthecold https://raw.githubusercontent.com/dbafromthecold/SqlServerHelmCharts/master

To confirm the repo has been added:-

helm repo list

To see if all is well:-

helm repo update

If you’re using VS Code and have the Kubernetes extension, you will be able to view the new repo under the Helm section: –

Final test is to perform a dry run:-

helm install dbafromthecold/testsqlchart --version 0.1.0 --dry-run --debug

If all looks good, then deploy!

helm install dbafromthecold/testsqlchart --version 0.1.0

To check your helm deployments: –

helm list

To check on the deployment/pod/service created by the helm chart: –

kubectl get deployments

kubectl get pods

kubectl get services

Once that external IP comes up it can be dropped into SSMS to connect: –

And BOOM! Connected to SQL Server running in Kubernetes deployed via a Helm package from a custom repo! 🙂

N.B. – To delete the deployment (deployment name grabbed from helm list): –

helm delete cantankerous-marsupial

Thanks for reading!

Displaying the tags within the SQL Server docker repository

A while back Microsoft moved all their SQL images to their new registry mcr.microsoft.com which means that we can no longer see the SQL repository when running docker search

Error response from daemon: Unexpected status code 404

To be honest, this isn’t really that much of an issue for me. I know the name of the repository that has the SQL Server images in it. What I really want to be able to do is view the tags of the images within it (this was a pain point with the images in the mssql-server-linux repository as well).

So I was pretty excited when a few days ago I saw this tweet by Tobias Fenster which said that mcr.microsoft.com supports the hub catalog API.

The hub catalog API allows us to view the tags of images within a repository!

It’s really simple to get the tags (the trick was finding the correct HTTP address): –

$repo = invoke-webrequest https://mcr.microsoft.com/v2/mssql/server/tags/list
$repo.content

And there we have it, all the tags listed for the SQL Server images within the repository.

Thanks for reading!

Creating custom SQL Server Helm charts

In my previous post I went through how to deploy SQL Server to Kubernetes using Helm in which I used the SQL Server chart that is available in the Helm Hub.

That’s great but what if we want to create our own charts? Let’s run through creating a simple SQL Server chart and deploying to Kubernetes (AKS).

First, ensure that Tiller (the server-side component of Helm) is installed on your cluster: –

helm init

Then create a directory to deploy the new chart into: –

mkdir C:\Helm

Navigate to the new directory: –

cd C:\Helm

And now create the new chart!

helm create testsqlchart

OK, what that has done is create an empty chart so we need to drop in our yaml configuration files.

Navigate to templates directory: –

cd testsqlchart/templates

Remove the template yaml files: –

rm deployment.yaml
rm service.yaml
rm ingress.yaml

Re-create deployment.yaml: –

apiVersion: apps/v1beta1
kind: Deployment
metadata:
  name: sqlserver
spec:
  replicas: 1
  template:
    metadata:
      labels:
        name: sqlserver
    spec:
      containers:
      - name: sqlserver1
        image: mcr.microsoft.com/mssql/server:2019-CTP2.2-ubuntu
        ports:
        - containerPort: 1433
        env:
        - name: SA_PASSWORD
          value: "Testing1122"
        - name: ACCEPT_EULA
          value: "Y"

Re-create service.yaml file: –

apiVersion: v1
kind: Service
metadata:
  name: sqlserver-service
spec:
  ports:
  - name: sqlserver
    port: 1433
    targetPort: 1433
  selector:
    name: sqlserver
  type: LoadBalancer

N.B. – Be careful when doing this, I’ve found that sometimes that Helm doesn’t like the format of the files. Re-creating in VS Code seems to do the trick.

Go back one directory: –

cd C:\Helm

And now we can test a deployment with –dry-run: –

helm install --dry-run --debug ./testsqlchart

If you get the following error: –

Tiller needs to be re-initialised: –

# delete current tiller deployment
kubectl delete deployment tiller-deploy --namespace kube-system

# create a service account
kubectl create serviceaccount --namespace kube-system tiller

# create clusterrolebinding
kubectl create clusterrolebinding tiller-cluster-rule --clusterrole=cluster-admin --serviceaccount=kube-system:tiller

# re-initialise tiller
helm init --service-account tiller --upgrade

Once the dry run returns no errors, you’re good to go!

helm install ./testsqlchart --name testsqlserver

To check the status: –

helm list

And you can monitor the creation of the deployment/service by running the usual kubectl commands: –

kubectl get deployments

kubectl get pods

kubectl get services

And that’s a custom SQL Server chart deployed into Kubernetes. SQL can be accessed by using the external IP of the service created.

Finally, to delete the deployed chart: –

helm delete testsqlserver

Thanks for reading!

Setting up SQL Server replication in containers

Last week I saw a thread on twitter about how to get replication setup for SQL Server running in a container. Now I know very little about replication, it’s not an area of SQL that I’ve had a lot of exposure to but I’m always up for figuring stuff out (especially when it comes to SQL in containers).

So let’s run through how to set it up here.

First, create a dockerfile to build an image from the SQL Server 2019 CTP 2.2 image with the SQL Server Agent enabled: –

FROM mcr.microsoft.com/mssql/server:2019-CTP2.2-ubuntu

RUN /opt/mssql/bin/mssql-conf set sqlagent.enabled true 

CMD /opt/mssql/bin/sqlservr

Now build the image: –

docker build -t sqlreplication .

The next step is to create a custom docker network: –

docker network create repnet

Confirm the network has been created: –

docker network ls

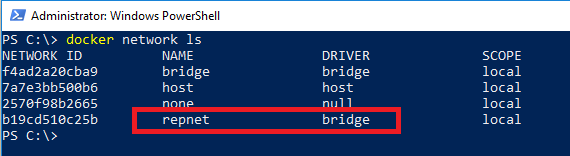
This stage is the key, containers running on the same network can communicate with each other by container name or IP address. More information about docker networking can be found here.

Once the network is created, run two containers using the network: –

docker run -d -p 15111:1433 `
    --env ACCEPT_EULA=Y --env SA_PASSWORD=Testing1122 `
        --net repnet `
            --name container1 `
                sqlreplication 

docker run -d -p 15222:1433 `
    --env ACCEPT_EULA=Y --env SA_PASSWORD=Testing1122 `
        --net repnet `
            --name container2 `
                sqlreplication 

The last (docker) step is to create a directory within container1 for the replication data: –

docker exec -it container1 mkdir /var/opt/mssql/data/ReplData/

And that’s it docker-wise! We can now setup replication within SQL itself. The steps below are taken from the Microsoft documentation here that goes through how to setup replication for SQL on Linux (slightly modified but not by much).

So let’s run through and see it in action!

Connect to container1 and create the database, table, and insert data that we want to replicate: –

USE [master];
GO

CREATE DATABASE [Sales];
GO

USE [SALES];
GO
 
CREATE TABLE CUSTOMER([CustomerID] [int] NOT NULL, [SalesAmount] [decimal] NOT NULL);
GO
 
INSERT INTO CUSTOMER (CustomerID, SalesAmount) VALUES (1,100),(2,200),(3,300);
GO

Connect to container2 and create (just) the database to receive the replicated data: –

USE [master];
GO

CREATE DATABASE [Sales];
GO

Connect back to container1 and configure the distributor (following the MS example the publisher will also be the distributor): –

USE [master];
GO
 
DECLARE @distributor AS SYSNAME;
DECLARE @distributorlogin AS SYSNAME;
DECLARE @distributorpassword AS SYSNAME;
DECLARE @Server SYSNAME;
 
SELECT @Server = @@servername;
 
SET @distributor = @Server;
SET @distributorlogin = N'sa';
SET @distributorpassword = N'Testing1122';
 
EXEC sp_adddistributor @distributor = @distributor;
 
EXEC sp_adddistributiondb @database = N'distribution'
    ,@log_file_size = 2
    ,@deletebatchsize_xact = 5000
    ,@deletebatchsize_cmd = 2000
    ,@security_mode = 0
    ,@login = @distributorlogin
    ,@password = @distributorpassword;
GO

USE [distribution];
GO
 
DECLARE @snapshotdirectory AS NVARCHAR(500);
 
SET @snapshotdirectory = N'/var/opt/mssql/data/ReplData/';
 
IF (NOT EXISTS (SELECT * FROM sysobjects WHERE name = 'UIProperties' AND type = 'U '))
    CREATE TABLE UIProperties (id INT);
 
IF (EXISTS (SELECT * FROM::fn_listextendedproperty('SnapshotFolder', 'user', 'dbo', 'table', 'UIProperties', NULL, NULL)))
    EXEC sp_updateextendedproperty N'SnapshotFolder'
        ,@snapshotdirectory
        ,'user'
        ,dbo
        ,'table'
        ,'UIProperties'
ELSE
    EXEC sp_addextendedproperty N'SnapshotFolder'
        ,@snapshotdirectory
        ,'user'
        ,dbo
        ,'table'
        ,'UIProperties';
GO

Configure the publisher: –

USE [distribution];
GO

DECLARE @publisher AS SYSNAME;
DECLARE @distributorlogin AS SYSNAME;
DECLARE @distributorpassword AS SYSNAME;
DECLARE @Server SYSNAME;

SELECT @Server = @@servername;

SET @publisher = @Server;
SET @distributorlogin = N'sa';
SET @distributorpassword = N'Testing1122';

EXEC sp_adddistpublisher @publisher = @publisher
	,@distribution_db = N'distribution'
	,@security_mode = 0
	,@login = @distributorlogin
	,@password = @distributorpassword
	,@working_directory = N'/var/opt/mssql/data/ReplData'
	,@trusted = N'false'
	,@thirdparty_flag = 0
	,@publisher_type = N'MSSQLSERVER';
GO

Configure the publication job run: –

USE [Sales];
GO

DECLARE @replicationdb AS SYSNAME;
DECLARE @publisherlogin AS SYSNAME;
DECLARE @publisherpassword AS SYSNAME;

SET @replicationdb = N'Sales';
SET @publisherlogin = N'sa';
SET @publisherpassword = N'Testing1122';

EXEC sp_replicationdboption @dbname = N'Sales'
	,@optname = N'publish'
	,@value = N'true';

EXEC sp_addpublication @publication = N'SnapshotRepl'
	,@description = N'Snapshot publication of database ''Sales'' from Publisher ''''.'
	,@retention = 0
	,@allow_push = N'true'
	,@repl_freq = N'snapshot'
	,@status = N'active'
	,@independent_agent = N'true';

EXEC sp_addpublication_snapshot @publication = N'SnapshotRepl'
	,@frequency_type = 1
	,@frequency_interval = 1
	,@frequency_relative_interval = 1
	,@frequency_recurrence_factor = 0
	,@frequency_subday = 8
	,@frequency_subday_interval = 1
	,@active_start_time_of_day = 0
	,@active_end_time_of_day = 235959
	,@active_start_date = 0
	,@active_end_date = 0
	,@publisher_security_mode = 0
	,@publisher_login = @publisherlogin
	,@publisher_password = @publisherpassword;
GO

Create the articles: –

USE [Sales];
GO

EXEC sp_addarticle @publication = N'SnapshotRepl'
	,@article = N'customer'
	,@source_owner = N'dbo'
	,@source_object = N'customer'
	,@type = N'logbased'
	,@description = NULL
	,@creation_script = NULL
	,@pre_creation_cmd = N'drop'
	,@schema_option = 0x000000000803509D
	,@identityrangemanagementoption = N'manual'
	,@destination_table = N'customer'
	,@destination_owner = N'dbo'
	,@vertical_partition = N'false';
GO

Configure the subscription run, note the name of the subscriber (it’s the name of the second container): –

USE [Sales];
GO

DECLARE @subscriber AS SYSNAME
DECLARE @subscriber_db AS SYSNAME
DECLARE @subscriberLogin AS SYSNAME
DECLARE @subscriberPassword AS SYSNAME

SET @subscriber = N'container2'
SET @subscriber_db = N'Sales'
SET @subscriberLogin = N'sa'
SET @subscriberPassword = N'Testing1122'

EXEC sp_addsubscription @publication = N'SnapshotRepl'
	,@subscriber = @subscriber
	,@destination_db = @subscriber_db
	,@subscription_type = N'Push'
	,@sync_type = N'automatic'
	,@article = N'all'
	,@update_mode = N'read only'
	,@subscriber_type = 0;

EXEC sp_addpushsubscription_agent @publication = N'SnapshotRepl'
	,@subscriber = @subscriber
	,@subscriber_db = @subscriber_db
	,@subscriber_security_mode = 0
	,@subscriber_login = @subscriberLogin
	,@subscriber_password = @subscriberPassword
	,@frequency_type = 1
	,@frequency_interval = 0
	,@frequency_relative_interval = 0
	,@frequency_recurrence_factor = 0
	,@frequency_subday = 0
	,@frequency_subday_interval = 0
	,@active_start_time_of_day = 0
	,@active_end_time_of_day = 0
	,@active_start_date = 0
	,@active_end_date = 19950101;
GO

Cool! Now we can run the Agent jobs: –

USE [msdb]; 
GO

DECLARE @job1 SYSNAME;

SELECT @job1 = name FROM msdb.dbo.sysjobs
WHERE name LIKE '%-Sales-SnapshotRepl-1'

EXEC dbo.sp_start_job @job1
GO


USE [msdb];
GO

DECLARE @job2 SYSNAME;

SELECT @job2 = name FROM msdb.dbo.sysjobs
WHERE name LIKE '%-Sales-SnapshotRepl-CONTAINER2-1'
 
EXEC dbo.sp_start_job @job2
GO

Awesome stuff, let’s check the data over on container2: –

SELECT * from [Sales].[dbo].[CUSTOMER]

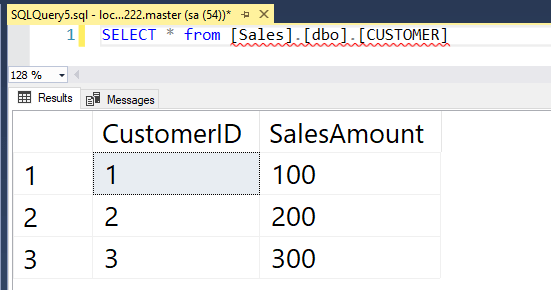
Great stuff! We have data being replicated from a SQL instance in one container to a SQL instance in another container 🙂

Thanks for reading!

Attaching databases via a dockerfile – UPDATE

This has been bugging me for a while but I just haven’t had a chance to get around to revisiting it…you can read the original post I wrote here

In that post I came up with a way to attach databases to SQL running in a linux container. There’s an environment variable you can use in windows containers (attach_dbs) that provides the ability to attach database data and log files to a SQL instance running within a container.

Sadly this doesn’t exist for linux containers so the what I came up with was: –

HEALTHCHECK --interval=10s  \
    CMD /opt/mssql-tools/bin/sqlcmd -S . -U sa -P Testing11@@ \
        -Q "CREATE DATABASE [DatabaseA] ON (FILENAME = '/var/opt/sqlserver/DatabaseA.mdf'),(FILENAME = '/var/opt/sqlserver/DatabaseA_log.ldf') FOR ATTACH"

Now this works a treat. It waits ten seconds for the SQL instance to come up within the container and then runs the sqlcmd script below.

The problem with this is, it’s a bit of a hack. The HEALTHCHECK command isn’t designed to run once, it’ll carry on running every 10 seconds once the container comes up…not great.

So, what’s the better way of doing it?

I sat down this weekend and started to write scripts to run the SQL statement above. However I ran into a bit of an issue, each time I ran a script like thus: –

sleep 10s

/opt/mssql-tools/bin/sqlcmd -S . -U sa -P Testing11@@ \
-Q "CREATE DATABASE [DatabaseA] ON (FILENAME = '/var/opt/sqlserver/DatabaseA.mdf'),(FILENAME = '/var/opt/sqlserver/DatabaseA_log.ldf') FOR ATTACH"

The script would error out or I would end up with a dead container. I tried a few alternatives, for example retrying the sql statement until I got a exit code of 0, but no dice.

So what was the fix? Well I was flipping through Bob Ward’s (t) excellent Pro SQL Server on Linux one evening and there was the answer!

The trick is to create two scripts called entrypoint.sh and attach-db.sh

attach-db.sh looks like this: –

sleep 15s

/opt/mssql-tools/bin/sqlcmd -S . -U sa -P Testing1122 \
-Q "CREATE DATABASE [DatabaseA] ON (FILENAME = '/var/opt/sqlserver/DatabaseA.mdf'),(FILENAME = '/var/opt/sqlserver/DatabaseA_log.ldf') FOR ATTACH"

Pretty standard right? Wait 15 seconds and then run the CREATE DATABASE statement.

But the real trick is in the entrypoint.sh script: –

/var/opt/sqlserver/attach-db.sh & /opt/mssql/bin/sqlservr

Huh? The attach-db.sh script is called before the SQL binary??

Yep, even though it’s a bit counter-initiative (well for me anyway), what’s happening here is that the attach-db.sh script is called, starts waiting, and then SQL is spun up. Then once SQL is up and running, the CREATE DATABASE statement is executed.

Containers need a process to be running in order for them to stay up, so without the SQL binary being called after the attach-db.sh script the container will shut down. That’s the issue that I was having (amongst others).

I’ve been playing around with this and ended up with the following dockerfile: –

So the docker looks like this: –

# base this image of the SQL 2017 latest image
FROM microsoft/mssql-server-linux:latest

# make a directory within the container
RUN mkdir /var/opt/sqlserver

# copy attach-db.sh into container
COPY attach-db.sh /var/opt/sqlserver

# copy database files into container
COPY DatabaseA.mdf /var/opt/sqlserver
COPY DatabaseA_log.ldf /var/opt/sqlserver

# use the ENTRYPOINT command to execute the script and start SQL Server
ENTRYPOINT /var/opt/sqlserver/attach-db.sh & /opt/mssql/bin/sqlservr

I’ve removed the entrypoint.sh script and replaced it with ENTRYPOINT command within the dockerfile. The ENTRYPOINT command specifies what will run when the container starts up, so in this case the attach-db.sh script and then SQL Server.

Boom! Once the image is created from the dockerfile, a container can be spun up, and there will be the database!

Thanks for reading!