Running a SQL Server Azure Container Instance in a virtual network

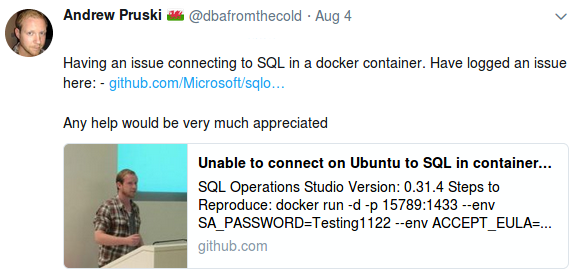
Up until now Azure Container Instances only had one option to allow us to connect. That was assigning a public IP address that was directly exposed to the internet.

Not really great as exposing SQL Server on port 1433 to the internet is generally a bad idea: –

Now I know there’s a lot of debated about whether or not you should change the port that SQL is listening on to prevent this from happening. My personal opinion is, that if someone wants to get into your SQL instance, changing the port isn’t going to slow them down much. However, a port change will stop opportunistic hacks (such as the above).

But now we have another option. The ability to deploy a ACI within a virtual network in Azure! So let’s run through how to deploy.

First thing, I’m going to be using the azure-cli. Deploying to a virtual network is a new feature so you’ll need to upgrade to v2.0.46. On windows it’s pretty simple, go to here and download the .msi. If you’re on linux (or running in WSL) run:-

sudo apt-get update && sudo apt-get install --only-upgrade -y azure-cli

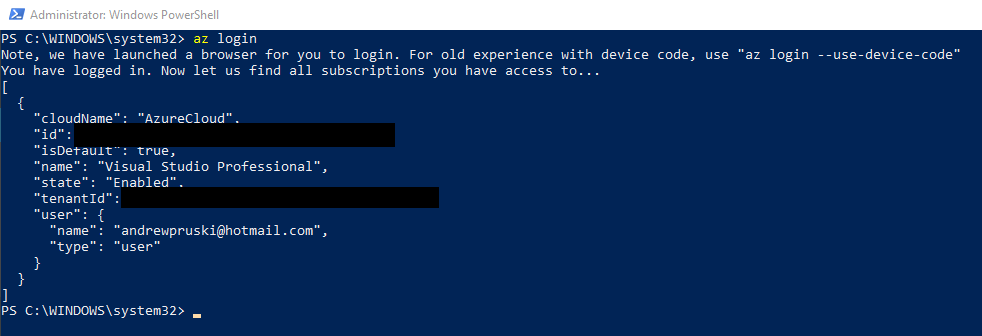
OK, now log in to azure: –

az login

Create a resource group (this is currently only supported in (westeurope & westus): –

az group create --name containers1 --location westeurope

Now create azure container instance!

az container create \
    --resource-group containers1 \
    --image mcr.microsoft.com/mssql/server:vNext-CTP2.0-ubuntu \
    --name testcontainer1 \
    --ports 1433 \
    --vnet-name aci_vnet1 \
    --vnet-address-prefix 10.0.0.0/16 \
    --subnet aci_subnet1 \
    --subnet-address-prefix 10.0.0.0/24 \
    --environment-variables ACCEPT_EULA=Y SA_PASSWORD=Testing1122

How simple is that? We don’t need to create the virtual network beforehand. It will be created for us. Also note, I’m using the new SQL 2019 running on Ubuntu image.

If you want to create the virtual network before hand, here’s how to do it. First create the virtual network: –

az network vnet create --resource-group containers1 --name aci_vnet1

And now create the subnet: –

az network vnet subnet create --resource-group container1 \ 
    --vnet-name aci_vnet1 --name aci_subnet1 \
        --address-prefix 10.0.0.0/24 \
          --delegation

Note the –delegation option. This is required for the subnet to be used for ACIs but once set, that subnet cannot be used for anything other than Azure Container Instances.

You can have a look at the delegation options by running: –

az network vnet subnet list-available-delegations --resource-group containers1

And now you can deploy an ACI: –

az container create \
    --resource-group containers1 \
    --image mcr.microsoft.com/mssql/server:vNext-CTP2.0-ubuntu \
    --name testcontainer1 \
    --ports 1433 \
    --vnet-name aci_vnet1 \
    --subnet aci_subnet1 \
    --environment-variables ACCEPT_EULA=Y SA_PASSWORD=Testing1122

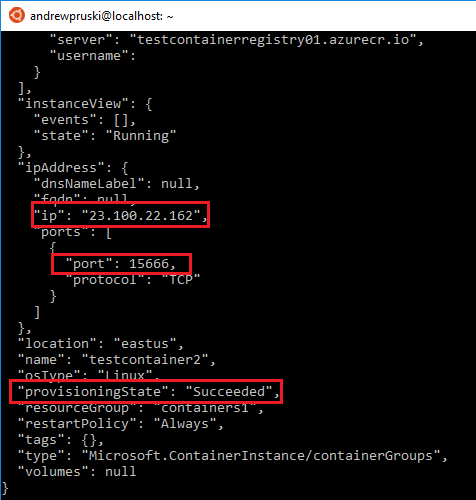
To check that the container has been created successfully: –

az container show –name testcontainer1 –resource-group containers1

Once up and running the container will have an IP within the virtual network. So that means you’ll need another resource within the network (on a different subnet) in order to connect. I’ve been using a Ubuntu jump box with the mssql-cli installed.

Full code is in this gist

N.B. – There does seem to be an issue currently when trying to delete a subnet that has been delegated for ACIs. I’m speaking with MS about it and will update this post once it is resolved.

EDIT 2018-10-06 – The network resources have to be manually deleted. The scripts to do that are in this gist

Thanks for reading!

Running SQL Server 2019 CTP in a Docker container

If you’ve been anywhere near social media this week you may have seen that Microsoft has announced SQL Server 2019.

I love it when a new version of SQL is released. There’s always a whole new bunch of features (and improvements to existing ones) that I want to check out. What I’m not too keen on however is installing a preview version of SQL Server on my local machine. It’s not going to be there permanently and I don’t want the hassle of having to uninstall it.

This is where containers come into their own. We can run a copy of SQL Server without it touching our local machine.

The post below will run through step-by-step how to install docker and get an instance of SQL Server 2019 up and running.

First, go to the Docker Store and download the Docker for Windows Community Edition (CE). Yes, unfortunately this is going to ask you to register but that gives you access to the Docker Hub which is pretty cool (for more info on that, see here).

Double click the .msi and accept the default setting of linux containers (yep, going to run SQL on Linux on Windows 10! For more information on this, check here).

You’ll then get the installation dialog: –

You’ll be asked to log out and log back in once the install is complete: –

Once you log back in, Docker will start automatically. It’ll scan your system to verify that the prerequisites are all there (the hyper-v and containers feature). If not, it’ll prompt you: –

Let your system restart and then log back in. Docker will start automatically: –

Now you can run your first docker command! I like to keep it simple and just check the version that docker is running: –

docker version

If you get a client and a server version back you’re good to go!

What you need to do now is pull the 2019 CTP image. I’m going to go for the ubuntu image so run: –

docker pull mcr.microsoft.com/mssql/server:vNext-CTP2.0-ubuntu

When that’s complete, verify that the image is on your machine: –

docker images

So now you can run a container!

docker run -d -p 15789:1433 --env ACCEPT_EULA=Y --env SA_PASSWORD=Testing1122 --name testcontainer mcr.microsoft.com/mssql/server:vNext-CTP2.0-ubuntu

N.B. – For more information on what’s going with this statement, check here

That’ll come back pretty much immediately, to check that the container is running: –

docker ps -a

Then connect in SQL using localhost,15789, and boom!

How awesome is that! An instance of SQL Server 2019 CTP 2.0 up and running on your local machine. If that’s peaked your interest into learning more about containers, I have put a list of all the blog posts I’ve written here.

Thanks for reading and have fun with SQL in containers!

SSL Provider error 31 when connecting to SQL in a docker container

I recently bought a Dell XPS 13 running Ubuntu 16.04 and ran into an issue when connecting SQL Operations Studio (version 0.31.4) to SQL 2017 CU9 running in a docker container. Other people seem to encountering this issue as well so am posting it so that it may be of some help to someone in the future.

The error generated was: –

System.Data.SqlClient.SqlException (0x80131904): A connection was successfully established with the server, but then an error occurred during the pre-login handshake. (provider: SSL Provider, error: 31)

The full error can be viewed here

I was a bit stumped with this one to be honest, I googled around but could not find a resolution.

So I reached out on twitter to get some help: –

I also logged an issue on the SQL Operations Studio Github

Thankfully I got a response from Kevin Cunnane (t): –

Kevin advised me to run: –

sudo update-ca-certificates --fresh

N.B. – See here for a detailed description of what this command does

Once I ran that I was able to connect to SQL running in a docker container from SQL Operations Studio. Many thanks Kevin!

Hope that helps!

Creating SQL images in Azure with ACR Build – Part Two

EDIT – 2018-10 – ACR Build is now known as ACR Tasks

In Part One I detailed how we can use ACR Build to push SQL Server docker images to the Azure Container Registry.

But that all seems a bit manual, doesn’t it?

One of the cool things about ACR build is that we can hook it into GitHub so when we commit to a repository it will build us a new image (very, very cool 🙂 ). Let’s run through how to set that up now…

There’s a couple of pre-reqs required to follow the code here. The first thing to do is fork and clone the following repository: –
https://github.com/dbafromthecold/AzureContainerRegistryBuild

The next thing to do is create a Personal Access Token (PAT) in GitHub.
Go to https://github.com/settings/tokens and select the following options for the new PAT: –

Scroll to the bottom of the page and hit Generate Token (make sure to copy the token)

Ok, now we’re set up to create a build task in ACR. I’m going to continue on from my previous post so will log into Azure: –

az login


N.B. – In Part One I used a powershell console however in this post I’ve switch to Bash for Windows. This is because if you try to create a build task in powershell, it’ll error out: –

I’ve played around a bit but couldn’t get it to work, so I cut my losses and jumped into bash. Probably shouldn’t be running the Azure-CLI commands in a powershell window but I needed to previously as I had to build a docker image locally, we don’t need to do that now.


Before we do anything else let’s just verify that we can see the existing repository created in Part One and the tagged image in it: –

az acr repository show-tags --name TestContainerRegistry01 --repository testimage<a 

Great! Now let’s create the build task: –

az acr build-task create \
    --registry TestContainerRegistry01 \
    --name buildsqlimage \
    --image testimage:{{.Build.ID}} \
    --context https://github.com/<your-github-username>/AzureContainerRegistryBuild \
    --branch master \
    --git-access-token YOUR_PERSONAL_ACCESS_TOKEN


N.B. – The {{.Build.ID}} will generate a tag for the new image created within the repository (based on the number created by ACR Build)

Fantastic, one build task created! How easy was that??

Let’s test by running: –

az acr build-task run --registry TestContainerRegistry01 --name buildsqlimage

And the progress of the build task can be monitored: –

az acr build-task logs --registry TestContainerRegistry01

After a while (be patient 🙂 ) a new tag will be in the repository: –

az acr repository show-tags --name TestContainerRegistry01 --repository testimage

Cool! Now let’s commit to the repository in GitHub and see if a new image is created. So navigate to where you cloned the repository: –

cd AzureContainerRegistryBuild

What we’re going to do is drop an environment variable into the dockerfile to change the port that SQL is listening on.

nano Dockerfile

Drop the following into the dockerfile:-

ENV MSSQL_TCP_PORT=15666

Now commit and push!

git add .
git commit -m "Changed the port for SQL Server"
git push

And then a new tag will be in the repository!

az acr repository show-tags --name TestContainerRegistry01 --repository testimage

Awesome! How cool is that?!

To make sure that it’s worked, let’s run an Azure Container Instance (using the credentials stored in the Key Vault created in Part One): –

az container create \
    --resource-group containers1 \
    --image testcontainerregistry01.azurecr.io/testimage:aa4 \
    --registry-username $(az keyvault secret show \
                        --vault-name aptestkeyvault01 \
                        --name testcontainerregistry-pull-usr \
                        --query value --output tsv) \
    --registry-password $(az keyvault secret show \
                        --vault-name aptestkeyvault01 \
                        --name testcontainerregistry-pull-pwd \
                        --query value --output tsv) \
    --name testcontainer2 \
    --cpu 2 --memory 4 \
    --environment-variables SA_PASSWORD=Testing1122 \
    --ip-address public \
    --ports 15666

N.B. – Make sure the image tag is correct!

Confirm that the ACI is up and running: –

az container show --name testcontainer2 --resource-group containers1

And BOOM! Connect to SQL Server: –

How. Cool. Is. That? Automatically creating SQL images in ACR with just a commit to a Github repo!

Thanks for reading!

Creating SQL images in Azure with ACR Build – Part One

EDIT – 2018-10 – ACR Build is now known as ACR Tasks

Whenever I’ve pushed images up to an Azure Container Registry I’ve been building them locally (using Docker for Windows) and then manually pushing them up. However, I don’t need to do this. What I can do instead is use the Azure Container Registry Build service.

Let’s have a look at how it works.


To follow along with the code here you will need the Azure-CLI installed and Docker for Windows running


First things first, log into azure: –

az login

Then create a resource group: –

az group create --resource-group containers1 --location eastus

Create a registry (the ACR): –

az acr create --resource-group containers1 --name TestContainerRegistry01 --sku Standard --location eastus

And then login to the registry: –

az acr login --name TestContainerRegistry01

Now create a directory on your local machine to hold the repo that we’re going to use to build the image: –

mkdir c:\git\dbafromthecold
cd c:\git\dbafromthecold

And then pull the repo down: –

git clone https://github.com/dbafromthecold/AzureContainerRegistryBuild.git


The dockerfile within this repo is pretty simple. All it’s going to do is build us an image that when run will have a database named TestDatabase already there. For more info on building images from a dockerfile, check out my blog here

Now navigate to the repo: –

cd c:\git\dbafromthecold\AzureContainerRegistryBuild

Great! We’re ready to build the image and push it to the Azure Container Registry.
To do this, run: –

az acr build --registry TestContainerRegistry01 --image testimage:latest .

Hmm…that does look like it hasn’t worked but trust me…it has (just wait a few minutes) 🙂

To verify that the new repository has been created: –

az acr repository list --name TestContainerRegistry01 --output table

And to view the tagged image within it: –

az acr repository show-tags --name TestContainerRegistry01 --repository testimage

Awesome! Our custom image is in our ACR!

But has it worked? Has it really? Oh ye of little faith…

I guess the only way to find out is to run a container! So let’s run a Azure Container Instance from our new image.

I’ve already blogged about creating ACIs here so I’m just going to run through this quickly but don’t worry, everything you need to deploy an ACI is in the following code.

In order for the ACI to pull the image from our new ACR we need to store credentials that can be used to grant access. So first, create a keyvault: –

az keyvault create --resource-group containers1 --name aptestkeyvault01

Once the vault is created, we need to create a service principal with read permissions to the ACR and store its credentials in the vault: –

az keyvault secret set `
  --vault-name aptestkeyvault01 `
  --name testcontainerregistry-pull-pwd `
  --value $(az ad sp create-for-rbac `
  			--name testcontainerregistry-pull `
  			--scopes $(az acr show --name testcontainerregistry01 --query id --output tsv) `
  			--role reader `
  			--query password `
  			--output tsv)

Then we grab the service principal’s appId which will be the username passed to the Azure Container Registry: –

az keyvault secret set `
  --vault-name aptestkeyvault01 `
  --name testcontainerregistry-pull-usr `
  --value $(az ad sp show `
  		--id http://testcontainerregistry-pull --query appId --output tsv)

Ok, now we can run a Azure Container Instance from our custom image!

az container create `
    --resource-group containers1 `
    --image testcontainerregistry01.azurecr.io/testimage:latest `
	--registry-username $(az keyvault secret show `
						--vault-name aptestkeyvault01 `
						--name testcontainerregistry-pull-usr `
						--query value --output tsv) `
	--registry-password $(az keyvault secret show `
						--vault-name aptestkeyvault01 `
						--name testcontainerregistry-pull-pwd `
						--query value --output tsv) `
	--name testcontainer1 `
	--cpu 2 --memory 4 `
	--environment-variables SA_PASSWORD=Testing1122 `
	--ip-address public `
	--ports 1433

Ok, we need to wait for the ACI to spin up. We can monitor for this by running: –

az container show --name testcontainer1 --resource-group containers1

Once the above command comes back with a status of Succeeded and an IP address we can drop that into SSMS: –

And boom! We’ve connected to an ACI created from our custom image built using Azure Container Registry Build!

So that’s an intro into ACR Build. There’s plenty more that we can do with it and I’ll explore that in future posts.

Thanks for reading!