6

In-Memory OLTP: Part 2 – Indexes

Following on from In-Memory OLTP: Part 1 – Introduction where we created a database capable of hosting memory optimised tables, I’d now like to run through the indexing options available.

As I mentioned in the last post, memory optimised tables do not have data pages. They are data rows written to memory sequentially with index pointers in the row header, meaning that it is the indexes that give order to the rows in the table. Therefore each memory optimised table must have at least one index and two new types of indexes are available.

These indexes are different from the disk based indexes that we’ve come to know and love. Each has their own internal structures which I’ll go through below.

Hash Indexes

Hash indexes are defined on Books Online as:-

A hash index consists of a collection of buckets organized in an array. A hash function maps index keys to corresponding buckets in the hash index

Confused? Yeah, me too. It helps to visualise this as:-

Hash Function Diagram

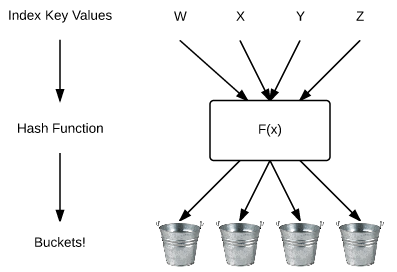
The new engine takes the value in the index and applies a hash function to map it to the internal structure (or “bucket”). We can see this by inserting records into the table created in part one and then querying a new DMV.

But first, here’s the code from part one to create the datatabase:-

USE [master];
GO

IF NOT EXISTS(SELECT 1 FROM sys.databases WHERE name = 'InMemoryOLTPDemo')
BEGIN
    CREATE DATABASE [InMemoryOLTPDemo]
	   ON PRIMARY
    (NAME       = N'InMemoryOLTPDemo Primary',
	FILENAME   = N'C:\SQLServer\Data\InMemoryOLTPDemo.MDF',
	SIZE       = 5MB,
	FILEGROWTH = 1MB,
	MAXSIZE    = UNLIMITED)
	   LOG ON
    (NAME       = 'InMemoryOLTPDemo Log',
	FILENAME   = N'C:\SQLServer\LogInMemoryOLTPDemo_Log.LDF',
	SIZE       = 5MB,
	FILEGROWTH = 1MB,
	MAXSIZE    = UNLIMITED)
    COLLATE Latin1_General_100_BIN2;


    ALTER DATABASE [InMemoryOLTPDemo] ADD FILEGROUP MemData CONTAINS MEMORY_OPTIMIZED_DATA;
 
    ALTER DATABASE [InMemoryOLTPDemo] 
    ADD FILE
    (NAME       = N'InMemoryOLTPDemo Memory Optimised',
	FILENAME   = N'C:\SQLServer\Data\InMemoryOLTPDemo_MemOp')
    TO FILEGROUP MemData;
END
GO

Now the table can be created and records inserted:-

USE [InMemoryOLTPDemo];
GO
 
IF NOT EXISTS(SELECT 1 FROM sys.tables WHERE name = 'EmployeeTableInMemory')
BEGIN
CREATE TABLE [EmployeeTableInMemory]
   (EmployeeID   INT NOT NULL PRIMARY KEY NONCLUSTERED HASH WITH (BUCKET_COUNT = 1024),
    Department   SYSNAME NOT NULL INDEX IX_Department NONCLUSTERED HASH WITH (BUCKET_COUNT = 1024),
    FirstName   SYSNAME,
    LastName    SYSNAME,
    DateCreated DATE)
WITH (MEMORY_OPTIMIZED = ON, DURABILITY = SCHEMA_ONLY);

 
DECLARE @Counter INT = 1;
DECLARE @Department SYSNAME;
 
WHILE @Counter < 1025
BEGIN
 
SELECT @Department =
    CASE
    WHEN @Counter <= 100 THEN 'IT'
    WHEN @Counter > 100 AND @Counter <= 200 THEN 'HR'
    WHEN @Counter > 200 AND @Counter <= 300 THEN 'Accounting'
    WHEN @Counter > 300 AND @Counter <= 400 THEN 'Finance'
    WHEN @Counter > 400 AND @Counter <= 500 THEN 'Marketing'
    WHEN @Counter > 500 AND @Counter <= 600 THEN 'IT'
    WHEN @Counter > 600 AND @Counter <= 700 THEN 'HR'
    WHEN @Counter > 700 AND @Counter <= 800 THEN 'Accounting'
    WHEN @Counter > 800 AND @Counter <= 900 THEN 'Finance'
    WHEN @Counter > 900 AND @Counter <= 1000 THEN 'Marketing'
    ELSE 'Management' END; 
 
INSERT INTO dbo.EmployeeTableInMemory
(EmployeeID, Department, FirstName, LastName, DateCreated)
VALUES
(@Counter, @Department, 'TestForename','TestSurname',CONVERT(DATE,GETDATE()))
 
SET @Counter = @Counter + 1;
END

END
GO

N.B. – I’ve created two hash indexes here. One as a primary key on EmployeeID and one as a nonclustered index on Department, just so that you can see the difference in syntax.

The newly created memory optimised table now has 1024 records in it. The number of buckets used can be viewed by querying the following DMV:-


--View hash index stats
SELECT
    OBJECT_NAME(h.object_id),
    i.name,
    h.total_bucket_count,
    h.empty_bucket_count,
    h.avg_chain_length,
    h.max_chain_length
FROM 
    sys.dm_db_xtp_hash_index_stats h
INNER JOIN
    sys.indexes i ON (h.object_id = i.object_id AND h.index_id = i.index_id)
WHERE 
    OBJECT_NAME(h.object_id) = 'EmployeeTableInMemory';
GO

Which gives the following output:-

Hash Index DMV Stats

Wait, why haven’t all the buckets been used? The indexes were created with 1024 buckets and the table had 1024 records inserted so what’s going on? Shouldn’t the PK have used all the buckets?

This happens because the hash function is balanced resulting in values not being mapped evenly to the hash buckets. Books Online advises that the distribution of values to their hash buckets usually follows a Poisson Distribution:-

Poission Distribution Example
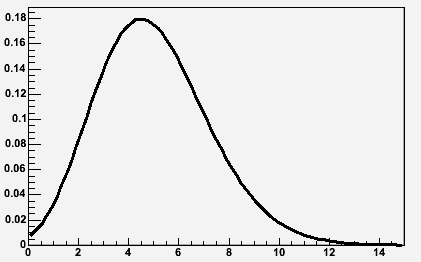
Image source:- http://root.cern.ch/root/html/TMath.html

But does that mean determining the number of buckets to use is very difficult? Remember that the index has to be created at the same time as the table and cannot be altered.

The general rule seems to be to have a bucket count that is approximately twice the number of unique records in the column it is applied to. Books Online also mentions that there should not be any noticeable performance impact if the bucket count is within five times the number of unique records.

Performance can be affected by setting an incorrect bucket count so if you cannot determine an approximate figure you should use the second type of index available on memory optimised tables, range indexes.

Range Indexes

Range indexes utilise a new structure called a Bw-tree:-

The Bw-tree Structure
Bw-Tree Structure

Look familiar? Looks somewhat similar to a normal B-tree right? In fact a Bw-tree can be thought of as a lock/latch free version of a traditional B-tree.

This is implemented by use of a mapping table which maps physical memory locations to logical page identifers (PIDs). The PIDs are used to link the nodes in the Bw-tree which allows the physical location of a page to change on every update with the mapping table updated to the new physical location. This means that the pages are never updated, never changed, they are simply replaced for each update enabling the no locking or latching functionality.

However at the leaf level, not all updates replace a page. Instead “delta” records are created.

Bw-tree Delta Record

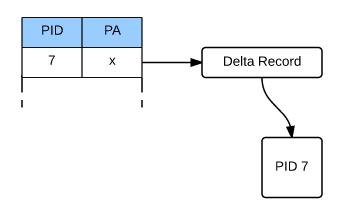
When a DML operation occurs (e.g.- delete/insert/update) a delta record describing the change is created. This delta record is then linked to the original page and the physical address of the page in the mapping table is updated to point to the delta record.

This allows a performance saving by the In-Memory OLTP engine not having to create a new page for every operation. However this does mean that when traversing down the Bw-tree, SQL will have to go through all the delta records before hitting a page. This can have a performance impact so there is a background process that routinely consolidates a page’s delta records.

Still with me? OK, let’s create a range index. It’s pretty simple to do, however again, as tables cannot be altered once created they must be created at the same time as the table:-

USE [InMemoryOLTPDemo];
GO

IF EXISTS(SELECT 1 FROM sys.tables WHERE name = 'EmployeeTableInMemory')
DROP TABLE [EmployeeTableInMemory];
GO


IF NOT EXISTS(SELECT 1 FROM sys.tables WHERE name = 'EmployeeTableInMemory')
CREATE TABLE [EmployeeTableInMemory]
   (EmployeeID	INT NOT NULL PRIMARY KEY NONCLUSTERED HASH WITH (BUCKET_COUNT = 1024),
    Department	SYSNAME NOT NULL INDEX IX_Department NONCLUSTERED HASH WITH (BUCKET_COUNT = 1024),
    FirstName   SYSNAME,
    LastName    SYSNAME,
    DateCreated DATE NOT NULL INDEX IX_DateCreated NONCLUSTERED)
WITH (MEMORY_OPTIMIZED = ON, DURABILITY = SCHEMA_ONLY);
GO

No new DMVs for range indexes (use sys.indexes for information) the differences are the internal structure and how they’re created.

Usage

So how are these new indexes used? Well hash indexes are used for queries with equality operators, for example:-

SELECT *
FROM dbo.EmployeeTableInMemory
WHERE Department = 'IT'
ORDER BY EmployeeID ASC;
GO

Range Indexes and used for queries with inequality operators (scanning a range of values):-

SELECT *
FROM dbo.EmployeeTableInMemory
WHERE DateCreated &gt;= CONVERT(DATE,'2015-03-31')
AND DateCreated &lt;= CONVERT(DATE,'2015-04-02')
ORDER BY EmployeeID ASC;
GO

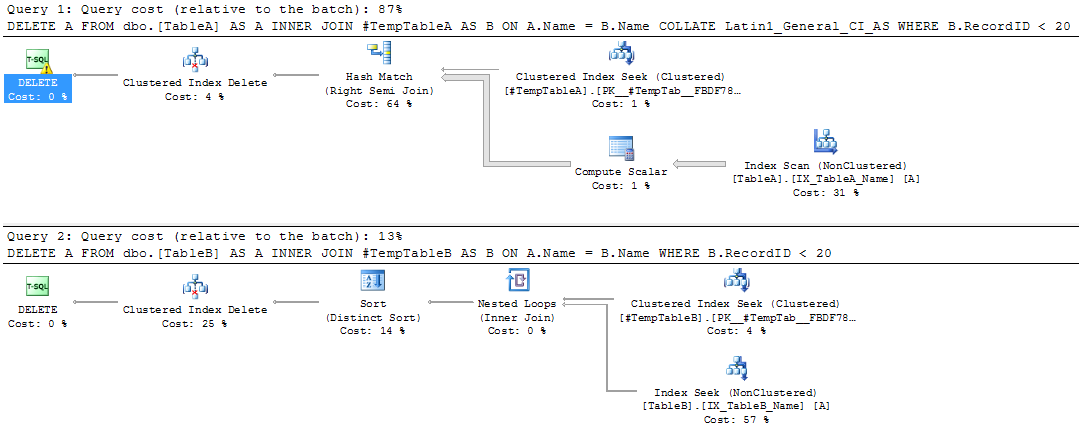
N.B. – Have a look at the query plans generated.

Limitations

Finally as this is pretty much version 1.0 of In-Memory OLTP there are some limitations on creating indexes:-

  • Character columns in the index must have a binary collation
  • No clustered indexes
  • Only one unique index supported (the primary key)
  • Maximum of eight indexes per table
  • Indexes created “in-line” with table and cannot be dropped/altered

I hope that’s been a good introduction into indexes on memory optimised tables. Thanks for reading!

Further Reading

Guidelines on using indexes on memory optimised table – Books Online
Hash indexes – Books Online
Hash indexes – Tony Rogerson
The Bw-Tree: A B-tree for New Hardware – Microsoft Research
The Bw-Tree: A B-Tree On Steroids – Justin Levandoski, David Lomet & Sudipta Sengupta

2

In-Memory OLTP: Part 1 – Introduction

In-Memory OLTP is getting a lot of (rightly deserved imho) hype at the moment. But what does it entail exactly? If you’re a DBA with a few years experience under your belt and are looking to get into this new feature but don’t have the time to sit and read the various technical articles that are out there, this series of blog posts will get you started. I’ll include links along the way so that you can dive further in when you get a chance.

Let’s get started…

Back in December I wrote a review of Kalen Daleny’s book SQL Server Internals: In-Memory OLTP, you can read it here

Since then I’ve had a chance investigate the new functionality for myself and as part of Ed Leighton-Dick’s #SQLNewBlogger challenge in April I’ll write a 4 part series covering:-

Introduction

In-Memory OLTP is a completely new engine incorporated within the existing SQL engine. This means that even though familiar tools and code are used to create and administer memory optimised objects they behave very differently than the established disk based objects.

Memory optimised tables exist entirely in memory, meaning that there are no calls to disk for user IO operations. However there are background processes that write to disk if data in the tables is specified as durable. Their internal structure is different too, no data pages are used, they are data rows written into memory sequentially with each row containing an index pointer to the next. This means that each memory optimised table must have a minimum of one index. I’ll go through the indexes available on memory optimised tables in Part 2 of this series.

Another major difference between In-Memory OLTP and traditional disk based objects is that In-Memory OLTP support the ACID properties of transactions but with no locking needed. In order to do this In-memory OLTP uses an optimistic concurrency model called the multi-version concurrency control (MVCC) model which implements a new form of row versioning. More information on MVCC can be found here.

However, before we get into the features of In-Memory OLTP we first need to create a database that can hold memory optimised objects.

So create a database as normal:-

CREATE DATABASE [InMemoryOLTPDemo]
    ON PRIMARY
(NAME	    = N'InMemoryOLTPDemo Primary',
 FILENAME   = N'C:\SQLServer\Data\InMemoryOLTPDemo.MDF',
 SIZE	    = 5MB,
 FILEGROWTH = 1MB,
 MAXSIZE    = UNLIMITED)
    LOG ON
(NAME	    = 'InMemoryOLTPDemo Log',
 FILENAME   = N'C:\SQLServer\LogInMemoryOLTPDemo_Log.LDF',
 SIZE	    = 5MB,
 FILEGROWTH = 1MB,
 MAXSIZE    = UNLIMITED)
COLLATE Latin1_General_100_BIN2;
GO

Now add a filegroup and file that is designated as containing memory optimised objects/data:-

ALTER DATABASE [InMemoryOLTPDemo] ADD FILEGROUP MemData CONTAINS MEMORY_OPTIMIZED_DATA;

ALTER DATABASE [InMemoryOLTPDemo] 
ADD FILE
(NAME       = N'InMemoryOLTPDemo Memory Optimised',
 FILENAME   = N'C:\SQLServer\Data\InMemoryOLTPDemo_MemOp')
TO FILEGROUP MemData;
GO

N.B. – Couple of notes with this…you can only have one memory optimised filegroup per database AND it cannot be removed once created (you have to drop the database!). Also note that a binary collation was specified. This is because indexes on memory optimised tables that include character columns have to be set to a binary collation.

The following SELECT statement will return the memory optimised filegroup and corresponding files:-

SELECT
    g.name,
    g.type_desc,
    f.name,
    f.physical_name,
    f.state_desc
FROM
    sys.filegroups g
INNER JOIN
    sys.master_files f on g.data_space_id = f.data_space_id
WHERE
    f.database_id = DB_ID()
AND
    g.type = 'FX';
GO

Once the filegroup has been created with the corresponding files, memory optimised tables can now be created and populated. The syntax is nearly exactly the same as for “normal” (or disk based) tables, with a couple of extra settings and restrictions:-

CREATE TABLE [TableInMemory]
   (RecordID    INT NOT NULL PRIMARY KEY NONCLUSTERED HASH WITH (BUCKET_COUNT = 1024),
	FirstName   SYSNAME,
	LastName    SYSNAME,
	DateCreated DATE)
WITH (MEMORY_OPTIMIZED = ON, DURABILITY = SCHEMA_ONLY);
GO

Memory optimised tables do not support clustered indexes so here I’ve used a new type of index called a HASH index. I’ll cover the new indexes supported by In-Memory OLTP objects in section 2 of this blog series.

The other difference from the norm is at the end of the script. MEMORY_OPTIMIZED = ON does exactly what it says on the tin, designates this table as memory optimised.

The second part DURABILITY = SCHEMA_ONLY indicates that in the event of a instance restart only the schema of the table will be preserved. DURABILITY = SCHEMA_AND_DATA indicates that the table will have data written to disk via a background process so that it can be recovered in the event of an instance restart (this option is the default). I’ll go through this in Part 3.

So, we’ve created a database that can contain memory optimised objects and also created a SCHEMA_ONLY durable memory optimised table. In the next post I’ll go through the new types of indexes supported by the In-Memory OLTP engine.

Finally, it’s worth mentioning the restrictions around memory optimised tables:-

  • No clustered indexes
  • No unique indexes (apart from the primary key)
  • Character columns in indexes have to be set to a binary collation
  • No foreign keys
  • No check constraints
  • No triggers
  • Only certain datatypes supported which are fully detailed here

Further Reading

In-Memory OLTP – Books Online
Exploring In-memory OLTP Engine – Rob Garrison
In-Memory OLTP Whitepaper – Kalen Delaney

5

Review of Minion Reindex

Back in October 2014 Midnight SQL released v1.0 of Minion Reindex, a free, open source index maintenance solution. I’m all for making my day job easier so I once I heard about this I wanted to get it into a development environment asap to see what it can do. Unfortunately other things have gotten in the way so I’m only getting around to reviewing it now.

I’m going to go through the deployment, main objects and an initial test of the solution but first off, let’s address the massive elephant in the room that is, Ola Hallengren’s maintenance solution. Ola’s scripts are tried and tested, I’ve been running them in my production environment for god knows how long so it’s going to take something pretty special to make me change. Midnight SQL are aware of this and have detailed the differences between the two solutions here.

Going through the list, the features of Minion Reindex that caught my eye were:-

  • Minimal job configuration – reduced amount of job/job steps needed
  • Exclude databases/tables without altering jobs
  • Configure database/table thresholds and settings without altering jobs
  • Monitoring/Collecting initial and post fragmentation

Ola’s solution does require a fair amount of configuration in the job steps. It also logs all information into one table, dbo.CommandLog which stores some information as XML. That’s fine to be honest but I’m looking to see if this solution can make my life simpler. Can it reduce the amount of time I spend making adjustments to index maintenance (i.e. – the jobs) on my servers? Will it give me more information than I have now? Will that information be easier to retrieve (i.e. – not having to parse XML)?

Deployment
Deployment is a cinche, just download the .zip file, extract and then run the MinionReindexInstall.sql script in the database you wish to deploy to. One thing I don’t like is the ascii art at the top of the script, it looks a bit tacky for my taste but each to their own.

Another thing to mention is that the script will enable xp_cmdshell, not something I’m particularly keen on because of security concerns surrounding it (see here https://msdn.microsoft.com/en-us/library/ms175046.aspx) so I’d rather have it turned off unless it is absolutely necessary. I’m only testing on one instance of SQL Server 2012 Development Edition and I am not using the centralised logging feature (which is why the script enables xp_cmdshell) so I removed the code that enabled xp_cmdshell from the deployment script.

Objects Created
The script creates its own schema, a scalar function, three stored procs and nine tables. I’m not going to go through what each of them does as they are all detailed in the documentation that comes in the .zip file, but here are the main ones:-

Tables
IndexMaintLog – Index operations breakdown by database
IndexMaintLogDetails – Index operations breakdown by individual database
IndexSettingsDB – Maintenance settings at database level
IndexSettingsTable – Maintenance settings at index level

Stored Procedures
IndexMaintMaster – Main procedure which analyses databases and then calls IndexMaintDB
IndexMaintDB – Performs the actual index maintenance in the databases

SQL Server Agent Jobs
MinionReindexDBs-All-All – Performs the heavy work i.e. – rebuilding indexes
MinionReindexDBs-All-REORG – Performs light weight maintenance (reorganising)

Fairly straightforward, right?

Initial Run
So the table that’ll start you off is IndexSettingsDB. Here you’ll add in rows for each database in your SQL instance OR just leave the default row. There’s loads of settings here, allowing you to finely tune your index maintenance for each database without having to touch the Agent jobs. Initially I just inserted a row for each database (using the default settings) and gave the MinionReindexDBs Agent job a whirl.

Whilst the jog is running, have a look at the IndexMaintLog and IndexMaintLogDetails tables. These will show you what operations the job has performed, what it is currently doing and, in the case of IndexMaintLogDetails, what is queued up.

The level of detail in these tables is fantastic. The IndexMaintLog table will give you a good overview of what has been done in each database, the execution time, the number of tables processed and not only the number of indexes processed but the number of indexes reorganised vs rebuilt.

Moving on to the IndexMaintLogDetails, we’re now getting down to the individual index stats. So we’ve got execution time of both reindex and stats update, initial fragmentation, post fragmentation (if you’ve included that option in IndexSettingsDB) and the index usage stats (seeks,scans, lookups etc.). I’ve always separated out my collection of stats from my maintenance tasks but I’m definitely going to switch on the post frag collection and see how it performs.

These two tables are absolutely screaming out for a SSRS report to be slapped over the top of them. And they’d be pretty easy to write, only two tables to track trends in your databases which would allow you to see changes in fragmentation patterns over time.

Further Testing
The next things for me will be, setting up table level exclusions in certain databases and setting the order of databases and tables to be reindexed. Once that’s all setup I’ll get both Agent jobs on a schedule, start fragmenting my test databases (I’ll shrink them) and then analysing the stats.

Conclusion
I like this solution, it’s easy to deploy, configure and run. I’m going to let this run in my dev environments for a while to see how it performs with a view to deploying to production.

I’d definitely recommend that DBAs should be downloading this, installing in a development environment and playing around.

What’s also encouraging about this solution is that Midnight SQL list on their website features that will be included at a later date. There are some features that I’d like to see, system table maintenance and the ability to rebuild individual partitions would probably be at the top of the list, but it’s good to know that there will be future releases (and with that, hopefully support).

Minion Reindex can be downloaded from here:- http://www.midnightsql.com/minion/

4

Identifying Blocking via Extended Events

There are a number of ways that you can identify blocking that is occurring in your SQL instance. You can run the undocumented sp_who2 stored procedure but that will only give you the session that is being blocked. You could download the excellent sp_whoisactive, written by Adam Machanic, which will give you the session_id and the SQL script that is causing the blocking. However both of these methods will only show you blocking sessions when you run it (obviously). If you want to capture historical blocking information then another method is needed. If you suspect that blocking is occurring in your system, the best way to capture the information is to use Extended Events.

In order to do this, first enable the blocked process report:-

EXEC sp_configure 'Show Advanced Options', 1
RECONFIGURE

EXEC sp_configure 'blocked process threshold (s)', 1
RECONFIGURE

EXEC sp_configure 'Show Advanced Options', 0
RECONFIGURE

N.B. – I’ve set the threshold limit here to one second. Depending on your environment you may wish to change it.

Then create an extended event to capture the information from the report:-

CREATE EVENT SESSION [BlockedProcesses] ON SERVER 
    ADD EVENT sqlserver.blocked_process_report
    ADD TARGET package0.event_file(SET filename=N'C:\SQLServer\XEvents\BlockedProcesses\BlockedProcesses.xel',max_file_size=(128))
WITH (STARTUP_STATE=OFF)
GO

N.B. – Don’t forget to change the file path.

Then start the session:-

ALTER EVENT SESSION [BlockedProcesses] ON SERVER
    STATE = START;

Now that the session is running you can query it:-

SELECT
 [XML DATA] AS [Raw XML],
 [XML Data].value('(/event[@name=''blocked_process_report'']/@timestamp)[1]','DATETIME') AS [TimeStamp],
 [XML Data].value('(/event/data[@name=''database_name'']/value)[1]','SYSNAME') AS [Database Name],
 [XML Data].value('(/event/action[@name=''username'']/value)[1]','SYSNAME') AS [Username],
 [XML Data].value('(/event/data[@name=''transaction_id'']/value)[1]','BIGINT') AS [Transaction ID],
 [XML Data].value('(/event/data[@name=''lock_mode'']/text)[1]','SYSNAME') AS [Lock Mode],
 [XML Data].value('(/event/data[@name=''duration'']/value)[1]','BIGINT')/1024 AS [Duration (ms)],
 [XML Data].value('(/event/data[@name=''blocked_process'']/value/blocked-process-report/blocked-process/process/inputbuf)[1]','SYSNAME') AS [Blocked Query],
 [XML Data].value('(/event/data[@name=''blocked_process'']/value/blocked-process-report/blocked-process/process/@waitresource)[1]','SYSNAME') AS [Wait Resource], 
 [XML Data].value('(/event/data[@name=''blocked_process'']/value/blocked-process-report/blocking-process/process/inputbuf)[1]','SYSNAME') AS [Blocking Query]
FROM
    (SELECT OBJECT_NAME 			  AS [Event], 
		  CONVERT(XML, event_data) AS [XML Data]
	FROM 
	   sys.fn_xe_file_target_read_file('C:\SQLServer\XEvents\BlockedProcesses\BlockedProcesses*.xel',NULL,NULL,NULL)) AS v
ORDER BY [XML Data].value('(/event[@name=''blocked_process_report'']/@timestamp)[1]','DATETIME') DESC

EDIT:- It’s been pointed out in the comments by Jason that the value for username will return as NULL because no action was defined for this value in the CREATE EVENT script. Adding the following piece of code will allow the username to be returned:-

ADD EVENT sqlserver.blocked_process_report(
Action (sqlserver.Username))

This piece of code will output the time of the block, the blocked query, the blocking query, the duration of the block and the resource that the blocked query is waiting on. I’ll run through a quick example now to show what information is retrieved when a block is recorded. So first I’ll create a demo database with one table (I have already run the setup scripts above):-

USE [master];
GO
 
CREATE DATABASE [BlockingExample];
GO
 
USE [BlockingExample];
GO
 
CREATE TABLE dbo.[BlockedTable]
(RecordID INT IDENTITY(1,1) PRIMARY KEY,
 ColA SYSNAME);
 
INSERT INTO dbo.BlockedTable
(ColA)
VALUES
('Blocking TEST');
GO

Then I’ll open two sessions, the first will be an update in a transaction that I’ll leave open (my blocker):-

USE [BlockingExample];
GO
 
BEGIN TRAN
 
UPDATE dbo.[BlockedTable]
SET ColA = 'BlockingTEST1';

The second will be a simple SELECT against the table (my blocked query):-

USE [BlockingExample];
GO

SELECT * FROM dbo.BlockedTable;

I’ll run this for a while, cancel it and commit the first query. Then I queried the extended event, here’s the results:- BlockedProcessScreenShot As you can see, The SELECT is showing up as the blocked query and the update as the blocker. But we’ve also got the resource the SELECT is waiting on:- KEY: 14:72057594039042048 (8194443284a0) Using this information we can identify the exact row in the table. The 14 is the database_id:-

SELECT name from sys.databases WHERE database_id = 14

This gives the name of the test database “BlockingExample”. Next 72057594039042048 is the hobt_id of the table, we can get the table name by running:-

SELECT o.name
FROM sys.objects o
INNER JOIN sys.partitions p ON o.object_id = p.object_id
WHERE p.hobt_id = 72057594039042048

This outputs the name of the test table “Blocked Table”. Finally we can use (8194443284a0) to identify the exact row in the table by running:-

SELECT *
FROM dbo.BlockedTable
WHERE %%LOCKRES%% = '(8194443284a0)'

This will output the test record that was inserted and then locked by the UPDATE statement. A very contrived example, I know, but it does show how verbose Extended Events are when capturing blocking. Not only can we identity the blocker and blockee but the exact record that the blockee was waiting on.

0

Collation Conflicts

I have recently seen some “bad plans” being generated by the optimiser and from investigation, the cause came down to the fact that the collation of the database where the queries were running was different to the tempdb collation.

Consider this situation, you have a stored procedure which collects various records and stores them in a temporary table. This temporary table is then used as a reference to delete records from another table in the database. This is a bit of a contrived example, but I just want to show you the impact differing collations can have.

N.B. – I’m running this in SQL Server 2012

First I’ll create a database with a different collation to the tempdb (the tempdb collation on my local instance is Latin1_General_CI_AS):-

CREATE DATABASE [CollationConflict] COLLATE SQL_Latin1_General_CP1_CI_AS;

Then I’ll create two tables in the database, populate them with data and create some nonclustered indexes.

Here’s the first table in the database:-

USE [CollationConflict];
GO

SET NOCOUNT ON;

IF EXISTS(SELECT 1 FROM sys.objects WHERE name = 'TableA')
    DROP TABLE dbo.[TableA];
GO

IF NOT EXISTS(SELECT 1 FROM sys.objects WHERE name = 'TableA')
    CREATE TABLE dbo.[TableA]
    (RecordID INT IDENTITY(1,1) PRIMARY KEY,
	Name VARCHAR(10));
GO

DECLARE @Counter	INT = 0;
DECLARE @Value		CHAR(10) = 'TEST';

WHILE @Counter <= 50000
BEGIN
    SET @Value = 'TEST' + CONVERT(VARCHAR(4),@Counter)

    INSERT INTO dbo.[TableA]
    (Name)
    VALUES
    (@Value);

    SET @Counter = @Counter + 1;
END

CREATE NONCLUSTERED INDEX [IX_TableA_Name] ON dbo.[TableA](NAME);
GO

And here’s the second table:-

IF EXISTS(SELECT 1 FROM sys.objects WHERE name = 'TableB')
    DROP TABLE dbo.[TableB];
GO

IF NOT EXISTS(SELECT 1 FROM sys.objects WHERE name = 'TableB')
    CREATE TABLE dbo.[TableB]
    (RecordID INT IDENTITY(1,1) PRIMARY KEY,
	Name VARCHAR(10));
GO

DECLARE @Counter	INT = 0;
DECLARE @Value		CHAR(10) = 'TEST';

WHILE @Counter <= 50000
BEGIN
    SET @Value = 'TEST' + CONVERT(VARCHAR(4),@Counter)

    INSERT INTO dbo.[TableB]
    (Name)
    VALUES
    (@Value);

    SET @Counter = @Counter + 1;
END

CREATE NONCLUSTERED INDEX [IX_TableB_Name] ON dbo.[TableB](NAME);
GO

To show the difference in plan’s generated, I’ll now create two temporary tables. The first one will use the same collation as tempdb but the second will be created with a different collation explicitly set.

Here’s the first temporary table using tempdb’s collation:-

CREATE TABLE #TempTableA
    (RecordID	 INT IDENTITY(1,1) PRIMARY KEY,
	Name		 VARCHAR(10));

DECLARE @Counter	INT = 0;
DECLARE @Value		CHAR(10) = 'TEST';

WHILE @Counter <= 500
BEGIN
    SET @Value = 'TEST' + CONVERT(VARCHAR(4),@Counter)

    INSERT INTO #TempTableA
    (Name)
    VALUES
    (@Value);

    SET @Counter = @Counter + 1;
END

CREATE NONCLUSTERED INDEX [IX_TempTableA_Name] ON #TempTableA(NAME);
GO

Here’s the second temporary table using same collation as the user database:-

CREATE TABLE #TempTableB
    (RecordID	 INT IDENTITY(1,1) PRIMARY KEY,
	Name		 VARCHAR(10) COLLATE SQL_Latin1_General_CP1_CI_AS);

DECLARE @Counter	INT = 0;
DECLARE @Value		CHAR(10) = 'TEST';

WHILE @Counter < 500
BEGIN
    SET @Value = 'TEST' + CONVERT(VARCHAR(4),@Counter)

    INSERT INTO #TempTableB
    (Name)
    VALUES
    (@Value);

    SET @Counter = @Counter + 1;
END

CREATE NONCLUSTERED INDEX [IX_TempTableB_Name] ON #TempTableB(NAME);
GO

Now I’m going to run two separate SQL statements which will reference the temp tables. The statements will perform the exact same operation, deleting a set of records from the main tables based on the records in the temp tables.

The only difference is that the COLLATE option is specified in the first (otherwise an error will be generated):-

DELETE A
FROM dbo.[TableA] AS A
INNER JOIN #TempTableA AS B ON A.Name = B.Name COLLATE Latin1_General_CI_AS
WHERE B.RecordID < 20;
GO

DELETE A 
FROM dbo.[TableB] AS A
INNER JOIN #TempTableB AS B ON A.Name = B.Name
WHERE B.RecordID < 20;
GO

The DELETE statements will generate the following plans when executed:-

Query Plans

The first query is scanning the nonclustered index. The properties of the DELETE operator show why:-

DELETE Operator Properties

SQL is performing an implicit conversion, even though the COLLATE option was specified in the join. This is causing the nonclustered index scan. The impact of this can be seen by comparing the properties of the scan vs the seek in the second plan:-

Comparison

The scan is reading all the records in the table, simply because of the implicit conversion!

So, if your user databases have a different collation than your tempdb ensure that you specify the correct collation when creating your temporary tables. Or just make sure your databases have the same collation as your SQL instance!