2

The Database Corruption Challenge

For the last ten weeks Steve Stedmen (blog | twitter) has been running a database corruption challenge. The final challenge closes today and even though I haven’t been able to take part in all of them, I have thoroughly enjoyed working through these challenges.

DBAs don’t often get to practice fixing corruption, I mean, you can corrupt a database yourself and then try and repair it but it’s kind of a easy task when you know how it was corrupted in the first place. That’s what has been great about these challenges, Steve supplied a corrupt database each week and let everyone work out how to repair it (with no data loss), he’s also provided clues in the weeks where the challenge was particularly fiendish.

These challenges have given me more confidence in my skills, beforehand I would always be looking to restore from a backup as soon as corruption was detected (depending on what the corruption was), now I feel confident that if there’s another way of repairing the data I’ll be able to find it. If a full database restore is going to take hours and you can repair the problem in a fraction of that time how much is your company going to love you?

(N.B. – Actually…we’ll see about that. Generally when there’s a problem with the database there’ll be about 5 people standing over my desk (all suggesting “helpful” ideas) so I’ll have to be pretty confident to suggest something other than restoring from backups, time will tell!)

Also as well as a fun challenge, Steve has also created a good training plan. I’ll definitely be coming back to these blog posts in the future to refresh my corruption repairing skills. I would recommend that every DBA does this, we’re paid to be able to fix these kind of issues so you always want them fresh in your mind.

Thank you Steve.

Here are the links to each weekly challenge:-
Week 1http://stevestedman.com/2015/04/introducing-the-database-corruption-challenge-dbcc-week-1-challenge/
Week 2http://stevestedman.com/2015/04/week-2-of-the-database-corruption-challenge/
Week 3 http://stevestedman.com/2015/04/week-3-of-the-database-corruption-challenge/
Week 4 http://stevestedman.com/2015/05/week-4-of-the-database-corruption-challenge/
Week 5 http://stevestedman.com/2015/05/week-5-corruption-challenge/
Week 6 http://stevestedman.com/2015/05/week-6-database-corruption-challenge/
Week 7http://stevestedman.com/2015/06/week-7-database-corruption-challenge/
Week 8http://stevestedman.com/2015/06/corruption-challenge-8/
Week 9http://stevestedman.com/2015/07/database-corruption-challenge-9/
Week 10 http://stevestedman.com/2015/07/database-corruption-challenge-10/

2

SQL Server 2016 – Stretch Databases

One of the features I’ve been interested in that’s coming with SQL Server 2016 is the stretched database. The ability to “stretch” individual tables in a database into the cloud seems really cool and could help organisations easily archive their data.

There’s a full guide to stretch databases in SQL 2016 Books Online but I’d like to go through a quick setup.

Prerequisites – An Azure account (uh huh) and if you’re installing on a server, you’ll have to add the Azure portal to the list of trusted sites and enable javascript.

First thing to do is enable the SQL instance to host stretched databases:-

EXEC sp_configure 'remote data archive' , '1';
RECONFIGURE;

Now create a database:-

USE [master];
GO

IF NOT EXISTS(SELECT TOP 1 1 FROM sys.databases WHERE name = 'StretchedDatabase')
	CREATE DATABASE [StretchDatabase];
GO

Then create a table that will be “stretched”:-

USE [StretchDatabase];
GO

IF NOT EXISTS(SELECT TOP 1 1 FROM sys.objects WHERE name = 'StretchTable')
CREATE TABLE [StretchTable]
(PkID INT IDENTITY(1,1) PRIMARY KEY,
 FirstName SYSNAME,
 CreatedDate DATETIME);
GO

Ok, so now we connect to our Azure account and setup the stretch. I’m sure there’s a way to do this in powershell but as this is my first time I’m going to use the GUI *gasp*. Right click on the database and go to Tasks > Enable Database for Stretch:-

EnableStretchDatabase1 EnableStretchDatabase2

Enter your Azure login details:-

EnableStretchDatabase3

Ensure you’re using the right subscription (I’ve only got one but you may have a personal & work account):-

EnableStretchDatabase5

Pick a location for the stretched data to residue in and a login/password. You’ll need to make a note of the login/password for future use when working on the Azure blob (think backup/restore). Also I kept the defaults for the firewall rules but you may want to change them:-

EnableStretchDatabase6

Review the details displayed and click “Finish” (note that there’s no option to script this):-

EnableStretchDatabase7

If all goes well you should see:-

EnableStretchDatabase8

And you can verify that the stretch is setup and connected by looking at the newly created linked server:-

EnableStretchDatabase9

There will also be a new database created in your Azure account:-
EnableStretchDatabase10
That’s it! The database is setup to be have tables stretched into Azure. Now we need to enable the table we created to be stretched:-

USE [StretchDatabase];
GO

ALTER TABLE [StretchTable]
    ENABLE REMOTE_DATA_ARCHIVE WITH ( MIGRATION_STATE = ON );
GO

OK, so let’s pump a load of data into the stretched table:-

INSERT INTO dbo.StretchTable
(FirstName,CreatedDate)
VALUES
('TEST',GETDATE());
GO 100

There’s a new DMV in SQL 2016 to allow us to see details of the data that has been migrated to Azure:-

SELECT * FROM sys.dm_db_rda_migration_status;

ViewMigratedData2

The new DMV is documented here

As you can see, all the rows that we inserted into the table have been migrated into Azure. I have to admit, I didn’t think this is how the stretch technology would work. For some reason (and I have no basis for thinking this), I thought there would be settings to say only migrate data in the table based on certain conditions would be stretched up to Azure. Being able to set conditions on stretched tables to control how data is migrated is definitely something I’d like to see Microsoft bring in but for now this technology could be very useful in moving old archives tables out of local storage and into the cloud.

But what happens when a database containing a stretched table is restored from backup? Let’s give it a go, so backup the database:-

USE [master];
GO

BACKUP DATABASE [StretchDatabase]
TO DISK = N'C:\SQLServer\Backups\StretchDatabase.BAK'
WITH STATS = 5;
GO

And then immediately restore it:-

RESTORE DATABASE [StretchDatabase]
FROM DISK = N'C:\SQLServer\Backups\StretchDatabase.BAK'
WITH REPLACE, RECOVERY, STATS = 5;
GO

Now query the stretched table:-

USE [StretchDatabase];
GO

SELECT * FROM dbo.StretchTable;
GO

What?! No rows! This happens because the stretched table needs to be reauthorised, remember that login & password you created earlier? You’ll need to use those when executing a new stored procedure sys.sp_reauthorize_remote_data_archive

EXEC sys.sp_reauthorize_remote_data_archive
	@azure_username = N'YOUR USERNAME',
	@azure_password = N'YOUR PASSWORD';
GO

Now try querying the table again:-

SELECT * FROM dbo.StretchTable;
GO

Rows! The table has reconnected with Azure and the query can return the rows. This step will need to be added to any backup/restore strategy that you put in place. Thankfully you’ll only have to do it once as it’s not table specific. Finally, let’s have a look at the query plan that is generated when querying tables that have been stretched. I’m going to use another new feature in SQL 2016, live query statistics. This couldn’t be easier to use, just click on the new button in SSMS 2016 next to the button that includes the actual execution plan and off you go:-

SELECT * FROM dbo.StretchTable;

LiveQueryStatistics

In the above GIF you can see the new remote query operator on the right. The live query statistics feature also shows that this is the only source of the data, with the table in the data not returning any rows at all. This is due to the fact that we have not inserted any more rows into the table, if the table was “live” we would see both the table and the remote query operator returning rows and then being combined by the concatenation operator before the select.

0

SQL Server 2016 features I’m interested in

Microsoft announced this month what features/improvements will be in the next version of SQL Server, SQL Server 2016. You can download the datasheet they’ve posted from here.

The features that have caught my attention are:-

  • Enhancements to In-Memory OLTP
  • The Query Data Store
  • Temporal Database
  • Stretch Database
  • Automatic failover based on database health
  • Enhanced Data Caching

Enhancements to In-Memory OLTP – I’ve said in previous posts that In-Memory OLTP in SQL 2014 is pretty much version 1.0, good start but it needs work (try dropping a memory optimised filegroup from a database, go on, try it!). It’ll be interesting to see exactly what they’ve changed.

The Query Data Store – This sounds great, being able to track how a query’s execution plan changes over time will be fantastic.

Temporal Database – The datasheet says “Track Historical Changes”. Does this mean the database will track DDL statements executed against it?

Stretch Database – Like it or not, Azure is getting bigger and bigger. I’m interested in this as I’d love to see what impact there would be on queries that span data held locally and in the cloud. I know, I know, One could argue that those queries shouldn’t be hitting your OLTP database but in my experience it will happen.

Automatic failover based on database health – This sounds like a recipe for diaster IMHO, wonder how this would actually determine a database’s health. Will the settings be configurable?

Enhanced Data Caching – Direct quote from the datasheet – “Cache data with automatic, multiple TempDB files per instance in multi-core environments” – Not exactly sure what this means, sounds exciting though, eh?

The datasheet is very brief on details, more of a marketing document than anything else so I’ll be keeping a close eye on the Microsoft blog for more details.

P.S. – Anyone not looking forward to native JSON support? 😉

UPDATE (2015-05-28):- It’s out for CTP, details on what’s new can be found here

1

In-Memory OLTP: Part 4 – Native Compilation

This post follows on from In-Memory OLTP: Part 3 – Durability & Recovery

In this final post for the #SQLNewBlogger challenge I want to go over another new feature of In-Memory OLTP, natively compiled stored procedures. Natively compiled stored procedures differ from normal stored procedures in that the In-Memory OLTP engine converts the code within the stored procedure to machine code when they are created. This means that no extra compilation to convert t-sql into a set of instructions that can be processed by a CPU needs to be performed when they are executed.

(I’m guessing that as disk IO has been taken out of the picture, Microsoft looked at other ways to improve performance of data operations and the compile time of stored procedures was identified, kinda cool eh?)

Here’s the syntax for creating a natively compiled stored procedure:-

CREATE PROCEDURE dbo.Example 
WITH NATIVE_COMPILATION, SCHEMABINDING, EXECUTE AS OWNER
AS
    BEGIN ATOMIC WITH
    (TRANSACTION ISOLATION LEVEL = SNAPSHOT, LANGUAGE = N'English')
	   .
	   .
	   .
	   .
	   .
	   .
    END
GO

Let’s go over the settings specified in the create statement:-

  • NATIVE_COMPLIATION – Does what it says on the tin
  • SCHEMABINDING – This prevents the tables accessed being dropped
  • EXECUTE AS OWNER – EXECUTE AS CALLER is not supported so a specific execution context must be supplied
  • ATOMIC – Everything within the stored procedure is executed as one “block”. Either all the statements within the transaction succeed or will be rolled back

As BEGIN ATOMIC has been specified the following must also be declared:-

  • TRANSACTION ISOLATION LEVEL = SNAPSHOT – Only SNAPSHOT, REPEATABLEREAD, and SERIALIZABLE are supported
  • LANGUAGE = N’English’ – a language from sys.syslanguages must be declared

Let’s see this in action. Create a database to contain a memory optimised table and stored procedure (code from the previous posts):-

USE [master];
GO

IF EXISTS(SELECT 1 FROM sys.databases WHERE name = 'InMemoryOLTPDemo')
DROP DATABASE [InMemoryOLTPDemo];
GO
  
IF NOT EXISTS(SELECT 1 FROM sys.databases WHERE name = 'InMemoryOLTPDemo')
BEGIN
    CREATE DATABASE [InMemoryOLTPDemo]
       ON PRIMARY
    (NAME       = N'InMemoryOLTPDemo Primary',
    FILENAME   = N'C:\SQLServer\Data\InMemoryOLTPDemo.MDF',
    SIZE       = 5MB,
    FILEGROWTH = 1MB,
    MAXSIZE    = UNLIMITED)
       LOG ON
    (NAME       = 'InMemoryOLTPDemo Log',
    FILENAME   = N'C:\SQLServer\LogInMemoryOLTPDemo_Log.LDF',
    SIZE       = 5MB,
    FILEGROWTH = 1MB,
    MAXSIZE    = UNLIMITED)
    COLLATE Latin1_General_100_BIN2;
 END

ALTER DATABASE [InMemoryOLTPDemo] ADD FILEGROUP MemData CONTAINS MEMORY_OPTIMIZED_DATA;
   
ALTER DATABASE [InMemoryOLTPDemo] 
ADD FILE
    (NAME       = N'InMemoryOLTPDemo Memory Optimised',
    FILENAME   = N'C:\SQLServer\Data\InMemoryOLTPDemo_MemOp')
    TO FILEGROUP MemData;
GO

Set up the memory optimised table:-

USE [InMemoryOLTPDemo];
GO
 
IF EXISTS(SELECT 1 FROM sys.tables WHERE name = 'EmployeeTableInMemory')
DROP TABLE [EmployeeTableInMemory];
GO
 
IF NOT EXISTS(SELECT 1 FROM sys.tables WHERE name = 'EmployeeTableInMemory')
CREATE TABLE [EmployeeTableInMemory]
   (EmployeeID   INT NOT NULL PRIMARY KEY NONCLUSTERED HASH WITH (BUCKET_COUNT = 1024),
    Department   SYSNAME NOT NULL INDEX IX_Department NONCLUSTERED HASH WITH (BUCKET_COUNT = 1024),
    FirstName   SYSNAME,
    LastName    SYSNAME,
    DateCreated DATE)
WITH (MEMORY_OPTIMIZED = ON, DURABILITY = SCHEMA_AND_DATA);
GO

SET NOCOUNT ON;
DECLARE @Counter INT = 1;
 
WHILE @Counter < 100000
BEGIN
 
INSERT INTO dbo.EmployeeTableInMemory
(EmployeeID, Department, FirstName, LastName, DateCreated)
VALUES
(@Counter, 'TEST', 'TestForename','TestSurname',CONVERT(DATE,GETDATE()))
 
SET @Counter = @Counter + 1;
END
GO

Now, create a normal stored procedure and a memory optimised one:-

CREATE PROCEDURE dbo.TestNormal
AS
    SELECT E1.EmployeeID, E1.Department, E1.FirstName, E1.LastName, E1.DateCreated
    FROM dbo.EmployeeTableInMemory E1
    INNER JOIN dbo.EmployeeTableInMemory E2 ON E1.EmployeeID = E2.EmployeeID 
    INNER JOIN dbo.EmployeeTableInMemory E3 ON E1.EmployeeID = E3.EmployeeID 
    INNER JOIN dbo.EmployeeTableInMemory E4 ON E1.EmployeeID = E4.EmployeeID 
    INNER JOIN dbo.EmployeeTableInMemory E5 ON E1.EmployeeID = E5.EmployeeID 
    INNER JOIN dbo.EmployeeTableInMemory E6 ON E1.EmployeeID = E6.EmployeeID 
    INNER JOIN dbo.EmployeeTableInMemory E7 ON E1.EmployeeID = E7.EmployeeID 
    INNER JOIN dbo.EmployeeTableInMemory E8 ON E1.EmployeeID = E8.EmployeeID 
    INNER JOIN dbo.EmployeeTableInMemory E9 ON E1.EmployeeID = E9.EmployeeID 
    INNER JOIN dbo.EmployeeTableInMemory E10 ON E1.EmployeeID = E10.EmployeeID 
    ORDER BY E10.EmployeeID DESC OPTION(RECOMPILE)
GO

CREATE PROCEDURE dbo.TestNative 
WITH NATIVE_COMPILATION, SCHEMABINDING, EXECUTE AS OWNER
AS
    BEGIN ATOMIC WITH
    (TRANSACTION ISOLATION LEVEL = SNAPSHOT, LANGUAGE = N'English')
	   SELECT E1.EmployeeID, E1.Department, E1.FirstName, E1.LastName, E1.DateCreated
	   FROM dbo.EmployeeTableInMemory E1
	   INNER JOIN dbo.EmployeeTableInMemory E2 ON E1.EmployeeID = E2.EmployeeID 
	   INNER JOIN dbo.EmployeeTableInMemory E3 ON E1.EmployeeID = E3.EmployeeID 
	   INNER JOIN dbo.EmployeeTableInMemory E4 ON E1.EmployeeID = E4.EmployeeID 
	   INNER JOIN dbo.EmployeeTableInMemory E5 ON E1.EmployeeID = E5.EmployeeID 
	   INNER JOIN dbo.EmployeeTableInMemory E6 ON E1.EmployeeID = E6.EmployeeID 
	   INNER JOIN dbo.EmployeeTableInMemory E7 ON E1.EmployeeID = E7.EmployeeID 
	   INNER JOIN dbo.EmployeeTableInMemory E8 ON E1.EmployeeID = E8.EmployeeID 
	   INNER JOIN dbo.EmployeeTableInMemory E9 ON E1.EmployeeID = E9.EmployeeID 
	   INNER JOIN dbo.EmployeeTableInMemory E10 ON E1.EmployeeID = E10.EmployeeID 
	   ORDER BY E10.EmployeeID DESC
    END
GO

N.B. – These are horrible stored procs, I know. They’re just for demo purposes. I’ve included OPTION(RECOMPILE) in the normal stored proc so that you can re-run when testing to see the differences each time (otherwise the plan will be cached).

Now run each one with STATISTICS TIME ON:-

SET STATISTICS TIME ON;
EXEC dbo.TestNormal;
GO

NormalProcCompileTime

SET STATISTICS TIME ON;
EXEC dbo.TestNative;
GO

NativeProcCompileTime


You can see that the natively compiled stored procedure never has any time registered for parse and compile. This is because it was compiled when it was created, meaning that if the procedure has any parameters they are not taken into consideration. All natively compiled stored procedures can be thought of as being optimised for unknown.

In addition, you’re not going to be able to see the execution plan when the stored procedure is executed. Try including the actual execution plan when running the code above. Querying sys.procedures will also not show any clues that the procedure is natively compiled, you’ll have to remember which stored procedures are natively compiled or you’re going to have real fun when investigating any performance issues!

So when should you use natively compiled stored procedures? As with many (most???) things with SQL Server, it depends. There are limitations to what you can do with them, they are designed for OLTP operations that are frequently called which need to be blazingly fast. A full list of the supported constructs for natively compiled stored procedures can be found here. My advice would be take every situation on a case by case basis and test to death but it’s worth remembering that they can only access memory optimised tables and that like those tables, they cannot be altered once created (you have to drop and re-create, feasible on a busy OLTP system?).

So that’s it! I’ve really enjoying writing this series of posts. Thanks very much for reading!

Further Reading
Creating Natively Compiled Stored Procedures – Microsoft
Best Practices for Calling Natively Compiled Stored Procedures

4

In-Memory OLTP: Part 3 – Checkpoints

This post follows on from In-Memory OLTP: Part 2 – Indexes

So far in this blog series memory optimised tables have been created with the durability option of SCHEMA_ONLY meaning that data will not be retained. However there is another durability option of SCHEMA_AND_DATA which means that SQL will retain data held in memory optimised tables.

But how is this achieved? Well, this is done via the transaction log (the same as with disk based tables) and checkpoint file pairs which are written to by the checkpoint process. It is these CFPs that I want to go through in this post.

Checkpoint Operations

The purpose of the checkpoint operation in SQL is to reduce recovery time by hardening to disk data pages that have been altered in memory (i.e.- “dirty” pages) and as such SQL will not have to apply the corresponding redo operations from the transaction log in the event of a crash. However even though the purpose is the same for both disk based and memory optimised tables the process is different. For memory optimised tables the checkpoint process is continuous and utilises the previously mentioned checkpoint file pairs (CFPs).

Each CFP contains:-

  • One data file which records INSERT operations
  • One delta file which records DELETE operations

N.B. – UPDATES are recorded as INSERT & DELETE operations

To show what is meant by a continuous checkpoint let’s have a look at the process. Create a database as normal:-

USE [master];
GO

IF EXISTS(SELECT 1 FROM sys.databases WHERE name = 'InMemoryOLTPDemo')
DROP DATABASE [InMemoryOLTPDemo];
GO
 
IF NOT EXISTS(SELECT 1 FROM sys.databases WHERE name = 'InMemoryOLTPDemo')
BEGIN
    CREATE DATABASE [InMemoryOLTPDemo]
       ON PRIMARY
    (NAME       = N'InMemoryOLTPDemo Primary',
    FILENAME   = N'C:\SQLServer\Data\InMemoryOLTPDemo.MDF',
    SIZE       = 5MB,
    FILEGROWTH = 1MB,
    MAXSIZE    = UNLIMITED)
       LOG ON
    (NAME       = 'InMemoryOLTPDemo Log',
    FILENAME   = N'C:\SQLServer\LogInMemoryOLTPDemo_Log.LDF',
    SIZE       = 5MB,
    FILEGROWTH = 1MB,
    MAXSIZE    = UNLIMITED)
    COLLATE Latin1_General_100_BIN2;
 END
 GO

Then add the filegroup and underlying file structure for memory optimised tables:-

ALTER DATABASE [InMemoryOLTPDemo] ADD FILEGROUP MemData CONTAINS MEMORY_OPTIMIZED_DATA;
  
ALTER DATABASE [InMemoryOLTPDemo] 
ADD FILE
    (NAME       = N'InMemoryOLTPDemo Memory Optimised',
    FILENAME   = N'C:\SQLServer\Data\InMemoryOLTPDemo_MemOp')
    TO FILEGROUP MemData;
GO

Have a look at the file system, you will see that a folder has been created at C:\SQLServer\Data\ called InMemoryOLTPDemo_MemOP:-

Memory Optimised Folder

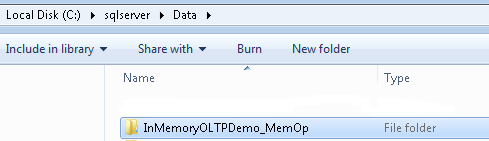
Drilling down into the folder, there will be two subfolders with unique identifiers for names. The lowest level folder will be empty until a memory optimised table is created:-

USE [InMemoryOLTPDemo];
GO

IF EXISTS(SELECT 1 FROM sys.tables WHERE name = 'EmployeeTableInMemory')
DROP TABLE [EmployeeTableInMemory];
GO

IF NOT EXISTS(SELECT 1 FROM sys.tables WHERE name = 'EmployeeTableInMemory')
CREATE TABLE [EmployeeTableInMemory]
   (EmployeeID	 INT NOT NULL PRIMARY KEY NONCLUSTERED HASH WITH (BUCKET_COUNT = 1024),
    Department	 SYSNAME NOT NULL INDEX IX_Department NONCLUSTERED HASH WITH (BUCKET_COUNT = 1024),
    FirstName   SYSNAME,
    LastName    SYSNAME,
    DateCreated DATE)
WITH (MEMORY_OPTIMIZED = ON, DURABILITY = SCHEMA_AND_DATA);
GO

N.B. – Note that the durability option for this table is now set as SCHEMA_AND_DATA

Rechecking the folder, it will now have a number of files:-

Checkpoint Files 1

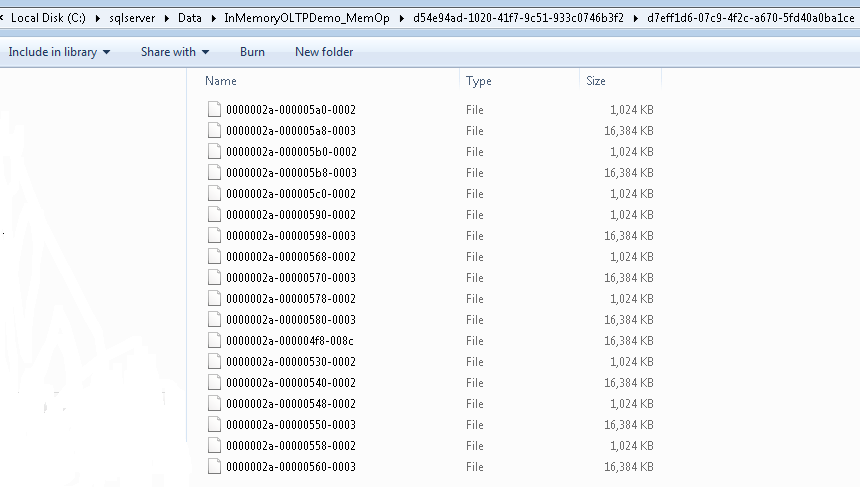
These are the physical CFPs, 18 files in total, 9 pairs.

We can get more information on these files by running the following script within SQL:-

SELECT
    container_id,
    internal_storage_slot,
    file_type_desc,
    state_desc,
    inserted_row_count,
    deleted_row_count,
    lower_bound_tsn,
    upper_bound_tsn
FROM
    sys.dm_db_xtp_checkpoint_files
ORDER BY
    file_type_desc,
    state_desc

sys.dm_db_xtp_checkpoint_files 1

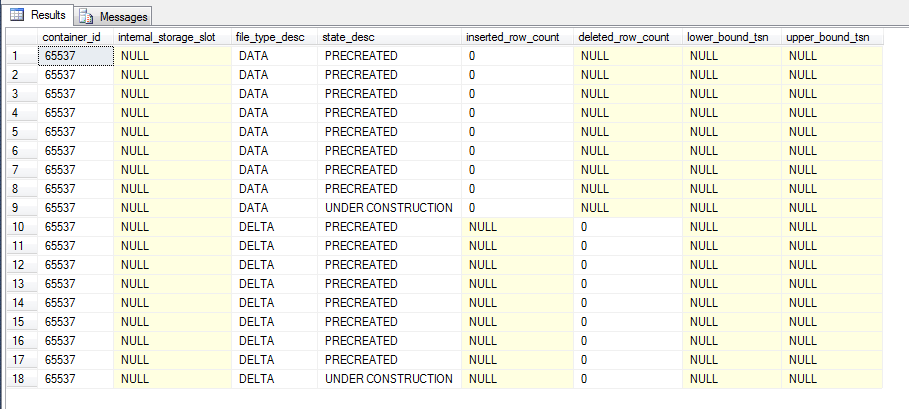
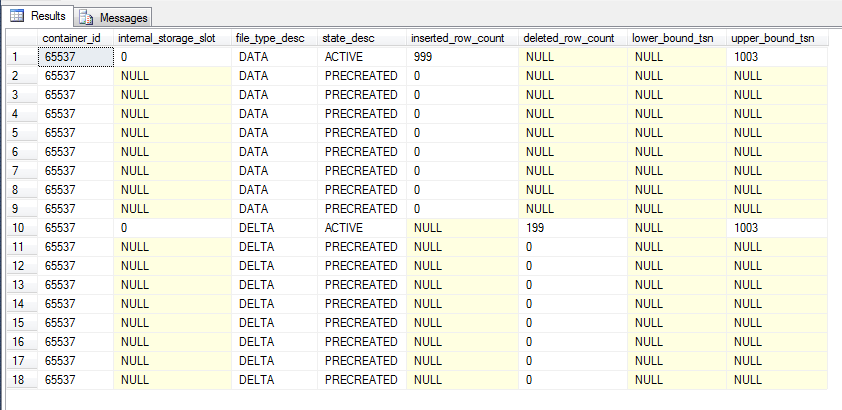
Here we can see the 9 file pairs, most of which are ready for use by being marked as PRECREATED and one pair currently ready to have records written to them by being marked as UNDER CONSTRUCTION.

We can also see the following:-

  • inserted_row_count – number of records inserted into the data file
  • deleted_row_count – number of records in the delta file marking records in the data file as deleted
  • lower_bound_tsn – earliest transaction covered by the file
  • upper_bound_tsn – latest transaction covered by the file

N.B. – For a full description of the columns contained in this DMV see here

So let’s insert and then delete some data:-

DECLARE @Counter INT = 1;

WHILE @Counter < 1000
BEGIN

INSERT INTO dbo.EmployeeTableInMemory
(EmployeeID, Department, FirstName, LastName, DateCreated)
VALUES
(@Counter, 'TEST', 'TestForename','TestSurname',CONVERT(DATE,GETDATE()))

SET @Counter = @Counter + 1;
END
GO

DELETE FROM dbo.EmployeeTableInMemory
WHERE EmployeeID < 200;
GO

Check the DMV:-

SELECT
    container_id,
    internal_storage_slot,
    file_type_desc,
    state_desc,
    inserted_row_count,
    deleted_row_count,
    lower_bound_tsn,
    upper_bound_tsn
FROM
    sys.dm_db_xtp_checkpoint_files
ORDER BY
    file_type_desc,
    state_desc

sys.dm_db_xtp_checkpoint_files 2

The continuous checkpoint process has written the data changes to the CFP marked as UNDER CONSTRUCTION. So what happens when a checkpoint occurs? Let’s run a manual checkpoint operation:-

CHECKPOINT

And then re-check the DMV:-

SELECT
    container_id,
    internal_storage_slot,
    file_type_desc,
    state_desc,
    inserted_row_count,
    deleted_row_count,
    lower_bound_tsn,
    upper_bound_tsn
FROM
    sys.dm_db_xtp_checkpoint_files
ORDER BY
    file_type_desc,
    state_desc

sys.dm_db_xtp_checkpoint_files 3

The previous files marked as “Under Construction” are now “Active”. This is the continuous checkpoint process in action, changes are written to the CFPs as they occur. When a CHECKPOINT command is issued (either by SQL or by the user manually) the current CFPs marked as UNDER CONSTRUCTION are then marked as ACTIVE. No more records will be written to the data file, although records can still be written to the delta (to mark records in the data file as deleted).

A new CFP will be created if more data is inserted into the table:-

DECLARE @Counter INT = 1000;
 
WHILE @Counter < 2000
BEGIN
 
INSERT INTO dbo.EmployeeTableInMemory
(EmployeeID, Department, FirstName, LastName, DateCreated)
VALUES
(@Counter, 'TEST', 'TestForename','TestSurname',CONVERT(DATE,GETDATE()))
 
SET @Counter = @Counter + 1;
END

And check the DMV again:-

SELECT
    container_id,
    internal_storage_slot,
    file_type_desc,
    state_desc,
    inserted_row_count,
    deleted_row_count,
    lower_bound_tsn,
    upper_bound_tsn
FROM
    sys.dm_db_xtp_checkpoint_files
ORDER BY
    file_type_desc,
    state_desc

sys.dm_db_xtp_checkpoint_files 4

There are now 20 records in the table, the two new records representing the data and delta files of the new CFP marked as UNDER CONSTRUCTION. As you may have guessed, adding more and more CFPs can affect recovery time so a background process runs to analyse the CFPs and merge old ones when necessary (i.e.- when the data in them is no longer required). But CFPs can be merged manually by running sys.sp_xtp_merge_checkpoint_files:-

EXEC sys.sp_xtp_merge_checkpoint_files 'InMemoryOLTPDemo',1003,1003;
GO

And check the DMV one more time:-

SELECT
    container_id,
    internal_storage_slot,
    file_type_desc,
    state_desc,
    inserted_row_count,
    deleted_row_count,
    lower_bound_tsn,
    upper_bound_tsn
FROM
    sys.dm_db_xtp_checkpoint_files
ORDER BY
    file_type_desc,
    state_desc

sys.dm_db_xtp_checkpoint_files 5

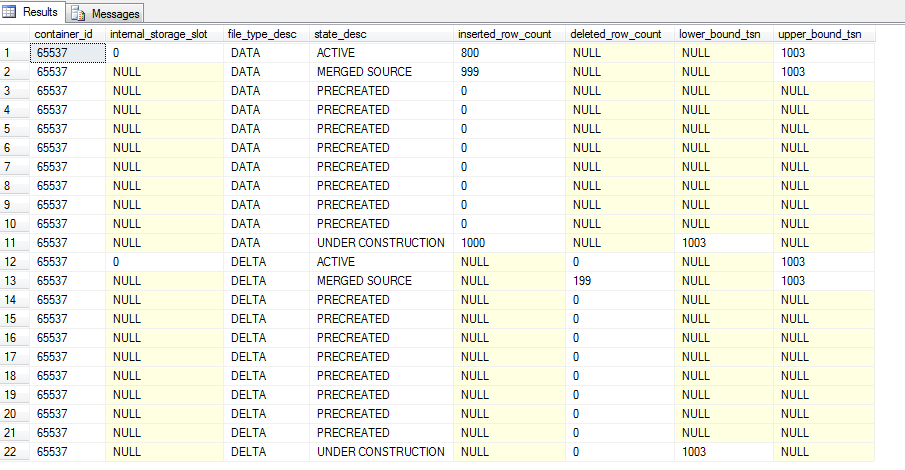
The active data file now has 800 records which is the original 999 minus the 199 from its corresponding delta file. The old CFP is now marked as MERGED SOURCE which means that a merge operation has been “installed”. This can be checked by running:-

SELECT request_state_desc, lower_bound_tsn, upper_bound_tsn
FROM sys.dm_db_xtp_merge_requests;
GO

sys.dm_db_xtp_merge_requests 1

This CFPs are no longer needed and can be removed by the background (or “garbage”) process, once:-

  • A checkpoint has occurred
  • A log backup has been taken
  • The garbage collection process has run

This can be done manually by running:-

--Take a full backup (as we don't currently have one)
BACKUP DATABASE [InMemoryOLTPDemo]
TO DISK = N'C:\SQLServer\Backups\InMemoryOLTPDemo.BAK';
GO

And then:-

--This section may need to be run twice
CHECKPOINT;
GO
BACKUP LOG [InMemoryOLTPDemo]
TO DISK = N'C:\SQLServer\Backups\InMemoryOLTPDemo.TRN';
GO
EXEC sp_xtp_checkpoint_force_garbage_collection;
GO
CHECKPOINT;
GO

The reason the second set of code has to be run twice is that SQL will mark the merged CFPs as REQUIRED FOR BACKUP/HA as this is the first log backup we’ve taken. Running it a second time will mark them as TOMBSTONE:-

sys.dm_db_xtp_checkpoint_files 6

These files can now be removed by the garbage collection process, which can be replicated by running:-

CHECKPOINT;
GO
BACKUP LOG [InMemoryOLTPDemo]
TO DISK = N'C:\SQLServer\Backups\InMemoryOLTPDemo.TRN';
GO
EXEC sp_filestream_force_garbage_collection;
GO

N.B.- You should never do this on a production system, the garbage process is automatic but hey, this is a demo.

Again, this code may have to be run more than once but (eventually) you’ll see:-
InMemory OLTP Garbage Collection Process
This means that two CFP files which were marked as TOMBSTONE have been removed.

Recovery

Just a final word on how the CFPs are used in the recovery process. If (when???) SQL crashes, the data and delta files are used to re-populate all memory optimised tables. The files are scanned and loaded into memory, all active rows in the data file are inserted after removal of rows in the delta file. Due to the pairing of the data & delta files the recovery process can be parallelised with multiple threads reading each pair. Once the load is complete the tail of the log is replayed to bring the database back to its state before the crash (as normal).

I hope that’s been a good overview of checkpoint file pairs for memory optimised tables. Thanks for reading!

Further Reading

Checkpoint Operation for Memory-Optimized Tables
Durability for Memory-Optimized Tables