0

Building a Docker image from a Github repository

To build a custom Docker image we create a docker file with instructions in it.

For example, a really simple custom SQL Server 2019 Docker image can be built with: –

FROM mcr.microsoft.com/mssql/server:2019-CU5-ubuntu-18.04

USER root

RUN mkdir /var/opt/sqlserver
RUN mkdir /var/opt/sqlserver/sqldata
RUN mkdir /var/opt/sqlserver/sqllog
RUN mkdir /var/opt/sqlserver/sqlbackups

RUN chown -R mssql /var/opt/sqlserver

USER mssql

CMD /opt/mssql/bin/sqlservr

We then build the image with: –

docker build -t <NEW IMAGE NAME> <PATH TO DOCKERFILE>

But if our dockerfile is hosted in a Github repository, we don’t need to manually pull the repo down and then run the build command.

We can reference the dockerfile in the repository directly in the build command with: –

docker build -t <NEW IMAGE NAME> <URL#BRANCH#PATH>

So for a docker file that’s in my dockerdeepdive repository, in the main branch, located at Demos/CustomImages/Image1/dockerfile: –

docker build -t testimage https://github.com/dbafromthecold/dockerdeepdive.git#main:Demos/CustomImages/Image1

N.B. – Ignore that error on line 2. It’s a known issue but the image has been successfully built.

Thanks for reading!

0

BUILTIN\Administrators in SQL Server on Linux

When I first started working with SQL on Linux one of the first things I did was to remove the default the [BUILTIN\Administrators] login. This is pretty much standard practice with SQL on Windows as we don’t want administrators on the server to have automatic sysadmin rights into the SQL instance.

But this login makes no sense on Linux as there is no administrators group, so it should be dropped…right?

However, there’s a catch. In the Frequently Asked Questions about SQL Server on Linux here: –

Dropping Builtin\administrators for SQL Server on Linux breaks execution of some of the system stored procedures. We suggest to not remove or drop the Builtin\administrator account from SQL Server on Linux/containers.

One of these stored procedures is sp_readerrorlog. Let’s see what happens.

I’m connected into my SQL on Linux instance in SSMS and am going to drop the login: –

DROP LOGIN [BUILTIN\Administrators];

And now try to read the error log: –

EXEC sp_readerrorlog;

And we get the following error: –
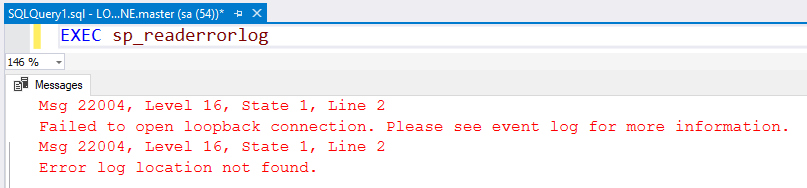
Argh! OK, let’s try to recreate: –

CREATE LOGIN [BUILTIN\Administrators] FROM WINDOWS;

And we get another error: –

That’s pretty much expected but, how can we fix this?

To get the login back, we need to rebuild the system databases. Not ideal I know!

So stop the SQL instance: –

sudo systemctl stop mssql-server

Rebuild the system databases: –

sudo -u mssql /opt/mssql/bin/sqlservr --force-setup

Control+C once the setup has completed and restart the SQL instance: –

sudo systemctl start mssql-server

However, if we now try connecting to the SQL instance: –
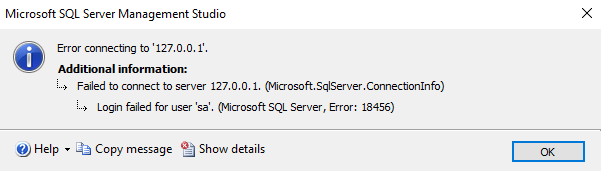
Bah, we need to set the SA password again! Stop the instance: –

sudo systemctl stop mssql-server

Set the SA password: –

sudo /opt/mssql/bin/mssql-conf set-sa-password
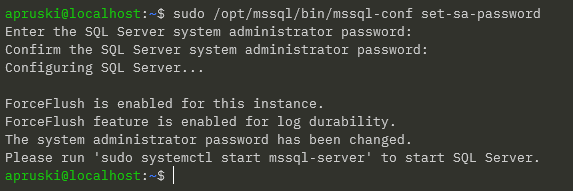
Btw, if you see an error saying that the SA password was unable to be set, try logging in anyway as sometimes the errors lie! 🙂


EDIT – 2023-12-18 – The false error message is documented here: –
https://learn.microsoft.com/en-us/sql/linux/sql-server-linux-release-notes-2022

Thanks Randolph!


Now start the SQL instance again: –

sudo systemctl start mssql-server

And now you should be able to log in and see that the [BUILTIN\Administrators] login is back: –
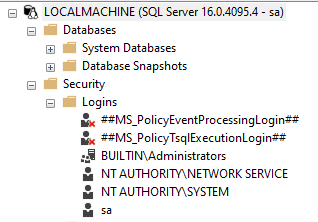
You will now also be able to run sp_readerrorlog. The sysadmin rights can be removed from that login and sp_readerrorlog will continue to run, so that’s at least one thing that can be restricted.

Something to watch out for when working with SQL on Linux.

Thanks for reading!

0

BUILTIN\Administrators in SQL Server on Linux

When I first started working with SQL on Linux one of the first things I did was to remove the default the [BUILTIN\Administrators] login. This is pretty much standard practice with SQL on Windows as we don’t want administrators on the server to have automatic sysadmin rights into the SQL instance.

But this login makes no sense on Linux as there is no administrators group, so it should be dropped…right?

However, there’s a catch. In the Frequently Asked Questions about SQL Server on Linux here: –

Dropping Builtin\administrators for SQL Server on Linux breaks execution of some of the system stored procedures. We suggest to not remove or drop the Builtin\administrator account from SQL Server on Linux/containers.

One of these stored procedures is sp_readerrorlog. Let’s see what happens.

I’m connected into my SQL on Linux instance in SSMS and am going to drop the login: –

DROP LOGIN [BUILTIN\Administrators];

And now try to read the error log: –

EXEC sp_readerrorlog;

And we get the following error: –

Argh! OK, let’s try to recreate: –

CREATE LOGIN [BUILTIN\Administrators] FROM WINDOWS;

And we get another error: –

That’s pretty much expected but, how can we fix this?

To get the login back, we need to rebuild the system databases. Not ideal I know!

So stop the SQL instance: –

sudo systemctl stop mssql-server

Rebuild the system databases: –

sudo -u mssql /opt/mssql/bin/sqlservr --force-setup

Control+C once the setup has completed and restart the SQL instance: –

sudo systemctl start mssql-server

However, if we now try connecting to the SQL instance: –

Bah, we need to set the SA password again! Stop the instance: –

sudo systemctl stop mssql-server

Set the SA password: –

sudo /opt/mssql/bin/mssql-conf set-sa-password

Btw, if you see an error saying that the SA password was unable to be set, try logging in anyway as sometimes the errors lie! 🙂


EDIT – 2023-12-18 – The false error message is documented here: –
https://learn.microsoft.com/en-us/sql/linux/sql-server-linux-release-notes-2022

Thanks Randolph!


Now start the SQL instance again: –

sudo systemctl start mssql-server

And now you should be able to log in and see that the [BUILTIN\Administrators] login is back: –

You will now also be able to run sp_readerrorlog. The sysadmin rights can be removed from that login and sp_readerrorlog will continue to run, so that’s at least one thing that can be restricted.

Something to watch out for when working with SQL on Linux.

Thanks for reading!

0

VMUG Ireland End of Year Event

This Thursday, November 30th, is the next VMUG Ireland event…our end of year social meetup!

We’re going to be down in BrewDog Dublin: –
THREE LOCKS SQUARE, 4, DUBLIN DOCKLANDS, DUBLIN 2, D02 E5R7 Dublin

This is a more informal event to round the year out. We’ll have two amazing speakers and then break out into groups to focus on specific tech areas, each hosted by an expert in the field (and yours truly! 🙂 )

The full agenda is: –

Time Session
14:00 – 14:30 Registration, Welcome Refreshments & Networking
14:30 – 15:15 VMware, Ed Hoppitt- VMware Explore 2023 – “Behind the Headlines”
15:15 – 16:00 Sponsor Session – Runecast
16:00 – 16:45 Round Table Breakout Groups
16:45 – 17:00 Raffle Results and Wrap Up
17:00 vBeers

Registration is completely free and available here: –
https://my.vmug.com/s/community-event?id=a1Y4x000003rmAOEAY

Hope to see you there!

0

Persisting data for SQL Server on Docker Swarm with Portworx

In my last couple of blog posts (here and here) I talked about how to get SQL Server running in Docker Swarm. But there is one big (and show-stopping) issue that I have not covered. How do we persist data for SQL Server in Docker Swarm?

Docker Swarm, like Kubernetes, has no native method to persist data across nodes…so we need another option and one of the options available to us is Portworx.

So how can we use Portworx to persist SQL Server databases in the event of a node failure in Docker Swarm?

There are three steps to get this working: –

  1. Install a key value store that can be accessed by Portworx on each cluster node
  2. Install and configure Portworx on each of the nodes
  3. Deploy a volume for SQL Server using the Portworx driver

Let’s run through each of those steps.


Installing etcd

Portworx needs a key value store to be installed and reachable from all the nodes in the Docker Swarm cluster.

So what we’re going to do is install ETCD on the manager node of the cluster and configure it so that all the other nodes in the cluster can talk to it.

First thing to do is download a sample config file and the etcd binaries: –

ETCD_VER=v3.4.27
DOWNLOAD_URL=https://github.com/etcd-io/etcd/releases/download

curl -L https://raw.githubusercontent.com/etcd-io/etcd/main/etcd.conf.yml.sample -o /tmp/etcd-download-test/etcd.conf.yml
curl -L ${DOWNLOAD_URL}/${ETCD_VER}/etcd-${ETCD_VER}-linux-amd64.tar.gz -o /tmp/etcd-${ETCD_VER}-linux-amd64.tar.gz
tar xzvf /tmp/etcd-${ETCD_VER}-linux-amd64.tar.gz -C /tmp/etcd-download-test --strip-components=1

Move files to a location in our PATH environment variable: –

sudo cp /tmp/etcd-download-test/etcd /tmp/etcd-download-test/etcdctl /tmp/etcd-download-test/etcd.conf.yml /usr/local/bin 

Confirm versions: –

etcd --version
etcdctl version

Create etcd user and group: –

sudo groupadd --system etcd
sudo useradd -s /sbin/nologin --system -g etcd etcd

Create etcd data and wal directories and configure permissions: –

sudo mkdir -p /var/lib/etcd/wal
sudo chown -R etcd:etcd /var/lib/etcd
sudo chmod -R 700 /var/lib/etcd

Update the sample configuration file: –

sudo vim /usr/local/bin/etcd.conf.yml

Here we are updating the following: –

  • line 4 – change name of etcd member to the server name
  • line 7 – add /var/lib/etcd as the data-dir
  • line 10 – add /var/lib/etcd/wal as the wal-dir
  • line 26/29/42/46 – change localhost to server IP address
  • line 62 – add initial-cluster: SERVERNAME=http://IPADDRESS:2380

The next thing to do is create a service to run etcd. So create a etcd.service file: –

echo "[Unit]
Description=etcd key-value store
Documentation=https://github.com/etcd-io/etcd
After=network.target

[Service]
User=etcd
Type=notify
ExecStart=/usr/local/bin/etcd --config-file=/usr/local/bin/etcd.conf.yml
Restart=always
RestartSec=10s
LimitNOFILE=40000

[Install]
WantedBy=multi-user.target" > etcd.service

And move it to the correct location: –

sudo mv etcd.service /etc/systemd/system

Reload systemd: –

sudo systemctl daemon-reload

Start etcd: –

sudo systemctl enable etcd
sudo systemctl start etcd

Confirm service: –

sudo systemctl status etcd

To check the endpoint and status of etcd: –

etcdctl --endpoints=10.0.0.40:2379 endpoint health
etcdctl --endpoints=10.0.0.40:2379 endpoint status

Great! That’s etcd up and running. Now we can install and configure Portworx.


Installing portworx

In order to get Portworx up and running, there are a couple of pre-requisities we need to consider: –

  • Swap is recommended to be disabled on each of the nodes
  • Each node should have a min of 4GB RAM
  • A block device available to be used as a storage pool for Portworx

Right, now we can install the Portworx binaries on our nodes To do this, we run a container with /opt/pwx and /etc/pwx mounted: –

REL="/3.0"  # Portworx v3.0 release

latest_stable=$(curl -fsSL "https://install.portworx.com$REL/?type=dock&stork=false&aut=false" | awk '/image: / {print $2}' | head -1)

sudo docker run --entrypoint /runc-entry-point.sh \
--rm -i --privileged=true \
-v /opt/pwx:/opt/pwx -v /etc/pwx:/etc/pwx \
$latest_stable

Once that’s complete we can finish the install with: –

sudo /opt/pwx/bin/px-runc install -k etcd://10.0.0.40:2379 -c AP-SWARM-01 -s /dev/sdb

Breaking this statement down: –

  • -k etcd://IPADDRESS:2379 – endpoint for our etcd cluster that we configured earlier
  • -c AP-SWARM-01 – name that we’re going to call our cluster in Portworx
  • -s /dev/sdb – block device on each node that will be used as a Portworx storage pool

When I created my hyper-v VMs I added a 20GB disk, /dev/sdb, that will be used as the storage pool.

You can see the available devices on a server by running: –

sudo lsblk

So on my server: –

OK. Once the above statement has completed on all nodes of our cluster, we need to restart the Portworx service: –

sudo systemctl restart portworx

Then confirm the service status: –

sudo systemctl status portworx

Then enable the service to start on server reboot: –

sudo systemctl enable portworx

And finally, confirm the status of Portworx itself: –

sudo /opt/pwx/bin/pxctl status

NOTE – Portworx will take around 5 minutes to come online.

Fantastic stuff! We have etcd and Portworx up and running. Now we can look at deploying SQL Server.


Deploying SQL Server

Ok phew…we’ve done all the hard work! Let’s have a look at deploying SQL Server using storage provisioned via Portworx in our Docker Swarm cluster.

So we need a volume to persist our data on: –

docker volume create -d pxd --name mssql_vol --opt repl=3 --opt fs=ext4 --opt sharedv4=true

Here we’re deploying a volume using the Portworx driver and using a replica count of 3 so that our volume is being replicated to each node in the cluster.

To confirm this, run: –

sudo /opt/pwx/bin/pxctl volume inspect mssql_vol

Here we can see the replica sets of the volume on each node and the node that the volume is currently attached to.

Now we can deploy SQL Server referencing that volume in the –mount flag: –

docker service create \
--name sqlswarm1 \
--replicas 1 \
--publish 15789:1433 \
--env ACCEPT_EULA=Y \
--env MSSQL_SA_PASSWORD=Testing1122 \
--mount type=volume,src=mssql_vol,dst=/var/opt/mssql,volume-driver=pxd \
mcr.microsoft.com/mssql/server:2022-CU4-ubuntu-20.04

We’re mounting the volume under /var/opt/mssql in the container, which is the default location for database data and log files.

So let’s create a database! I’m going to use the mssql-cli to do this but you can do this in SSMS using an IP address of a node in the cluster (I usually use the manager node’s IP address) and port 15789: –

mssql-cli -S 10.0.0.40,15789 -U sa -P Testing1122 -Q "CREATE DATABASE [testdatabase];"

Confirm the database: –

mssql-cli -S 10.0.0.40,15789 -U sa -P Testing1122 -Q "SELECT [name] FROM sys.databases;"

OK, now that we have a database in our SQL instance…let’s test failover! What we’re going to do is shut down the node that the container is running on and see what happens.

To find the node that the container is running on: –

docker service ps sqlswarm1

It’s running on AP-NODE-02, so let’s shut that node down!

Let’s see what happened to our SQL container: –

docker service ps sqlswarm1

It’s now running on AP-NODE-03! But has our database survived?

mssql-cli -S 10.0.0.40,15789 -U sa -P Testing1122 -Q "SELECT [name] FROM sys.databases;"

Yes! It’s there! We have persisted our database from one node to another in our Docker Swarm cluster!

Thanks for reading!