Deploying Azure Container Instances

In a previous post I went through how to Push an image to the Azure Container Registry

Now let’s look at using that image to create an Azure Container Image instance.

Azure Container Instances (ACI) are Microsoft’s serverless container technology. They allow us to spin up a container without having to manage the underlying infrastructure (VMs etc). Let’s run through spinning up an ACI now.

First off, I’ll be using the image I pushed up in my previous post. If you haven’t run through doing that, the link is here

OK, so let’s log in to Azure (using the Azure-CLI on Windows Subsystem for Linux): –

az login

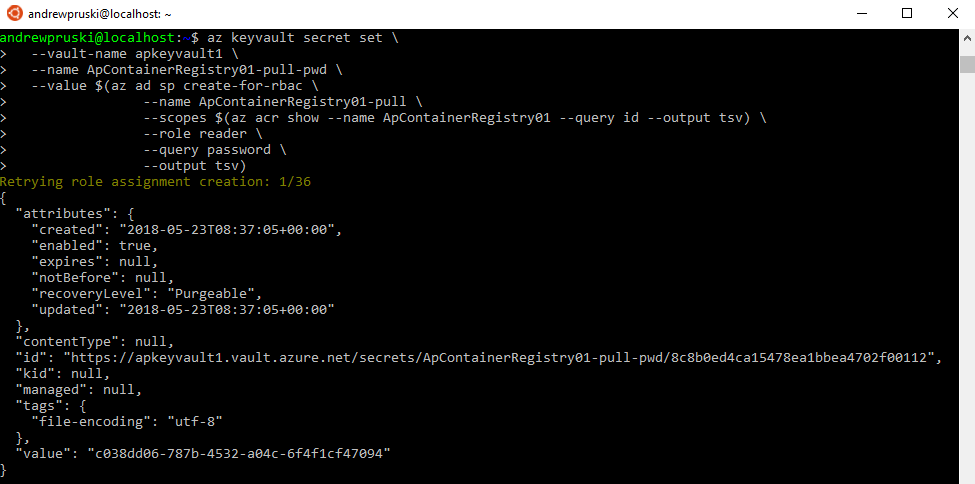
In order to store credentials that can be used to access our Azure Container Registry and pull the container image, we first need to create a key vault: –

az keyvault create --resource-group apcontainers1 --name apkeyvault1

Now that the vault is created, we create a service principal and store its credentials in the vault: –

az keyvault secret set \
  --vault-name apkeyvault1 \
  --name ApContainerRegistry01-pull-pwd \
  --value $(az ad sp create-for-rbac \
                --name ApContainerRegistry01-pull \
                --scopes $(az acr show --name ApContainerRegistry01 --query id --output tsv) \
                --role reader \
                --query password \
                --output tsv)

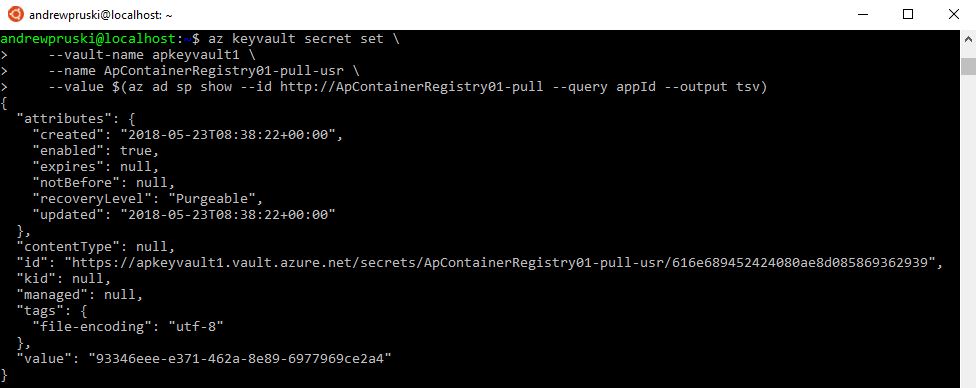
Then we grab the service principal’s appId which will be the username passed to the Azure Container Registry: –

az keyvault secret set \
    --vault-name apkeyvault1 \
    --name ApContainerRegistry01-pull-usr \
    --value $(az ad sp show --id http://ApContainerRegistry01-pull --query appId --output tsv)

Great stuff. Now let’s confirm the repositories in our Azure Container Registry: –

az acr repository list --name apcontainerregistry01 --output table

We have the image that was pushed up to the ACR in my last post, so let’s deploy that to an Azure Container Instance: –

az container create \
    --resource-group apcontainers1 \
    --image apcontainerregistry01.azurecr.io/sqlserverlinuxagent:latest \
    --registry-login-server apcontainerregistry01.azurecr.io \
    --registry-username $(az keyvault secret show --vault-name apkeyvault1 -n ApContainerRegistry01-pull-usr --query value -o tsv) \
    --registry-password $(az keyvault secret show --vault-name apkeyvault1 -n ApContainerRegistry01-pull-pwd --query value -o tsv) \
    --name testcontainer1 \
    --cpu 2 --memory 4 \
    --environment-variables ACCEPT_EULA=Y SA_PASSWORD=Testing1122 \
    --ip-address public \
    --ports 1433

The code should be fairly self explanatory. I’m using the username and password created earlier to access the ACR and am then spin up a container from the sqlserverlinuxagent:latest image. The container has 2 CPUs and 4GB of memory available to it and it will be listening on a public IP address on port 1433 (be very careful with this).

At the time of writing, the only option available for ip-address is public, hopefully further options will be available soon. I will update this blog if/when that happens.

OK, let’s grab the container details: –

az container show --name testcontainer1 --resource-group apcontainers1

Once the provisioning state is succeeded and there’s an IP address, we are good to go.

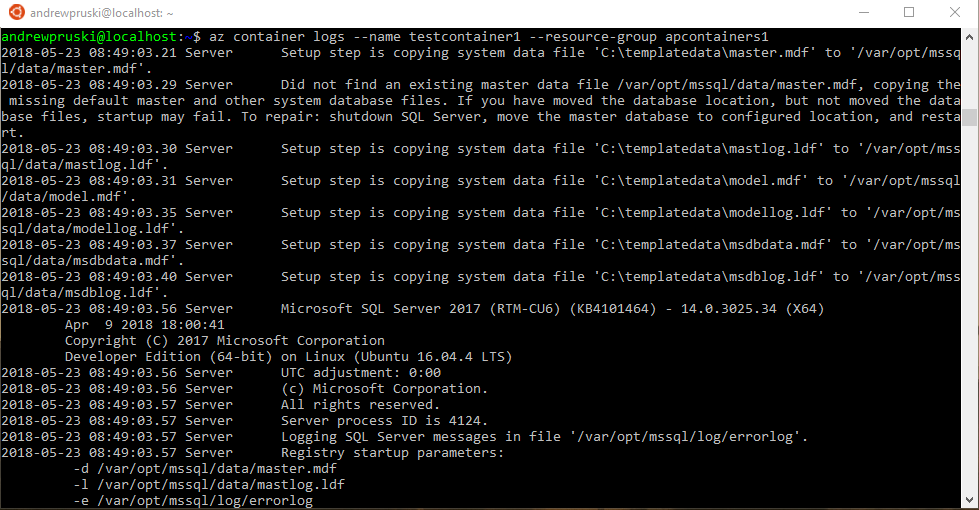
If you want to view the logs of the container: –

az container logs --name testcontainer1 --resource-group apcontainers1

And we can also remote into the container: –

az container exec --resource-group apcontainers1 --name testcontainer1 --exec-command bash

Finally, to clean-up (delete the container): –

az container delete --name testcontainer1 --resource-group apcontainers1

So, that’s how to deploy a custom container image from the Azure Container Registry to an Azure Container Instance.

Thanks for reading!

Pushing SQL Server images to the Azure Container Registry

The Azure Container Registry is an online repository for storing Docker images (think the Docker Hub).

What’s cool about this is that we can store our images in the same data centre as our deployments, so spinning up containers from the images should be pretty quick. Let’s run through setting up a Registry and pushing an image to it.

But first things first, a quick terminology reminder 🙂

Registry – this is a remote service that will store all our images
Repository – this is a collection of images

Cool, let’s run through setting up a Registry and pushing an image to it. I’ll be using the Azure-CLI and VS Code with the Azure-CLI plugin. However, I’ll be using a powershell terminal within VS Code. This is because I want to access Docker on my Windows 10 machine, so that I can push an image up to the ACR.

First thing to do is check that the azure-cli is installed: –

az --version

N.B. – You can install it from here if you don’t already have it

Then we need to log in to azure: –

az login

N.B. – You can specify a username and password with this command HOWEVER it doesn’t work for accounts with 2 factor authentication (I mean…really)

Anyway…now we can create a resource group for our registry: –

az group create --name apcontainers1 --location westus2

Then we can create the registry: –

az acr create --resource-group apcontainers1 --name ApContainerRegistry01 --sku Basic

I’m setting this up with the Basic SKU (as this is a demo). You can read more about the Registry SKU levels here

In order to be able to push to the registry, we need to log in: –

az acr login --name ApContainerRegistry01

And we also need to get the login server of the registry: –

az acr list --resource-group apcontainers1 --query "[].{acrLoginServer:loginServer}" --output table

N.B. – save the output of this command.

OK, now let’s look locally for an image that we want to push to our ACR: –

docker images

I’m going to push my custom dbafromthecold/sqlserverlinuxagent image. It’s a public image so if you want to use it, just run: –

docker pull dbafromthecold/sqlserverlinuxagent:latest

So similar to pushing to the Docker hub, we need to tag the image with the login server name that we retrieved a couple of commands ago and the name of the image: –

docker tag dbafromthecold/sqlserverlinuxagent apcontainerregistry01.azurecr.io/sqlserverlinuxagent:latest

We can see the new tag locally by running: –

docker images

Cool! Ok, so now we can push to the ACR: –

docker push apcontainerregistry01.azurecr.io/sqlserverlinuxagent:latest

And then confirm that the image is there: –

az acr repository list --name apcontainerregistry01 --output table

What this has done is create a repository called sqlserverlinuxagent with our image tagged underneath it. To see the image run: –

az acr repository show-tags --name apcontainerregistry01 --repository sqlserverlinuxagent

So we have a repository called sqlserverlinuxagent with one image tagged as latest underneath it.

Awesome, now that the image is there we can use it to deploy an Azure Container Instance. I’ll cover how to do that in my next post 🙂

To clean up, we delete the repository: –

az acr repository delete --name ApContainerRegistry01 --repository sqlserverlinuxagent

Oh, if you want to delete the registry…

az acr delete --name apcontainerregistry01

And a more nuclear option (which will delete the resource group): –

az group delete --name apcontainers1

Thanks for reading!

Loopback available for Windows Containers

The April 2018 update for Windows brought a few cool things but the best one (imho) is that now we can now connect to Windows containers locally using ‘localhost’ and the port specified upon container runtime.

Let’s have a look at how this works.

First, spin up a container:-

docker run -d -p 15789:1433 `
    --env ACCEPT_EULA=Y `
        --env SA_PASSWORD=Testing1122 `
            --name testcontainer `
                microsoft/mssql-server-windows-developer:latest

Previously, if we wanted to connect to the container locally, we would have had to grab its Private IP by running: –

docker inspect -f '{{range .NetworkSettings.Networks}}{{.IPAddress}}{{end}}' testcontainer

Not any more though! We can now use ‘localhost’ and the port number.

This update was available for a while in the Windows 10 insiders track but it’s now gone GA. Pretty cool as this functionality has been around for Linux containers since, well, forever. 🙂

Thanks for reading!

Changing the location of docker named volumes

A few weeks ago I was presenting at SQL Saturday Raleigh and was asked a question that I didn’t know the answer to.

The question was, “can you change the location of named volumes in docker?”

This is one of the things that I love about presenting, being asked questions that I don’t know the answer to. They give me something to go away and investigate (many thanks to Dave Walden (b|t) for his help!)

N.B. – I’ve previously written about persisting data using named volumes here

First let’s have a look at a named volume. To create one, run: –

docker volume create sqlserver

And now let’s have a look at it: –

docker volume inspect sqlserver

You can see above where the named volume lives on the host. But what if we want to change that location?


UPDATE – February 2022

This article originally only talked about using a docker volume plugin called Local Persist to change the location of a named volume.

However, you can do this without using a plugin by using the docker local driver and the bind option, which I’ll go through here.

I’ve left the details of how to use the plugin below as it does work to move a named volume but the plugin has not been updated for a while so using the local driver is the preferred way.


So let’s create a directory to point our named volume to: –

mkdir /sqlserver

And now create the named volume using the local driver and the bind option, setting the device to our custom location: –

docker volume create --driver local -o o=bind -o type=none -o device=/sqlserver sqlserver

Let’s have a look at it: –

docker volume inspect sqlserver

There we can see the device listed, /sqlserver, and the mount point, /var/lib/docker/volumes/sqlserver/_data.

What will happen when this named volume is used in a container is that /sqlserver will be mounted to /var/lib/docker/volumes/sqlserver/_data

And there you have it, a named volume in a custom location


Original post using the docker volume plugin – 2018

Well, in order to do so we need to use a docker volume plugin. Which unfortunately means that this functionality is not available on Windows or on Macs (as plugins aren’t supported on those platforms). The workaround is to run the plugin from a container but I would just mount a volume from the host (see here).

The plugin that I’m going to use is the Local Persist Plugin

Really simple to install: –

curl -fsSL https://raw.githubusercontent.com/CWSpear/local-persist/master/scripts/install.sh | sudo bash

And we are good to go!

Ok, let’s create a directory to point our named volume to: –

mkdir /sqlserver

And now we can create our named volume: –

docker volume create -d local-persist -o mountpoint=/sqlserver --name=sqlserver2

Let’s have a look at it: –

docker volume inspect sqlserver2

And there you have it, the named volume pointing to a custom location.

Thanks for reading!

Changing the port for SQL Server in Azure Kubernetes Services

I got asked this question last week and it’s a very good one. After all, running Sql Server in Azure Container Services (AKS) does mean exposing a port to the internet to allow connections.


EDIT – Azure Container Services (AKS) has been renamed to Azure Kubernetes Services. Blog title has been updated


So leaving SQL Server listening on the default port can be risky.

Now I know there’s a debate as to whether or not it is worth changing the port that SQL is listening on in order to secure it. My opinion is that it’ll prevent opportunistic attacks by port scanners but would not prevent a directed attack.

So, how do you do it when running SQL Server in Azure Container Services?

Well there’s a couple of options available.

The first one is to change the port that SQL is listening on in the container, open that port on the container, and direct to that port from the service.

The second one is to leave SQL Server listening on the default port and direct a non-default port to port 1433 from the service.

Let’s run through both.

N.B. – Even though I’ll set this up from scratch I’d recommend you read through my previous post on AKS here


In order to set this up, I’ll use the Azure-CLI via Bash for Windows.

First thing to do is install the Azure-CLI: –

echo "deb [arch=amd64] https://packages.microsoft.com/repos/azure-cli/ wheezy main" | \
     sudo tee /etc/apt/sources.list.d/azure-cli.list
      
      
sudo apt-key adv --keyserver packages.microsoft.com --recv-keys 52E16F86FEE04B979B07E28DB02C46DF417A0893
sudo apt-get install apt-transport-https
sudo apt-get update && sudo apt-get install azure-cli

And install Kubectl: –

az aks install-cli

Then login to Azure: –

az login

Enable AKS on your Azure subscription: –

az provider register -n Microsoft.ContainerService

Create a resource group: –

az group create --name ApContainerResGrp1 --location centralus

And now we can create the cluster: –

az aks create --resource-group ApContainerResGrp1 --name mySQLK8sCluster1 --node-count 2 --generate-ssh-keys

N.B. – This can take some time

Once that’s complete we need to get credentials to connect to the cluster: –

az aks get-credentials --resource-group ApContainerResGrp1 --name mySQLK8sCluster1

Now test the connection by viewing the nodes in the cluster: –

kubectl get nodes

If both nodes come back with a status of Ready, you’re good to go!

Ok, so now let’s create the yaml file to spin up the container and service: –

nano sqlserver.yml

And drop this code into the file: –

apiVersion: apps/v1beta1
kind: Deployment
metadata:
  name: sqlserver
  labels:
    app: sqlserver
spec:
  replicas: 1
  template:
    metadata:
      labels:
        name: sqlserver
    spec:
      containers:
      - name: sqlserver1
        image: microsoft/mssql-server-linux:latest
        ports:
        - containerPort: 4433
        env:
        - name: SA_PASSWORD
          value: "Testing1122"
        - name: ACCEPT_EULA
          value: "Y"
        - name: MSSQL_TCP_PORT
          value: "4433"
---
apiVersion: v1
kind: Service
metadata:
  name: sqlserver-service
spec:
  ports:
  - name: sqlserver
    port: 4433
    targetPort: 4433
  selector:
    name: sqlserver
  type: LoadBalancer

N.B. – Code is also available here

Note the following code in the deployment section: –

        ports:
        - containerPort: 4433
.
.
.
        - name: MSSQL_TCP_PORT
          value: "4433"

This will use an environment variable to change the port that SQL is listening on to 4433 and open that port on the container.

Also note the following code in the service section: –

  ports:
  - name: sqlserver
    port: 4433
    targetPort: 4433

This will open the port 4433 externally and direct any connections to 4433 on the container.

So let’s deploy!

kubectl create -f sqlserver.yml

You can check the deployment process by running: –

kubectl get pods
kubectl get service

Once the pod has a status of Running and the service has an external IP, we can use the external IP and the port to connect to SQL in SSMS: –

And confirm that Sql is listening on the specified port by checking the log: –

EXEC sp_readerrorlog

Cool! Sql is listening on a non-default port and we’ve connected to it!

Alright, let’s try the next option.

First thing is to remove the old deployment: –

kubectl delete service sqlserver-service
kubectl delete deployment sqlserver
rm sqlserver.yml

Now let’s create the new yaml file: –

nano sqlsever.yml

And drop the following into it: –

apiVersion: apps/v1beta1
kind: Deployment
metadata:
  name: sqlserver
  labels:
    app: sqlserver
spec:
  replicas: 1
  template:
    metadata:
      labels:
        name: sqlserver
    spec:
      containers:
      - name: sqlserver1
        image: microsoft/mssql-server-linux:latest
        ports:
        - containerPort: 1433
        env:
        - name: SA_PASSWORD
          value: "Testing1122"
        - name: ACCEPT_EULA
          value: "Y"
---
apiVersion: v1
kind: Service
metadata:
  name: sqlserver-service
spec:
  ports:
  - name: sqlserver
    port: 4433
    targetPort: 1433
  selector:
    name: sqlserver
  type: LoadBalancer

N/B. – The code is also available here

Note the following in the service section:-

  ports:
  - name: sqlserver
    port: 4433
    targetPort: 1433

This opens port 4433 on the service and directs it to port 1433 in the container.

Rebuild the deployment: –

kubectl create -f sqlserver.yml

And once that’s created, connect on the service’s external IP and port 4433.

Awesome stuff! SQL is listening on the default port but we’ve connected to the port opened on the service and it has routed it to port 1433 opened on the container.

But which method would I recommend?

How about both! 🙂

Let’s change the default port that SQL is listening on and open a different port in the service!

Again, remove the old deployment: –

kubectl delete service sqlserver-service
kubectl delete deployment sqlserver
rm sqlserver.yml

Recreate the yaml file: –

nano sqlsever.yml

And the drop the following into the file: –

apiVersion: apps/v1beta1
kind: Deployment
metadata:
  name: sqlserver
  labels:
    app: sqlserver
spec:
  replicas: 1
  template:
    metadata:
      labels:
        name: sqlserver
    spec:
      containers:
      - name: sqlserver1
        image: microsoft/mssql-server-linux:latest
        ports:
        - containerPort: 4433
        env:
        - name: SA_PASSWORD
          value: "Testing1122"
        - name: ACCEPT_EULA
          value: "Y"
        - name: MSSQL_TCP_PORT
          value: "4433"
---
apiVersion: v1
kind: Service
metadata:
  name: sqlserver-service
spec:
  ports:
  - name: sqlserver
    port: 15789
    targetPort: 4433
  selector:
    name: sqlserver
  type: LoadBalancer

N.B. – This code is also available here

What’s happening here is that SQL will be configured to listen on port 4433 but we’ll connect externally to the service to port 15789 which is mapped to 4433 on the container.

Now redeploy: –

kubectl create -f sqlserver.yml

Same as before, wait for the container to be created and the service to have an external IP assigned: –

kubectl get pods
kubectl get service

Then use the external IP and the port 15789 to connect in SSMS: –

How cool is that?! SQL is listening on a non-default port and we’ve used a completely different port to connect!

Finally, to tear everything down: –

az group delete --name ApContainerResGrp1

Thanks for reading!