0

Running a SQL Server container from scratch

I’ve been interested (obsessed?) with running SQL Server in containers for a while now, ever since I saw how quick and easy it was to spin one up. That interest has led me down some rabbit holes for the last few years as I’ve been digging into exactly how containers work.

The weirdest concept I had to get my head around was that containers aren’t actually a thing.

Containers are just processes running on a host that implement a set of Linux constructs in order to achieve isolation.

So if we know what constructs are used…shouldn’t we be able to build our own container from scratch?

Well as we’re about to see, yes we can! But before that…let’s briefly go over exactly how containers achieve isolation. There’s three main Linux constructs that are used: –

  1. Control Groups
  2. Namespaces
  3. Changing the root of the container

Ok, first one…control groups.

Control groups limit the amount of resources of the host that a container can use. So when we use the cpus or memory flags in a docker container run statement…what’s happening in the background is that control groups are created to enforce those limits.

Next one, namespaces.

If control groups control what a container can use, namespaces control what a container can see. There’s a few of them in practice but the ones I want to mention here are the obviously named Unix Timesharing Namespace and the Process ID (PID) Namespace.

The Unix Timesharing Namespace…sounds complicated but in practice all this does is allow the hostname the container sees to be different to the actual host the container is running on.

Run the following against a container: =

docker exec CONTAINERNAME hostname

You’ll see that the output is different (usually the container ID) that the actual name of the host the container is running on. This is due to the container having its own UTS namespace.

The Process ID namespace is implemented to restrict which processes the container can see.

Run this against a container: –

docker exec CONTAINERNAME ps aux

The output will only show the processes running in the container. This is due to the container having its own process ID namespace.

If you run the following on the host, you’ll see the SQL processes of the container: –

ps aux | grep mssql

So there’s the processes on the host! Different process IDs due to the container running in a process ID namespace but there they are!

Ok, final one…changing the root of the container.

Containers can’t see the whole host’s filesystem, they can only see a subset of that file system. That’s because the root of the container is changed upon start up to some location on the host…and the container can only see from that location down.

Anyway, by using control groups, namespaces, and changing the root of the container…processes are isolated on a host and boom! We have a “container”.

So, we know the constructs involved…let’s put this into practice and build our own container from scratch using Go.

Right…let’s go ahead and build a container from scratch….


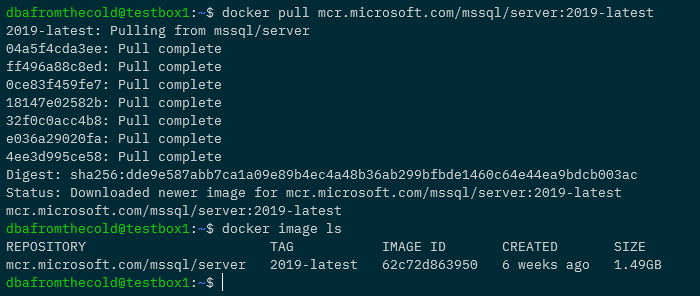
First thing we’re going to do is pull down the latest SQL Server 2019 container image. Yes I know I said we’d be building a container from scratch but bear with me 🙂

docker pull mcr.microsoft.com/mssql/server:2019-latest

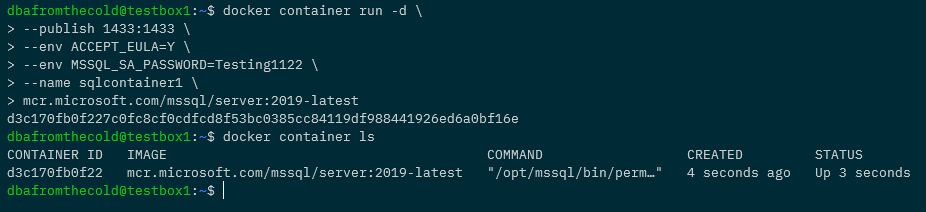
Now run a container: –

docker container run -d \
--publish 1433:1433 \
--env ACCEPT_EULA=Y \
--env MSSQL_SA_PASSWORD=Testing1122 \
--name sqlcontainer1 \
mcr.microsoft.com/mssql/server:2019-latest

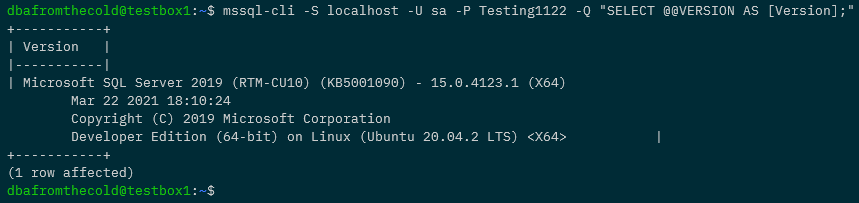
Confirm SQL is running within the container (mssql-cli can be installed using these instructions): –

mssql-cli -S localhost -U sa -P Testing1122 -Q "SELECT @@VERSION AS [Version];"

Stop the container: –

docker stop sqlcontainer1

Export the container: –

docker export sqlcontainer1 -o sqlcontainer.tar

Create a directory and extract the .tar file to it: –

mkdir sqlcontainer1
tar -xvf sqlcontainer1 -C ./sqlcontainer1

Then list the contents of the directory: –

ls ./sqlcontainer1

Cool! We have extracted the containers filesystem. So we can now use that as the root of our own container, built from scratch!

We’re going to be using Go to run our container from scratch so we’ll need to install it: –

sudo apt-get install golang-go

And now, here is the code to run our container: –

package main

import (
	"fmt"
	"io/ioutil"
	"os"
	"os/exec"
	"path/filepath"
	"strconv"
	"syscall"
)

// go run main.go run <cmd> <args>
func main() {
	switch os.Args[1] {
	case "run":
		run()
	case "child":
		child()
	default:
		panic("help")
	}
}

func run() {
	fmt.Printf("Running %v \n", os.Args[2:])

	cmd := exec.Command("/proc/self/exe", append([]string{"child"}, os.Args[2:]...)...)
	cmd.Stdin = os.Stdin
	cmd.Stdout = os.Stdout
	cmd.Stderr = os.Stderr
	cmd.SysProcAttr = &syscall.SysProcAttr{
		Cloneflags:   syscall.CLONE_NEWUTS | syscall.CLONE_NEWPID | syscall.CLONE_NEWNS,
		Unshareflags: syscall.CLONE_NEWNS,
	}

	must(cmd.Run())
}

func child() {
	fmt.Printf("Running %v \n", os.Args[2:])

	cg()

	cmd := exec.Command(os.Args[2], os.Args[3:]...)
	cmd.Stdin = os.Stdin
	cmd.Stdout = os.Stdout
	cmd.Stderr = os.Stderr

	must(syscall.Sethostname([]byte("sqlcontainer1")))
	must(syscall.Chroot("/home/dbafromthecold/sqlcontainer1"))
	must(os.Chdir("/"))
	must(syscall.Mount("proc", "proc", "proc", 0, ""))
	must(cmd.Run())

	must(syscall.Unmount("proc", 0))
}

func cg() {
	cgroups := "/sys/fs/cgroup/"
	memory := filepath.Join(cgroups, "memory")
	os.Mkdir(filepath.Join(memory, "sqlcontainer1"), 0755)
	must(ioutil.WriteFile(filepath.Join(memory, "sqlcontainer1/memory.limit_in_bytes"), []byte("2147483648"), 0700))

	cpu := filepath.Join(cgroups, "cpu,cpuacct")
	os.Mkdir(filepath.Join(cpu, "sqlcontainer1), 0755)
	must(ioutil.WriteFile(filepath.Join(cpu, "sqlcontainer1/cpu.cfs_quota_us"), []byte("200000"), 0700))

	// Removes the new cgroup in place after the container exits
	must(ioutil.WriteFile(filepath.Join(memory, "sqlcontainer1/notify_on_release"), []byte("1"), 0700))
	must(ioutil.WriteFile(filepath.Join(memory, "ssqlcontainer1/cgroup.procs"), []byte(strconv.Itoa(os.Getpid())), 0700))

	must(ioutil.WriteFile(filepath.Join(cpu, "sqlcontainer1/notify_on_release"), []byte("1"), 0700))
	must(ioutil.WriteFile(filepath.Join(cpu, "sqlcontainer1/cgroup.procs"), []byte(strconv.Itoa(os.Getpid())), 0700))
}

func must(err error) {
	if err != nil {
		panic(err)
	}
}

Now, this is Liz Rice’s Containers From Scratch code, with a couple of (minor) modifications to run SQL.

I’m not going to go through what all of it does, Liz Rice does a far better job of that in her Building Containers From Scratch session. Highly recommend you check out that session.

However I do want to point a couple of things out.

Firstly here: –

Cloneflags:   syscall.CLONE_NEWUTS | syscall.CLONE_NEWPID

This is where we’re creating a new unix timesharing namespace, so the hostname within the container will be different to the actual host the container is running on. And we’re also creating a new process id namespace, so that the container can only see its own processes.

Then we’re changing the hostname the container sees to sqlcontainer1: –

must(syscall.Sethostname([]byte("sqlcontainer1")))

Then changing the root of the container to the location that we extracted the Docker container’s filesystem to: –

must(syscall.Chroot("/home/dbafromthecold/sqlcontainer1"))

Finally, creating a couple of cgroups: –

must(ioutil.WriteFile(filepath.Join(memory, "sqlcontainer1/memory.limit_in_bytes"), []byte("2147483648"), 0700))
must(ioutil.WriteFile(filepath.Join(cpu, "sqlcontainer1/cpu.cfs_quota_us"), []byte("200000"), 0700))

Here we’re creating cgroups to limit the memory available to the container to 2GB, and limiting the number of CPUs to 2.

Right, let’s pull that code down into a directory: –

mkdir container
cd container
curl https://gist.githubusercontent.com/dbafromthecold/139e93907f7eab45a20944d0eaffeb3a/raw/d1d7b71197d70755bc055b9dd06744e50916d657/main.go -o main.go

Awesome stuff, we are ready to run our container!

Switching to the root user, we can run our container and open a shell into it by running: –

sudo su
go run main.go run /bin/bash

Hmm, ok…the terminal now looks different..are we in our container?

Let’s have a look at the hostname: –

hostname

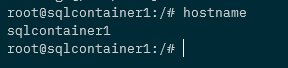
Ah ha! The hostname is set to sqlcontainer1! We are in our container!

OK, let’s spin up SQL Server within it! Firstly we need to create a special file that SQL requires to run :-

mknod -m 444 /dev/urandom c 1 9

Many thanks to Mark Wilkinson (b|t) who figured that one out!

Right, we are good to go! Let’s run SQL in the background: –

/opt/mssql/bin/sqlservr&> /dev/null &

Err, ok…has that worked? Let’s check the processes in the container: –

ps aux

Cool! We have a couple of SQL processes running! And because the container is in a process id namespace…it can only see its own processes.

If we check the processes on the host: –

ps aux | grep mssql

There they are on the host! With different process IDs because of the namespace.

OK, final thing to have a look at…the control groups. We created one for memory and CPU..so let’s have a look at them.

Running on the host (not in the container)…let’s get the memory limit: –

MEMORYLIMIT=$(cat /sys/fs/cgroup/memory/sqlcontainer1/memory.limit_in_bytes)
expr $MEMORYLIMIT / 1024 / 1024

There is the 2GB memory limit for the container being implemented by a control group!

Ok, let’s check the CPU limit: –

cat /sys/fs/cgroup/cpu,cpuacct/sqlcontainer1/cpu.cfs_quota_us

Cool! There’s the CPU limit that was set.

So by using that little piece of Go code, and some knowledge of how containers work in the background…we can spin up our own container built from scratch!

Ok, I admit…this isn’t exactly going to be as stable as running a container in Docker and there’s a few things still missing (port mapping anyone?) but I think it’s really cool to be able to do this. 🙂

Thanks for reading!

0

Converting a SQL Server Docker image to a WSL2 Distribution

Windows Subsystem for Linux is probably my favourite feature of Windows 10. It gives us the ability to run full blown linux distributions on our Windows 10 desktop. This allows us to utilise the cool features of linux (grep ftw) on Windows 10.

I’ve been playing around a bit with WSL2 and noticed that you can import TAR files into it to create your own custom distributions.

This means that we can export docker containers and run them as WSL distros!

So, let’s build a custom SQL Server 2019 docker image, run a container, and then import that container into WSL2…so that we have a custom distro running SQL Server 2019.

Note…this is kinda cool as WSL2 is not (currently) a supported platform to install SQL on Linux: –

Anyway, let’s run through the process.

Here’s the dockerfile for the custom SQL Docker image: –

FROM ubuntu:20.04

RUN apt-get update &amp;&amp; apt-get install -y wget software-properties-common apt-transport-https

RUN wget -qO- https://packages.microsoft.com/keys/microsoft.asc | apt-key add -

RUN add-apt-repository "$(wget -qO- https://packages.microsoft.com/config/ubuntu/20.04/mssql-server-2019.list)"

RUN apt-get update &amp;&amp; apt-get install -y mssql-server

CMD /opt/mssql/bin/sqlservr

Pretty standard, following the SQL on Linux install instructions here.

OK, let’s build the image: –

docker build -t sqlserver2019 .

Now run a container from the new custom image: –

docker container run -d `
--publish 1433:1433 `
--env ACCEPT_EULA=Y `
--env MSSQL_SA_PASSWORD=Testing1122 `
--name sqlcontainer1 `
sqlserver2019

Confirm that the container is running: –

docker container ls

OK, now we’re going to rename the instance in the container for no other reason that we want the instance name not to be the container ID when we run it as a WSL2 Distro: –

mssql-cli -S localhost -U sa -P Testing1122 -Q "SELECT @@SERVERNAME AS [InstanceName];"

mssql-cli -S localhost -U sa -P Testing1122 -Q "sp_dropserver [8622203f7381];"

mssql-cli -S localhost -U sa -P Testing1122 -Q "sp_addserver [sqlserver2019], local;"

Stop, then start the container and confirm the rename has been successful: –

docker stop sqlcontainer1

docker start sqlcontainer1

mssql-cli -S localhost -U sa -P Testing1122 -Q "SELECT @@SERVERNAME AS [InstanceName];"

Cool! Now, stop the container again: –

docker stop sqlcontainer1

Right, now we can export the container to a tar file: –

docker export sqlcontainer1 -o C:\temp\sqlcontainer1.tar

Once the export is complete we can then import it into WSL2: –

wsl --import sqlserver2019 C:\wsl-distros\sqlserver2019 C:\temp\sqlcontainer1.tar --version 2

Here’s what the code above is doing…

  • sqlserver2019 – the name of the new WSL distro
  • C:\wsl-distros\sqlserver2019 – The path where the new distro will be stored on disk
  • C:\temp\sqlcontainer1.tar – The location of the tar file we are importing
  • version 2 – WSL version of the new distro

Confirm that the new distro is in WSL2: –

wsl --list --verbose

Great stuff, the distro has been imported. Now we need to start it by running SQL. We’re going to use the setsid command to start up SQL here, as if we didn’t…the SQL log would write to our current session and we’d have to open up another powershell window: –

wsl -d sqlserver2019 bash -c "setsid /opt/mssql/bin/sqlservr"

Verify the distro is running: –

wsl --list --verbose

There’s our distro running! And we also execute ps aux against the distro to see if SQL is running: –

wsl -d sqlserver2019 ps aux

Cool! So now we can connect to SQL running in the distro with (using 127.0.0.1 instead of localhost): –

mssql-cli -S 127.0.0.1 -U sa -P Testing1122 -Q "SELECT @@SERVERNAME"

Excellent stuff! We have a new WSL2 distro running the latest version of SQL Server 2019!

So we can do our work and when we’re finished we can close down the distro with: –

wsl -t sqlserver2019

And if we want to get rid of the new distro completely: –

wsl --unregister sqlserver2019

Pretty cool! Ok, I admit…most people would prefer to run SQL in a container for this kind of stuff BUT it does give us another option…and having more options is always a good thing to have…right?

Right?

Thanks for reading!

0

Creating presentations with Reveal and Github pages

I really don’t like Powerpoint.

I’ll do pretty much anything to avoid writing a presentation in it. Thankfully for the last few years there’s been a service called GitPitch which allowed me to write presentations in markdown, push to Github, and it publishes the presentation at a custom URL.

I really liked this service as it made updating my presentations really easy and if anyone asked for my slides I could give them the URL.

Unfortunately, GitPitch is shutting down on March 1st so all my presentations will become unavailable after that date.

So I had to find an alternative and as there’s no way I was going to use Powerpoint, I was kinda stuck.

Thankfully, Mark Wilkinson (b|t) came to my rescue and told me about Reveal.

(He also gave me some (ok, a LOT) of pointers in how to get up and running, thank you Mark!)

Reveal combined with Github Pages pretty much gives me the same setup that I had with GitPitch so I was saved from Powerpoint!

Let’s run through how to create a presentation using both.

First, clone down the Reveal repo: –

git clone https://github.com/hakimel/reveal.js.git

Create a directory for the new presentation locally: –

mkdir demopresentation

Navigate to the new directory: –

cd demopresentation

Initialise the repo: –

git init

N.B. – you can confiure git to initialise a main branch instead of master by running: –

git config --global init.defaultBranch main

We need to populate the repo with something before we can do anything else. So create a test file: –

new-item test.txt

Commit test.txt to main branch: –

git add test.txt
git commit -m "added test.txt"

Now go to Github and create the repository that we’re going to push the local one to: –

Once the repo is created, Github will give instructions on how to link and push our local repository to it: –

So run: –

git remote add origin https://github.com/dbafromthecold/demopresentation.git
git branch -M main
git push -u origin main

And there’s the repo with our test file in it on Github: –

Now that the main branch has been initialised and the first commit executed we can create a gh-pages branch.

The gh-pages branch, when pushed to Github, will automatically create a URL that we can use to publish our presentation.

So let’s create the branch: –

git branch gh-pages

Switch to the gh-pages branch: –

git checkout gh-pages

Copy the required files into the gh-pages branch from the Reveal repo: –

copy-item ..\reveal.js\index.html
copy-item ..\reveal.js\css -recurse
copy-item ..\reveal.js\dist -recurse
copy-item ..\reveal.js\js -recurse
copy-item ..\reveal.js\plugin -recurse

Open the index.html file and replace: –

<div class="reveal">
    <div class="slides">
        <section>Slide 1</section>
        <section>Slide 2</section>
    </div>
</div>

With the following: –

<div class="reveal">
    <div class="slides">
        <section data-markdown="slides.md"
                 data-separator="^^\r?\n---\r?\n$"
                 data-separator-vertical="^\r?\n------\r?\n$"
                 data-separator-notes="^Note:"
                 data-charset="iso-8859-15"
                 data-transition="slide">
        </section>
    </div>
</div>

The index.html file should now look like this.

What this is doing is allowing us to use a slides.md file to create our presentation (data-markdown=”slides.md”). Check out this page for what the other lines are doing.

Now create the slides.md file (just going to have a title slide initially): –

echo '## Demo Presentation' > slides.md

Now run a commit on the gh-pages branch: –

git add .
git commit -m "created demo presentation"

And finally, add the remote location for the branch and push: –

git push --set-upstream origin gh-pages

And that’s it! Give it a few minutes and the presentation will be available at dbafromthecold.github.io/demopresentation

The URL can be checked in the settings of the repo: –

And there’s the presentation! To add more slides, simply update the slides.md file. For an example, check out my Docker Deep Dive slides.

DISCLAIMER! – that doesn’t contain the greatest markdown if I’m honest, but it works for what I want 🙂

Finally…what happens if you’re at a conference and the wifi is sketchy? No bother, if you have Python installed you can navigate to where your presentation is locally and run: –

python -m http.server 8080

And the presentation will be available at localhost:8080

Pretty cool eh?

Thanks for reading!

0

EightKB is coming!

The next EightKB is coming on January 27th, kicking off at 2pm UTC.

Once again we have 5 mind melting sessions on 5 in-depth SQL Server internals topics, from 5 top notch speakers.

Registration is free and you can sign up here: – https://eightkb.online/

Let’s have a closer look at the sessions 🙂


SQL Server Memory Internals & Troubleshooting – Amit Bansal @ 14:15

Welcome to the dungeon.

Yes, SQL Server memory concepts are like entering a dungeon where you are guaranteed to get lost. It’s dark and complex out there and not many have come back alive.

Join Microsoft Certified Master of SQL Server, Amit Bansal (b|t), and find your way out from the dungeon.

In this deep-dive session, you will understand SQL Server memory architecture, how the database engine consumes memory and how to track memory usage. Complex concepts will be made simple and you will see some light beyond the darkness.

This session will be an eye-opener for you. Assured.


The Ins and Outs of SQL Server Data – Bob Pusateri @ 15:45

While data compression is best-known for reducing a database’s size on disk, it’s also an effective tool for making your queries fly. Come see how reduced disk usage and increased performance mean that with compression, less really can be more!

Join Microsoft Data Platform MVP and MCM, Bob Pusateri (b|t), who will arm you with the knowledge and understanding to capitalize on both of these aspects of SQL Server’s row and page compression features, as well as columnstore and updateable columnstore indexes.

This session will combine a lesson on the internals of compression with real-world scenarios to show you how to determine the most appropriate compression type for any situation.

Since there’s no such thing as a “free lunch” in computing, the drawbacks of these features will also be discussed.


Intelligent Query Processing? What’s up with that? – Gail Shaw @ 17:00

One of the major changes in SQL Server 2017 and 2019 is addition of Intelligent Query Processing, which includes a number of improvements to the way queries are optimised and executed.

Join Microsoft Data Platform MVP and MCM, Gail Shaw (b|t), who will show why this is a radical departure from the way that things worked previously and how it can improve the performance of some query forms.

This session will look at the places where Intelligent Query Processing works and compare the performance of queries using these features to see just what kind of improvement it can make.


Latches, Spinlocks, and Lock Free Data Structures – Klaus Aschenbrenner @ 18:30

You know locking and blocking very well in SQL Server? You know how the isolation level influences locking? Perfect!

Join SQL Server expert and author, Klaus Aschenbrenner (b|t) in this session for a deep dive into how SQL Server implements physical locking with lightweight synchronization objects like Latches and Spinlocks. He will cover the differences between both, and their use-cases in SQL Server.

You will learn about best practices how to analyze and resolve Latch- and Spinlock contention for your performance critical workload.

This session will talk about lock free data structures, what they are, and how they are used by the new In-Memory OLTP technology that is part of SQL Server since 2014.


Scaling SQL Server beyond two CPU’s – Thomas Grohser @ 20:00

Join SQL Server Infrastructure Architect and Engineer, Thomas Grohser for this session on how to build and configure a large SQL Server (CPU, Memory, Storage, Network) and how to modify your data model to support the scaling.

The whole talk is based on real world examples with servers as large as 224 cores and over 2 PB of storage.


We are REALLY excited for this event, it’s going to be a blast 🙂

Hope to see you there!

0

Provisioning storage for Azure SQL Edge running on a Raspberry Pi Kubernetes cluster

In a previous post we went through how to setup a Kubernetes cluster on Raspberry Pis and then deploy Azure SQL Edge to it.

In this post I want to go through how to configure a NFS server so that we can use that to provision persistent volumes in the Kubernetes cluster.

Once again, doing this on a Raspberry Pi 4 with an external USB SSD. The kit I bought was: –

1 x Raspberry Pi 4 Model B – 2GB RAM
1 x SanDisk Ultra 16 GB microSDHC Memory Card
1 x SanDisk 128 GB Solid State Flash Drive

The initial set up steps are the same as the previous posts, but we’re going to run through them here (as I don’t just want to link back to the previous blog).

So let’s go ahead and run through setting up a Raspberry Pi NFS server and then deploying persistent volumes for Azure SQL Edge.


Flashing the OS

The first thing to do is flash the SD card using Rufus: –

Grab the Ubuntu 20.04 ARM image from the website and flash the SD card: –

Once that’s done, connect the Pi to an internet connection, plug in the USB drive, and then power the Pi on.


Setting a static IP

Once the Pi is powered on, find it’s IP address on the network. Nmap can be used for this: –

nmap -sP 192.168.1.0/24

Or use a Network Analyzer application on your phone (I find the output of nmap can be confusing at times).

Then we can ssh to the Pi: –

ssh pi@192.168.1.xx

And then change the password of the default ubuntu user (default password is ubuntu): –

Ok, now we can ssh back into the Pi and set a static IP address. Edit the file /etc/netplan/50-cloud-init.yaml to look something like this: –

eth0 is the network the Pi is on (confirm with ip a), 192.168.1.160 is the IP address I’m setting, 192.168.1.254 is the gateway on my network, and 192.168.1.5 is my dns server (my pi-hole).

There is a warning there about changes not persisting, but they do 🙂

Now that the file is configured, we need to run: –

sudo netplan apply

Once this is executed it will break the current shell, wait for the Pi to come back on the network on the new IP address and ssh back into it.


Creating a custom user

Let’s now create a custom user, with sudo access, and diable the default ubuntu user.

To create a new user: –

sudo adduser dbafromthecold

Add to the sudo group: –

sudo usermod -aG sudo dbafromthecold

Then log out of the Pi and log back in with the new user. Once in, disable the default ubuntu user: –

sudo usermod --expiredate 1 ubuntu

Cool! So we’re good to go to set up key based authentication into the Pi.


Setting up key based authentication

In the post about creating the cluster we already created an ssh key pair to use to log into the Pi but if we needed to create a new key we could just run: –

ssh-keygen

And follow the prompts to create a new key pair.

Now we can copy the public key to the Pi. Log out of the Pi and navigate to the location of the public key: –

ssh-copy-id -i ./raspberrypi_k8s.pub dbafromthecold@192.168.1.160

Once the key has been copied to the Pi, add an entry for the Pi into the ssh config file: –

Host pi-nfs-server
    HostName 192.168.1.160
    User dbafromthecold
    IdentityFile ~/raspberrypi_k8s

To make sure that’s all working, try logging into the Pi with: –

ssh dbafromthecold@pi-nfs-server

Installing and configuring the NFS server

Great! Ok, now we can configure the Pi. First thing, let’s rename it to pi-nfs-server and bounce: –

sudo hostnamectl set-hostname pi-nfs-server
sudo reboot

Once the Pi comes back up, log back in and install the nfs server itself: –

sudo apt-get install -y nfs-kernel-server

Now we need to find the USB drive on the Pi so that we can mount it: –

lsblk

And here you can see the USB drive as sda: –

Another way to find the disk is to run: –

sudo lshw -class disk

So we need to get some more information about /dev/sda it in order to mount it: –

sudo blkid /dev/sda

Here you can see the UUID of the drive and that it’s got a type of NTFS.

Now we’re going to create a folder to mount the drive (/mnt/sqledge): –

sudo mkdir /mnt/sqledge/

And then add a record for the mount into /etc/fstab using the UUID we got earlier for the drive: –

sudo vim /etc/fstab

And add (changing the UUID to the value retrieved earlier): –

UUID=242EC6792EC64390 /mnt/sqledge ntfs defaults 0 0

Then mount the drive to /mnt/sqledge: –

sudo mount -a

To confirm the disk is mounted: –

df -h

Great! We have our disk mounted. Now let’s create some subfolders for the SQL system, data, and log files: –

sudo mkdir /mnt/sqledge/{sqlsystem,sqldata,sqllog}

Ok, now we need to modify the export file so that the server knows which directories to share. Get your user and group ID using the id command: –

The edit the /etc/exports file: –

sudo vim /etc/exports

Add the following to the file: –

/mnt/sqledge *(rw,all_squash,insecure,async,no_subtree_check,anonuid=1001,anongid=1001)

N.B. – Update the final two numbers with the values from the id command. A full break down of what’s happening in this file is detailed here.

And then update: –

sudo exportfs -ra

Configuring the Kubernetes Nodes

Each node in the cluster needs to have the nfs tools installed: –

sudo apt-get install nfs-common

And each one will need a reference to the NFS server in its /etc/hosts file. Here’s what the hosts file on k8s-node-1 now looks like: –


Creating a persistent volume

Excellent stuff! Now we’re good to go to create three persistent volumes for our Azure SQL Edge pod: –

apiVersion: v1
kind: PersistentVolume
metadata:
  name: sqlsystem-pv
spec:
  capacity:
    storage: 1024Mi
  accessModes:
    - ReadWriteOnce
  nfs:
    server: pi-nfs-server
    path: "/mnt/sqledge/sqlsystem"
---
apiVersion: v1
kind: PersistentVolume
metadata:
  name: sqldata-pv
spec:
  capacity:
    storage: 1024Mi
  accessModes:
    - ReadWriteOnce
  nfs:
    server: pi-nfs-server
    path: "/mnt/sqledge/sqldata"
---
apiVersion: v1
kind: PersistentVolume
metadata:
  name: sqllog-pv
spec:
  capacity:
    storage: 1024Mi
  accessModes:
    - ReadWriteOnce
  nfs:
    server: pi-nfs-server
    path: "/mnt/sqledge/sqllog"

What this file will do is create three persistent volumes, 1GB in size (although that will kinda be ignored as we’re using NFS shares), in the ReadWriteOnce access mode, pointing at each of the folders we’ve created on the NFS server.

We can either create the file and deploy or run (do this locally with kubectl pointed at the Pi K8s cluster): –

kubectl apply -f https://gist.githubusercontent.com/dbafromthecold/da751e8c93a401524e4e59266812dc63/raw/d97c0a78887b6fcc41d0e48c46f05fe48981c530/azure-sql-edge-pv.yaml

To confirm: –

kubectl get pv

Now we can create three persistent volume claims for the persistent volumes: –

apiVersion: v1
kind: PersistentVolumeClaim
metadata:
  name: sqlsystem-pvc
spec:
  volumeName: sqlsystem-pv
  accessModes:
    - ReadWriteOnce
  resources:
    requests:
      storage: 1024Mi
---
apiVersion: v1
kind: PersistentVolumeClaim
metadata:
  name: sqldata-pvc
spec:
  volumeName: sqldata-pv
  accessModes:
    - ReadWriteOnce
  resources:
    requests:
      storage: 1024Mi
---
apiVersion: v1
kind: PersistentVolumeClaim
metadata:
  name: sqllog-pvc
spec:
  volumeName: sqllog-pv
  accessModes:
    - ReadWriteOnce
  resources:
    requests:
      storage: 1024Mi

Each one with the same AccessMode and size as the corresponding persistent volume.

Again, we can create the file and deploy or just run: –

kubectl apply -f https://gist.githubusercontent.com/dbafromthecold/0c8fcd74480bba8455672bb5f66a9d3c/raw/f3fdb63bdd039739ef7d7b6ab71196803bdfebb2/azure-sql-edge-pvc.yaml

And confirm with: –

kubectl get pvc

The PVCs should all have a status of Bound, meaning that they’ve found their corresponding PVs. We can confirm this with: –

kubectl get pv


Deploying Azure SQL Edge with persistent storage

Awesome stuff! Now we are good to go and deploy Azure SQL Edge to our Pi K8s cluster with persistent storage! Here’s the yaml file for Azure SQL Edge: –

apiVersion: apps/v1
kind: Deployment
metadata:
  name: sqledge-deployment
spec:
  replicas: 1
  selector:
    matchLabels:
      app: sqledge
  template:
    metadata:
      labels:
        app: sqledge
    spec:
      volumes:
        - name: sqlsystem
          persistentVolumeClaim:
            claimName: sqlsystem-pvc
        - name: sqldata
          persistentVolumeClaim:
            claimName: sqldata-pvc
        - name: sqllog
          persistentVolumeClaim:
            claimName: sqllog-pvc
      containers:
        - name: azuresqledge
          image: mcr.microsoft.com/azure-sql-edge:latest
          ports:
            - containerPort: 1433
          volumeMounts:
            - name: sqlsystem
              mountPath: /var/opt/mssql
            - name: sqldata
              mountPath: /var/opt/sqlserver/data
            - name: sqllog
              mountPath: /var/opt/sqlserver/log
          env:
            - name: MSSQL_PID
              value: "Developer"
            - name: ACCEPT_EULA
              value: "Y"
            - name: SA_PASSWORD
              value: "Testing1122"
            - name: MSSQL_AGENT_ENABLED
              value: "TRUE"
            - name: MSSQL_COLLATION
              value: "SQL_Latin1_General_CP1_CI_AS"
            - name: MSSQL_LCID
              value: "1033"
            - name: MSSQL_DATA_DIR
              value: "/var/opt/sqlserver/data"
            - name: MSSQL_LOG_DIR
              value: "/var/opt/sqlserver/log"
      terminationGracePeriodSeconds: 30
      securityContext:
        fsGroup: 10001

So we’re referencing our three persistent volume clams and mounting them as

  • sqlsystem-pvc – /var/opt/mssql
  • sqldata-pvc – /var/opt/sqlserver/data
  • sqllog-pvc – /var/opt/sqlserver/log

We’re also setting environment variables to set the default data and log paths to the paths mounted by persistent volume claims.

To deploy: –

kubectl apply -f https://gist.githubusercontent.com/dbafromthecold/92ddea343d525f6c680d9e3fff4906c9/raw/4d1c071e9c515266662361e7c01a27cc162d08b1/azure-sql-edge-persistent.yaml

To confirm: –

kubectl get all

All looks good! To dig in a little deeper: –

kubectl describe pods -l app=sqledge


Testing the persistent volumes

But let’s not take Kubernetes’ word for it! Let’s create a database and see it persistent across pods.

So expose the deployment: –

kubectl expose deployment sqledge-deployment --type=LoadBalancer --port=1433 --target-port=1433

Get the External IP of the service created (provided by MetalLb configured in the previous post): –

kubectl get services

And now create a database with the mssql-cli: –

mssql-cli -S 192.168.1.101 -U sa -P Testing1122 -Q "CREATE DATABASE [testdatabase];"

Confirm the database is there: –

mssql-cli -S 192.168.1.101 -U sa -P Testing1122 -Q "SELECT [name] FROM sys.databases;"

Confirm the database files: –

mssql-cli -S 192.168.1.101 -U sa -P Testing1122 -Q "USE [testdatabase]; EXEC sp_helpfile;"

We can even check on the NFS server itself: –

ls -al /mnt/sqledge/sqldata
ls -al /mnt/sqledge/sqllog

Ok, so the “real” test. Let’s delete the existing pod in the deployment and see if the new pod has the database: –

kubectl delete pod -l app=sqledge

Wait for the new pod to come up: –

kubectl get pods -o wide

And then see if our database is in the new pod: –

mssql-cli -S 192.168.1.101 -U sa -P Testing1122 -Q "SELECT [name] FROM sys.databases;"

And that’s it! We’ve successfully built a Pi NFS server to deploy persistent volumes to our Raspberry Pi Kubernetes cluster so that we can persist databases from one pod to another! Phew!

Thanks for reading!