The Burrito Bot: AI-Powered Search in SQL Server 2025

A while back I posted about a couple of side projects that I’ve been working on when I get the chance. One of those was the Burrito Bot…a bot to make burrito recommendations in Ireland 🙂

Over the last 18 months or so I’ve reworked this project to utilise the new vector search functionality in SQL Server 2025…so now it looks like this: –

Pretty cool, eh?

So this is really a way for me to learn the new features in SQL Server 2025…but there’s a whole bunch of aspects to this, from data collection to creating the web app, so what I’m going to do is break this down into sections here and then post follow up blogs which will be a deep dive into each of those sections.

But here we will go through the whole process, so let’s build a bot that’ll provide burrito recommendations in Ireland using semantic similarity searching in SQL Server 2025…all the code detailed here is available in a Github repository: –
https://github.com/dbafromthecold/burrito-bot


Semantic Similarity Search

When I built the first iteration of this bot, I pulled a load of information down from Yelp! that had things like:

Name
Address
Rating
Number of Reviews

However…I realised that I was being a bit daft! SQL has been able to perform searches over this type of data for YEARS! So why bother with the new features in SQL 2025?

Ok, but how about the statement in the gif above? Or something like this?

Find me a restaurant with a cozy atmosphere

What if we could capture the meaning behind that statement and search say, restaurant reviews to see if any of that data has a similar meaning?

That’s exactly what the new features in SQL Server 2025 allow us to do, perform something called semantic similarity searching over our data. Semantic similarity searching is defined as…

Semantic similarity search finds results with similar meaning, even when the exact words differ, by comparing vector embeddings generated from data

So that’s what I ended up doing…using restaurant review data for the Burrito Bot!


Infrastructure

Ok so what do we need to do this? Well, an instance of SQL Server 2025 (obviously)…but we also need an embedding model…to send our data to generate our embeddings.

I could have built all this locally, and if you want to do that my colleagues Anthony Nocentino and Andy Yun have blogs on how to do just that. But I decided to go and build everything in Azure…as that gives me access to the Azure Foundry which has a number of models that I can use.

So, we need an instance of SQL 2025…which I installed on a VM…didn’t go with Managed Instance or SQL Database, and I deployed a model called text-embedding-3-small to send my data to.


Gathering the data

As I mentioned earlier, I started off with Yelp! data. Initially just had restaurant metadata but then decided to include that in my database but actually perform searches over review data. Unfortunately by the time I’d decided this, my free trial had run out with Yelp…so I went looking elsewhere.

Now there’s a bunch of free APIs that I can hit to pull the required data but let’s be honest here…most people use Google Maps to search for restaurants (well anything) so I went there.

To do this, I created an account in Google Cloud and enabled the Places API.

This gave me an endpoint that I can hit to pull data down about specific restaurant types in specific locations. From the code below, you’ll see that I went with 6 cities around Ireland…used their Latitude and Longitude, and searched a 20km radius.

Oh I did this one city at a time, so I can troubleshoot but also so that I’m not firing off a tonne of APIs calls at once. I’m being overly paranoid here but this isn’t free and my personal credit card is tied into my Google account and I’ve heard enough stories about people getting massive bills, so yeah being really cautious.

I also recommend that if you do this yourself, you place tight quotas on the API that you’re calling 🙂

So here’s the code…

$ApiKey  = "XXXXXXXXXXXXXXXXXXXXXXXXXXXXXXXXXXXXXXX"
$Keyword = "mexican"
$BaseUrl = "https://maps.googleapis.com/maps/api/place/nearbysearch/json"
$Radius  = 20000

$Cities = @(
    @{ Name="Dublin";   Lat=53.3498; Lng=-6.2603 },
    @{ Name="Cork";     Lat=51.8985; Lng=-8.4756 },
    @{ Name="Limerick"; Lat=52.6638; Lng=-8.6267 },
    @{ Name="Galway";   Lat=53.2707; Lng=-9.0568 },
    @{ Name="Belfast";  Lat=54.5973; Lng=-5.9301 },
    @{ Name="Waterford"; Lat=52.2593; Lng=-7.1101 }
)

$CityName = "Dublin"
$City = $Cities | Where-Object { $_.Name -eq $CityName }
$Latitude = $City.Lat
$Longitude = $City.Lng

$Results   = @()
$NextPageToken = $null
$Page          = 1

do {
    if ($NextPageToken) {
        Start-Sleep -Seconds 2
        $Url = "$BaseUrl" + "?pagetoken=$NextPageToken&key=$ApiKey"
    }
    else {
        $Url = "$BaseUrl" + "?location=$Latitude,$Longitude" +
               "&radius=$Radius" +
               "&type=restaurant" +
               "&keyword=$Keyword" +
               "&key=$ApiKey"
    }

    Write-Host "Calling page $Page"
    $Response = Invoke-RestMethod -Method GET -Uri $Url

    if ($Response.status -ne "OK") {
        Write-Error "Google API returned status: $($Response.status)"
        break
    }

    $Results += $Response.results
    $NextPageToken = $Response.next_page_token
    $Page++

} while ($NextPageToken)

$AllResults = @()
foreach ($Place in $Results) {
        $AllResults += [PSCustomObject]@{
            place_id           = $Place.place_id
            name               = $Place.name
            rating             = $Place.rating
            review_count       = $Place.user_ratings_total
            price_level        = $Place.price_level
            address            = $Place.vicinity
            phone_number       = $Place.international_phone_number
            latitude           = $Place.geometry.location.lat
            longitude          = $Place.geometry.location.lng
            business_status    = $Place.business_status
        }
    }

$AllResults | Export-Csv -Path "C:\temp\mexican_restaurants_$CityName.csv" -NoTypeInformation -Encoding UTF8

What’s happening here is that google will only provide 20 results per page so we’re batching through the retrieved data, 20 at a time…then writing down to a CSV file.

But this API only gives us metadata, things like number of ratings and reviews. Which is fine if we were doing searches like: –

Find me a restaurant with a 5 star rating and over 1000 reviews

But that’s not what we’re after here. So let’s use another API, the Places (New) API, which’ll allow us to grab review data: –

$CityName = "Dublin"
$ApiKey = "XXXXXXXXXXXXXXXXXXXXXXXXXXXXXXXXXXXXXXXXX"
$restaurants = Import-Csv "C:\temp\restaurants\mexican_restaurants_placeids_$CityName.csv"

$PlaceIDs= $restaurants.place_id
$Results   = @()
foreach($PlaceId in $PlaceIDs){

$DetailsUrl = "https://places.googleapis.com/v1/places/$PlaceId"
    $Headers = @{
        "X-Goog-Api-Key"    = $ApiKey
        "X-Goog-FieldMask"  = "id,displayName,rating,userRatingCount,formattedAddress,location,reviews"
    }

    $Response = Invoke-RestMethod -Method GET -Uri $DetailsUrl -Headers $Headers
    $Results += $Response
}

$ReviewRows = foreach ($p in $Results) {
    if (-not $p.reviews) { continue }

    foreach ($r in $p.reviews) {
        [PSCustomObject]@{
            place_id            = $p.id
            place_name          = $p.displayName.text
            formatted_address   = $p.formattedAddress
            latitude            = $p.location.latitude
            longitude           = $p.location.longitude
            place_rating        = $p.rating
            place_review_count  = $p.userRatingCount

            review_name         = $r.name
            review_rating       = $r.rating
            review_published_utc= $r.publishTime
            review_relative_time= $r.relativePublishTimeDescription
            review_text         = $r.text.text
            review_original_text= $r.originalText.text
            review_maps_uri     = $r.googleMapsUri
        }
    }
}

$ReviewRows | Export-Csv "C:\temp\restaurants\mexican_restaurant_reviews_$CityName.csv" -NoTypeInformation -Encoding UTF8

This pulls the place_id from the CSV generated from the data via the previous API call and gets the review data for that restaurant. This’ll give a maximum of 5 reviews per restaurant, which is fine for our search.

Now we have the raw data…let’s go ahead and build the database.


Database Design

Here’s the statement to create the database: –

CREATE DATABASE [burrito-bot-db]
 ON PRIMARY 
( NAME = N'burrito-bot-db', FILENAME = N'F:\SQLData1\burrito-bot-db.mdf', SIZE = 1048576KB , MAXSIZE = UNLIMITED, FILEGROWTH = 524288KB ), 
 FILEGROUP [ARCHIVE] 
( NAME = N'burrito-bot-db-archive', FILENAME = N'F:\SQLData1\burrito-bot-db-archive.ndf', SIZE = 1048576KB , MAXSIZE = UNLIMITED, FILEGROWTH = 524288KB ), 
 FILEGROUP [DATA] 
( NAME = N'burrito-bot-db-data', FILENAME = N'F:\SQLData1\burrito-bot-db-data.ndf', SIZE = 1048576KB , MAXSIZE = UNLIMITED, FILEGROWTH = 524288KB ), 
 FILEGROUP [EMBEDDINGS] 
( NAME = N'burrito-bot-db-embeddings', FILENAME = N'F:\SQLData1\burrito-bot-db-embeddings.ndf', SIZE = 1048576KB , MAXSIZE = UNLIMITED, FILEGROWTH = 524288KB ), 
 FILEGROUP [RAW_DATA] 
( NAME = N'burrito-bot-db-raw-data', FILENAME = N'F:\SQLData1\burrito-bot-db-raw-data.ndf', SIZE = 1048576KB , MAXSIZE = UNLIMITED, FILEGROWTH = 524288KB )
 LOG ON 
( NAME = N'burrito-bot-db_log',	FILENAME = N'G:\SQLTLog1\burrito-bot-db_log.ldf', SIZE = 131072KB  , MAXSIZE = UNLIMITED, FILEGROWTH = 524288KB );
GO

Not doing anything too mad here, have a data filegroup to hold my tables, a raw_data filegroup to host the data that will be imported from the CSVs, and an embeddings filegroup as I want to keep the embeddings separate from my main data (there’s a reason for this that I will talk about later on). And I always throw in an archive filegroup so I can chuck stuff in there that I think I may no longer need but may want to come back to.

Now let’s create some tables to hold the data. I’m splitting out the restaurant metadata, reviews, and embeddings: –

CREATE TABLE [data].[restaurants](
	[id]            [INT] IDENTITY(1,1) CONSTRAINT [pk_restaurants] PRIMARY KEY CLUSTERED NOT NULL,
	[place_id]      [NVARCHAR](255) NOT NULL,
	[name]          [NVARCHAR](50) NOT NULL,
	[city]          [NVARCHAR](50) NOT NULL,
	[rating]        [FLOAT] NOT NULL,
	[review_count]  [SMALLINT] NOT NULL,
	[address]       [NVARCHAR](100) NOT NULL,
	[phone]         [NVARCHAR](50) NULL,
	[url]           [NVARCHAR](200) NOT NULL,
) ON [DATA];
GO

CREATE TABLE [data].[reviews](
	review_id            [INT] IDENTITY(1,1) CONSTRAINT [pk_reviews] PRIMARY KEY CLUSTERED NOT NULL,
	restaurant_id        [INT] NOT NULL,
	place_id             [NVARCHAR](50) NOT NULL,
	review_name          [NVARCHAR](150) NOT NULL,
	review_rating        [TINYINT] NOT NULL,
	review_published_utc [NVARCHAR](50) NOT NULL,
	review_text          [NVARCHAR](MAX) NOT NULL COLLATE Latin1_General_100_CI_AS_SC_UTF8
) ON [DATA];
GO

CREATE TABLE [embeddings].[restaurant_review_embeddings](
	[id]            [INT] IDENTITY(1,1) CONSTRAINT [pk_embeddings] PRIMARY KEY CLUSTERED NOT NULL,
	[restaurant_id] [INT] NOT NULL,
	[embeddings]    [VECTOR](1536, FLOAT32) NULL,
) ON [EMBEDDINGS];
GO

Couple of things to note here is the VECTOR data type for the [embeddings] column in the [embeddings].[restaurant_review_embeddings] table and the collation of the review_text column.

I went with FLOAT32, which is the default base type, which supports up to 1998 dimensions. The number of dimensions is determined by the model that we are generating the embeddings from and the text-embedding-3-small model that is being used here returns embeddings with 1536 dimensions. Now this can be overridden but let’s keep things simple.

SQL also supports the FLOAT16 type for vector columns…so if storage is a concern or if the model that you are using returns more than 1998 dimensions…that is an option. But here, keeping things simple, we’ll stay with the default.

For the collation…I used Latin1_General_100_CI_AS_SC_UTF8 because the review data has emojis in it and that collation supports them 🙂

OK, so we also need tables to import the raw data from the CSVs to. I went with one table per city, could have just been one table, but wanted to separate them out. Here’s the structure of one: –

CREATE TABLE [raw_data].[mexican_restaurant_reviews_Belfast](
	[place_id]              [nvarchar](50) NOT NULL,
	[place_name]            [nvarchar](50) NOT NULL,
	[formatted_address]     [nvarchar](100) NOT NULL,
	[latitude]              [float] NOT NULL,
	[longitude]             [float] NOT NULL,
	[place_rating]          [float] NOT NULL,
	[place_review_count]    [smallint] NOT NULL,
	[review_name]           [nvarchar](150) NOT NULL,
	[review_rating]         [tinyint] NOT NULL,
	[review_published_utc]  [nvarchar](50) NOT NULL,
	[review_relative_time]  [nvarchar](50) NOT NULL,
	[review_text]           [nvarchar](max) COLLATE Latin1_General_100_CI_AS_SC_UTF8 NOT NULL,
	[review_original_text]  [nvarchar](max) COLLATE Latin1_General_100_CI_AS_SC_UTF8 NOT NULL,
	[review_maps_uri]       [nvarchar](200) NOT NULL
) ON [RAW_DATA]
GO

Again, with the changed collation to support the emojis.


Importing the data

First thing to do is to import the CSV files into each of the raw data tables: –

BULK INSERT [raw_data].[mexican_restaurant_reviews_Belfast]
FROM 'C:\git\burrito-bot\Data\Raw Data\reviews\mexican_restaurant_reviews_Belfast.csv'
WITH (
    FORMAT = 'CSV',
    FIRSTROW = 2,
    CODEPAGE = '65001'
	);
GO

CODEPAGE = ‘65001’ being used here as it’ll tell SQL to interpret the file as UTF-8 encoded text, allowing emojis.

Then once the data is in the raw tables, it can be reviewed, cleansed, and then imported into the main data tables: –

INSERT INTO [data].[restaurants]
           ([place_id],
            [name]
           ,[city]
           ,[rating]
           ,[review_count]
           ,[address]
           ,[phone]
           ,[url])
SELECT DISTINCT
        place_id
        ,place_name 
        ,'Belfast'
        ,place_rating
        ,place_review_count
        ,formatted_address
        ,NULL
        ,'https://www.google.com/maps/place/?q=place_id:' + [place_id]
FROM [raw_data].[mexican_restaurant_reviews_Belfast];
GO

INSERT INTO [data].[reviews]
           ([restaurant_id]
           ,[place_id]
           ,[review_name]
           ,[review_rating]
           ,[review_published_UTC]
           ,[review_text])
SELECT 
           r.id
           ,d.place_id
           ,d.review_name
           ,d.review_rating
           ,d.review_published_UTC
           ,d.review_text
FROM [raw_data].[mexican_restaurant_reviews_Belfast] AS d
INNER JOIN [data].[restaurants] r ON d.place_id = r.place_id
WHERE r.City = 'Belfast'
GO

Not gonna lie here, I totally didn’t check the data and 100% just imported it into the main data tables…but it gives me the option to do so in the future (which I totally will do, honest, at some point).

The URL column in the restuarants table will allow for the user to click on it and be taken to the restaurant’s entry in google maps (handy, eh?).

Now that we have the data in the main table, we can go ahead and create our embeddings!


Creating an external model

We need to create a reference to the embedding model so that we can create our embeddings. To do this, we create a master key in the database, a credential to hold the API Key to authenticate to the model, and then use the CREATE EXTERNAL MODEL statement with the model details: –

CREATE MASTER KEY ENCRYPTION BY PASSWORD = 'Th1s1s@Str0ngP@assw0rd!';  
GO

CREATE DATABASE SCOPED CREDENTIAL [https://burrito-bot-ai.openai.azure.com]
WITH IDENTITY = 'HTTPEndpointHeaders', SECRET = N'{"api-key":"XXXXXXXXXXXXXXXXXXXXXXXXXXXXXXXXXXXXXXXXXXXXXXXXXXXXXXXXXXXXX"}'
GO

CREATE EXTERNAL MODEL [text-embedding-3-small]
WITH (
    LOCATION = 'https://burrito-bot-ai.openai.azure.com/openai/deployments/text-embedding-3-small/embeddings?api-version=2023-05-15',
    API_FORMAT = 'Azure OpenAI',
    MODEL_TYPE = EMBEDDINGS,
    MODEL = 'text-embedding-3-small',
    CREDENTIAL = [https://burrito-bot-ai.openai.azure.com]
);
GO

I pulled the info for the model out of Azure Foundry…but now we have the reference to the model…we can go and create the embeddings!


Generating embeddings

What we’re doing here is using a new function, AI_GENERATE_EMBEDDINGS, to send our data over to the model which will return embeddings representing the meaning of that data: –

INSERT INTO [embeddings].[restaurant_review_embeddings] (restaurant_id, embeddings)
SELECT
    rv.restaurant_id,
    AI_GENERATE_EMBEDDINGS(
        CONCAT(
            d.name, ' is a Mexican restaurant in ', d.city, '. ',
            'Customer reviews say:', CHAR(13) + CHAR(10),
            STRING_AGG(
                ' - ' + REPLACE(rv.review_text, CHAR(13) + CHAR(10), ' '),
                CHAR(13) + CHAR(10)
            ) WITHIN GROUP (ORDER BY rv.review_published_utc)
        )
        USE MODEL [text-embedding-3-small]
    )
FROM [data].[reviews] rv
INNER JOIN [data].[restaurants] d ON rv.restaurant_id = d.id
GROUP BY rv.restaurant_id, d.name, d.city;

Here we’re building up a single piece of text per restaurant by combining some basic context (name and city) with the review data. What I’m trying to do here is get the embeddings to represent the overall “feel” of a restaurant rather than individual reviews.

We could also include things like the overall rating or number of reviews, but for now we’ll keep it focused on the review text.

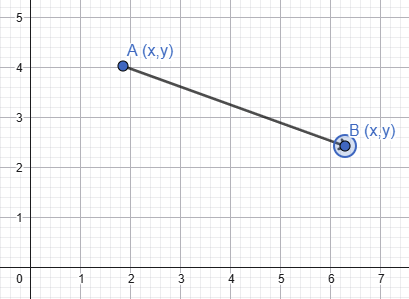
This will return one embedding per restaurant, with 1536 dimensions…each dimension corresponding to an axis in high dimensional space with embeddings that contain similar meaning grouped together. When we come to comparing embeddings in the sections below, we can use different metrics to work out how close embeddings are to each other in that high dimensional space and therefore determine how similar they are in meaning.

This is something that I want to 100% dive further in on (as well as a load of other stuff) as I find this incredibly interesting but let’s move on to actually searching our data.


Performing a search

Phew, still with me? We’ve done all the ground work so now we can start performing semantic similarity searches over our data.

The first search type that we’re going to do is called Exact Nearest Neighbour search…or k-NN search (k is the number of results returned). We do this with a new function called VECTOR_DISTANCE: –

DECLARE @search_text   NVARCHAR(MAX) = 'Find me a restaurant with a good atmosphere';
DECLARE @search_vector VECTOR(1536)  = AI_GENERATE_EMBEDDINGS(@search_text USE MODEL [text-embedding-3-small]);

SELECT TOP(1)
	r.[id], 
	r.[name], 
	r.[city], 
	r.[rating], 
	r.[review_count], 
	r.[address], 
	r.[phone], 
	r.[url],
	VECTOR_DISTANCE('cosine', @search_vector, e.embeddings) AS distance
FROM [data].[restaurants] r
INNER JOIN [embeddings].[restaurant_review_embeddings] e ON r.id = e.restaurant_id
ORDER BY distance;
GO

What’s happening here is that we take a search statement, generate an embedding from it using our model, and then compare it to the rest of the embeddings in the table.

VECTOR_DISTANCE then calculates a distance metric between our search vector and the other vectors in the table…which we then order by that distance metric

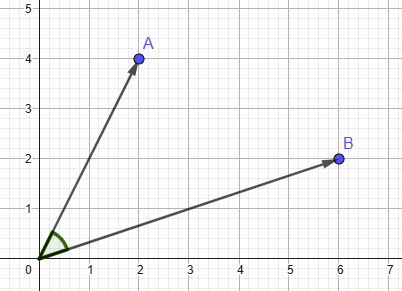
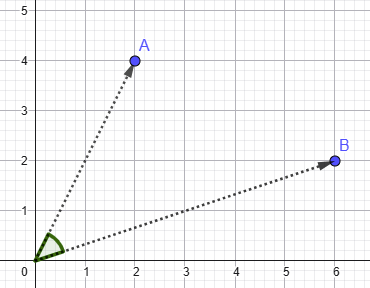
We have three different metrics available to us. Breaking them down (and this is very high level) we have: –

Euclidean – How far apart are these vectors in space?
Dot Product – How aligned are they, factoring in magnitude?
Cosine – How aligned are they, ignoring magnitude?

Generally the metric recommended is cosine as that removes the magnitude of the vector as a factor…so that we’re just focused on the meaning captured, which is exactly what we want for our bot. Now this is a REAL rabbit hole to go down, and I will get a deep dive into this as soon as possible…but for now, we’ll go with cosine.

So that’s searching our data! Cool, eh? If you’re following along, check the reviews of the restaurants returned…why did those specific restaurants come back in the search? What phrases in the review would result in the review meaning being similar to the meaning of our search query?

However, there’s a downside here…VECTOR_DISTANCE performs a search over the entire table…every row…which means table scans!

And table scans are bad 🙂

Ok not so much here as we’re working with a small data set, but if we had a very large data set…we couldn’t be scanning all the data for every search.

There has to be another way.


Vector Indexes and approximate search

So we don’t want to be scanning all our data each time we search…in traditional SQL Server operations we prevent this by creating indexes, and it’s exactly the same here! We have a new type of index, the vector index, that we can create to help us speed up our searches.

As of the time of this post, vector indexes are still a preview feature…so let’s switch on preview features in the database: –

ALTER DATABASE SCOPED CONFIGURATION SET PREVIEW_FEATURES = ON
GO

And now create our index…and it does look like a normal index create statement: –

CREATE VECTOR INDEX vec_idx ON [embeddings].[restaurant_review_embeddings]([embeddings])
WITH (
    METRIC  = 'cosine', -- euclidean and dot also supported
    TYPE    = 'diskann',-- only diskann supported
    MAXDOP  = 8         -- set the parallelism of the create index operation - currently ignored!
);
GO

We’re creating an index, using a distance metric, specifying an algorithm called DiskANN to create the index with, and then setting a MAXDOP value with which to create the index.

Now this helps us out because it’s the basis for Approximate Nearest Neighbour search. The creation of the index means we use it during searches and avoid comparing our search query against every row in the table. So no more table scans! However what we gain in speed we lose a little in accuracy…not much, about 95-99% accuracy compared to k-NN search but hey, we’re not dealing with financial data here…95% accuracy is fine.

So now we can perform an ANN search using the VECTOR_SEARCH function: –

DECLARE @question       NVARCHAR(MAX) = 'Find me a restaurant with a good atmosphere';
DECLARE @search_vector  VECTOR(1536)  = AI_GENERATE_EMBEDDINGS(@question USE MODEL [text-embedding-3-small]);

SELECT
    r.[id]              AS [restaurant_id],
    r.[name]            AS [Name], 
    r.[city]            AS [City], 
    ROUND(r.[rating],1) AS [Rating], 
    r.[review_count]    AS [Review Count], 
    r.[address]         AS [Address], 
    r.[phone]           AS [Phone Number], 
    r.[url]             AS [URL],
    vs.distance
FROM VECTOR_SEARCH(
    TABLE      = [embeddings].[restaurant_review_embeddings] AS e,
    COLUMN     = [embeddings],
    SIMILAR_TO = @search_vector,
    METRIC     = 'cosine',
    TOP_N      = 5
) AS vs
INNER JOIN [data].[restaurants] r ON r.id = e.restaurant_id
ORDER BY vs.distance;
GO

Very similar to VECTOR_DISTANCE, using the index to work out the embeddings with the closest meaning and return the results. Again, if you’re following along…have a look at the restaurants returned…are they different than the results from the k-NN search? What is in the review data that would make them be returned in this search?


The Web Application

OK, we are pretty much done! All the functionality is there to perform semantic similarity searching over restaurant review data. All we need is a front end, which is a web application built in Azure with python. I’m not going to post the whole script here (this post is long enough and I want it to focus on the SQL Server functionality) but it’s available in the azure-web-app branch of the Burrito-Bot github repository.

All it is really doing is running a stored procedure in the database…so let’s create that stored procedure: –

CREATE OR ALTER PROCEDURE [dbo].[search_restaurants]
    @question     NVARCHAR(MAX),
    @num_results  INT = 5
AS
BEGIN
    SET NOCOUNT ON;

    DECLARE @search_vector VECTOR(1536) =
        AI_GENERATE_EMBEDDINGS(@question USE MODEL [text-embedding-3-small]);

    SELECT
        r.[name] AS [Name], 
        r.[city] AS [City], 
        ROUND(r.[rating],1) AS [Rating], 
        r.[review_count] AS [Review Count], 
        r.[address] AS [Address], 
        r.[phone] AS [Phone Number], 
        r.[url] AS [URL],
        --vs.distance,
        combined_reviews.reviews AS [combined_reviews]
    FROM VECTOR_SEARCH(
        TABLE      = [embeddings].[restaurant_review_embeddings] AS e,
        COLUMN     = [embeddings],
        SIMILAR_TO = @search_vector,
        METRIC     = 'cosine',
        TOP_N      = @num_results
    ) AS vs
    INNER JOIN [data].[restaurants] r ON r.id = e.restaurant_id
    INNER JOIN (SELECT
                    rv.restaurant_id as restaurant_id,
                    CONCAT(
                        d.name COLLATE Latin1_General_100_CI_AS_SC_UTF8,
                        N' is a Mexican restaurant in ',
                        d.city COLLATE Latin1_General_100_CI_AS_SC_UTF8,
                        N'. Customer reviews say:', CHAR(13) + CHAR(10),
                        STRING_AGG(
                            ' - ' + REPLACE(rv.review_text, CHAR(13) + CHAR(10), ' '),
                            CHAR(13) + CHAR(10)
                        ) WITHIN GROUP (ORDER BY rv.review_published_utc)
                    ) as reviews
                FROM [data].[reviews] rv
                INNER JOIN [data].[restaurants] d ON rv.restaurant_id = d.id
                GROUP BY rv.restaurant_id, d.name, d.city) as combined_reviews ON r.id = combined_reviews.restaurant_id
    ORDER BY vs.distance;
END
GO

This is using the VECTOR_SEARCH function but also retrieving the review data in the result set. Why? So that it can be passed to another model (gpt-4.1-mini in this case) in the Azure Foundry to generate a custom response (this is the Generation part of a RAG application).

But that’s it…we have a Burrito-Bot!


Summary

So that’s how to perform semantic similarity searching in SQL Server 2025 using the new VECTOR capabilities! We built the database from the ground up, collected the data, generated embeddings, and then performed searches over those embeddings.

This is a really interesting topic that I must admit, I’ve gone down a rabbit hole with…I’ll be posting deep dives to each of the sections over the next while…when I get a chance but I hope this has been a good overview.

Thanks for reading!

Startup scripts in SQL Server containers

I was messing around performing investigative work on a pod running SQL Server 2025 in Kubernetes the other day and noticed something…the sqlservr process is no longer PID 1 in its container.

Instead there is: –

Hmm, ok we have a script /opt/mssql/bin/launch_sqlservr.sh and then the sqlservr binary is called.

I swear this wasn’t always the case, have I seen that before? Started to doubt myself so spun up a pod running an older version of SQL (2019 CU5) and took a look: –

Ahh ok, there has been a change. Now those two processes there are expected, one is essentially a watcher process and the other is sql server (full details here: –
https://techcommunity.microsoft.com/blog/sqlserver/sql-server-on-linux-why-do-i-have-two-sql-server-processes/3204412)

I went and had a look at a 2022 image and that script is there as well…so there has been a change at some point to execute that script first in the container (not sure when and I’m not going back to check all the different images 🙂 )

Right, but what is that script doing?

Now this is a bit of a rabbit hole but from what I can work out, that script calls three other scripts: –

/opt/mssql/bin/permissions_check.sh
Checks the location and ownership of the master database.

/opt/mssql/bin/init_custom_setup.sh
Determines whether one-time SQL Server initialization should run on first startup.

/opt/mssql/bin/run_custom_setup.sh
If initialisation is enabled, wait for SQL Server to be ready, then use environment variables and the setup-scripts directory to perform a custom setup.

Oooooh, OK…custom setup available? Let’s have a look at that.

Essentially it comes down to whether or not SQL is spinning up for the first time (so we haven’t persisted data from one container to another) and if certain environment variables are set…these are: –

MSSQL_DB – used to create a database
MSSQL_USER – login/user for that database
MSSQL_PASSWORD – password for that login
MSSQL_SETUP_SCRIPTS_LOCATION – location for custom scripts

Nice…so let’s have a go at using those!

Here’s a SQL Server 2025 Kubernetes manifest using the first three: –

apiVersion: apps/v1
kind: StatefulSet
metadata:
  name: mssql-statefulset-test
spec:
  serviceName: "mssql"
  replicas: 1
  podManagementPolicy: Parallel
  selector:
    matchLabels:
      name: mssql-pod
  template:
    metadata:
      labels:
        name: mssql-pod
    spec:
      securityContext:
        fsGroup: 10001
      containers:
        - name: mssql-container-test
          image: mcr.microsoft.com/mssql/server:2025-RTM-ubuntu-22.04
          ports:
            - containerPort: 1433
              name: mssql-port
          env:
            - name: ACCEPT_EULA
              value: "Y"
            - name: MSSQL_SA_PASSWORD
              value: "Testing1122"
            - name: MSSQL_DB
              value: "testdatabase"
            - name: MSSQL_USER
              value: "testuser"
            - name: MSSQL_PASSWORD
              value: "Testing112233"

Then if we look at the logs for SQL in that pod (I’ve stripped out the normal startup messages): –

Creating database testdatabase
2026-01-23 10:56:38.48 spid51      [DBMgr::FindFreeDatabaseID] Next available DbId EX locked: 5
2026-01-23 10:56:38.56 spid51      Starting up database 'testdatabase'.
2026-01-23 10:56:38.59 spid51      Parallel redo is started for database 'testdatabase' with worker pool size [2].
2026-01-23 10:56:38.60 spid51      Parallel redo is shutdown for database 'testdatabase' with worker pool size [2].
Creating login testuser with password defined in MSSQL_PASSWORD environment variable
Changed database context to 'testdatabase'.

There it is creating the database! Cool!

But what about the last environment variable, the custom scripts location?

From the startup scripts, this has a default value of /mssql-server-setup-scripts.d so let’s drop a script in there and see what happens.

To do this I created a simple T-SQL script to create a test database: –

CREATE DATABASE testdatabase2;

And then created a configmap in Kubernetes referencing that script: –

kubectl create configmap mssql-setup-scripts --from-file=./create-database.sql

Now we can reference that in our SQL manifest: –

apiVersion: apps/v1
kind: StatefulSet
metadata:
  name: mssql-statefulset-test
spec:
  serviceName: "mssql"
  replicas: 1
  podManagementPolicy: Parallel
  selector:
    matchLabels:
      name: mssql-pod
  template:
    metadata:
      labels:
        name: mssql-pod
    spec:
      securityContext:
        fsGroup: 10001
      containers:
        - name: mssql-container-test
          image: mcr.microsoft.com/mssql/server:2025-RTM-ubuntu-22.04
          ports:
            - containerPort: 1433
              name: mssql-port
          env:
            - name: ACCEPT_EULA
              value: "Y"
            - name: MSSQL_SA_PASSWORD
              value: "Testing1122"
          volumeMounts:
            - name: setup-scripts
              mountPath: /mssql-server-setup-scripts.d
              readOnly: true
      volumes:
        - name: setup-scripts
          configMap:
            name: mssql-setup-scripts

And now we have these entries in the SQL startup log: –

Executing custom setup script /mssql-server-setup-scripts.d/create-database.sql
2026-01-23 11:08:52.08 spid60      Starting up database 'testdatabase2'.

Ha, and there’s our script being executed and the database created!

I had a look around and couldn’t see this documented anywhere (it may be somewhere though) but hey, another way of customising SQL Server in a container.

Although in reality I’d probably be using a custom image for SQL Server but this was fun to dive into 🙂

Thanks for reading!

Running SQL Server on KubeVirt – Getting Started

With all the changes that have happened with VMware since the Broadcom acquisition I have been asked more and more about alternatives for running SQL Server.

One of the options that has repeatedly cropped up is KubeVirt

KubeVirt provides the ability to run virtual machines in Kubernetes…so essentially could provide an option to “lift and shift” VMs from VMware to a Kubernetes cluster.

A bit of background on KubeVirt…it’s a CNCF project accepted in 2019 and moved to “incubating” maturity level in 2022…so it’s been around a while now. KubeVirt uses custom resources and controllers in order to create, deploy, and manage VMs in Kubernetes by using libvirt and QEMU under the hood to provision those virtual machines.

I have to admit, I’m skeptical about this…we already have a way to deploy SQL Server to Kubernetes, and I don’t really see the benefits of deploying an entire VM.

But let’s run through how to get up and running with SQL Server in KubeVirt. There are a bunch of pre-requisites required here so I’ll detail the setup that I’m using.

I went with a physical server for this, as I didn’t want to deal with any nested virtualisation issues (VMs within VMs) and I could only get ONE box…so I’m running a “compressed” Kubernetes cluster, aka the node is both a control and worker node. I also needed a storage provider, and as I work for Pure Storage…I have access to a FlashArray which I’ll provision persistent volumes from via Portworx (the PX-CSI offering to be exact). Portworx provides a CSI driver that exposes FlashArray storage to Kubernetes for PersistentVolume provisioning.

So it’s not an ideal setup…I’ll admit…but should be good enough to get up and running to see what KubeVirt is all about.

Let’s go ahead and get started with KubeVirt.

First thing to do is actually deploy KubeVirt to the cluster…I followed the guide here: –
https://kubevirt.io/user-guide/cluster_admin/installation/

export RELEASE=$(curl https://storage.googleapis.com/kubevirt-prow/release/kubevirt/kubevirt/stable.txt) # set the latest KubeVirt release
kubectl apply -f https://github.com/kubevirt/kubevirt/releases/download/${RELEASE}/kubevirt-operator.yaml # deploy the KubeVirt operator
kubectl apply -f https://github.com/kubevirt/kubevirt/releases/download/${RELEASE}/kubevirt-cr.yaml # create the KubeVirt CR (instance deployment request) which triggers the actual installation

Let’s wait until all the components are up and running: –

kubectl -n kubevirt wait kv kubevirt --for condition=Available

Here’s what each of these components does: –

virt-api        - The API endpoint used by Kubernetes and virtctl to interact with VM and VMI subresources.
virt-controller - Control-plane component that reconciles VM and VMI objects, creates VMIs, and manages migrations.
virt-handler    - Node-level component responsible for running and supervising VMIs and QEMU processes on each node.
virt-operator   - Manages the installation, upgrades, and lifecycle of all KubeVirt core components.

There’s two pods for the controllers and operator as they are deployments with a default replicas value of 2…I’m running on a one node cluster so could scale those down but I’ll leave the defaults for now.

More information on the architecture of KubeVirt can be found here: –
https://kubevirt.io/user-guide/architecture/

And I found this blog post really useful!
https://arthurchiao.art/blog/kubevirt-create-vm/

The next tool we’ll need is the Containerized Data Importer, this is the backend component that will allow us to upload ISO files to the Kubernetes cluster, which will then be mounted as persistent volumes when we deploy a VM. The guide I followed was here : –
https://github.com/kubevirt/containerized-data-importer

export VERSION=$(curl -s https://api.github.com/repos/kubevirt/containerized-data-importer/releases/latest | grep '"tag_name":' | sed -E 's/.*"([^"]+)".*/\1/')
kubectl create -f https://github.com/kubevirt/containerized-data-importer/releases/download/$VERSION/cdi-operator.yaml
kubectl create -f https://github.com/kubevirt/containerized-data-importer/releases/download/$VERSION/cdi-cr.yaml

And again let’s wait for all the components to be up and running: –

kubectl get all -n cdi

Right, the NEXT tool we’ll need is virtctl this is the CLI that allows us to deploy/configure/manage VMs in KubeVirt: –

export VERSION=$(curl https://storage.googleapis.com/kubevirt-prow/release/kubevirt/kubevirt/stable.txt)
wget https://github.com/kubevirt/kubevirt/releases/download/${VERSION}/virtctl-${VERSION}-linux-amd64

And confirm that it’s installed (add to your $PATH environment variable): –

virtctl version

Okey dokey, now need to upload our ISO files for Windows and SQL Server to the cluster.

Note I’m referencing the storage class from my storage provider (PX-CSI) here. Also, I could not get this to work from my desktop, I had to upload the ISO files to the Kubernetes node and run there. The value for the –uploadproxy-url flag is the IP address of the cdi-uploadproxy service: –

Uploading the Windows ISO (I went with Windows Server 2025): –

virtctl image-upload pvc win2025-pvc --size 10Gi \
--image-path=./en-us_windows_server_2025_updated_oct_2025_x64_dvd_6c0c5aa8.iso \
--uploadproxy-url=https://10.97.56.82:443 \
--storage-class px-fa-direct-access \
--insecure

And uploading the SQL Server 2025 install ISO: –

virtctl image-upload pvc sql2025-pvc --size 10Gi \
--image-path=./SQLServer2025-x64-ENU.iso \
--uploadproxy-url=https://10.97.56.82:443 \
--storage-class px-fa-direct-access \
--insecure

Let’s confirm the resulting persistent volumes: –

kubectl get persistent volumes

Ok, so the next step is to pull down a container image so that it can be referenced in the VM yaml. This image contains the VirtIO drivers needed for Windows to detect the VM’s virtual disks and network interfaces: –

sudo ctr images pull docker.io/kubevirt/virtio-container-disk:latest
sudo ctr images ls | grep virtio

The final thing to do is create the PVCs/PVs that will be used for the OS, SQL data files, and SQL log files within the VM. The yaml is: –

apiVersion: v1
kind: PersistentVolumeClaim
metadata:
  name: winos
spec:
  accessModes: [ "ReadWriteOnce" ]
  resources:
    requests:
      storage: 100Gi
  storageClassName: px-fa-direct-access
  volumeMode: Block
---
apiVersion: v1
kind: PersistentVolumeClaim
metadata:
  name: sqldata
spec:
  accessModes: [ "ReadWriteOnce" ]
  resources:
    requests:
      storage: 50Gi
  storageClassName: px-fa-direct-access
  volumeMode: Block
---
apiVersion: v1
kind: PersistentVolumeClaim
metadata:
  name: sqllog
spec:
  accessModes: [ "ReadWriteOnce" ]
  resources:
    requests:
      storage: 25Gi
  storageClassName: px-fa-direct-access
  volumeMode: Block

And then create!

kubectl apply -f pvc.yaml

Right, now we can create the VM! Below is the yaml I used to create the VM: –

apiVersion: kubevirt.io/v1
kind: VirtualMachine
metadata:
  name: win2025
spec:
  runStrategy: Manual # VM will not start automatically
  template:
    metadata:
      labels:
        app: sqlserver
    spec:
      domain:
        firmware:
          bootloader:
            efi: # uefi boot
              secureBoot: false # disable secure boot
        resources: # requesting same limits and requests for guaranteed QoS
          requests:
            memory: "8Gi"
            cpu: "4"
          limits:
            memory: "8Gi"
            cpu: "4"
        devices:
          disks:
            # Disk 1: OS
            - name: osdisk
              disk:
                bus: scsi
            # Disk 2: SQL Data
            - name: sqldata
              disk:
                bus: scsi
            # Disk 3: SQL Log
            - name: sqllog
              disk:
                bus: scsi
            # Windows installer ISO
            - name: cdrom-win2025
              cdrom:
                bus: sata
                readonly: true
            # VirtIO drivers ISO
            - name: virtio-drivers
              cdrom:
                bus: sata
                readonly: true
            # SQL Server installer ISO
            - name: sql2025-iso
              cdrom:
                bus: sata
                readonly: true
          interfaces:
            - name: default
              model: virtio
              bridge: {}
              ports:
                - port: 3389 # port for RDP
                - port: 1433 # port for SQL Server      
      networks:
        - name: default
          pod: {}
      volumes:
        - name: osdisk
          persistentVolumeClaim:
            claimName: winos
        - name: sqldata
          persistentVolumeClaim:
            claimName: sqldata
        - name: sqllog
          persistentVolumeClaim:
            claimName: sqllog
        - name: cdrom-win2025
          persistentVolumeClaim:
            claimName: win2025-pvc
        - name: virtio-drivers
          containerDisk:
            image: kubevirt/virtio-container-disk
        - name: sql2025-iso
          persistentVolumeClaim:
            claimName: sql2025-pvc

Let’s deploy the VM: –

kubectl apply -f win2025.yaml

And let’s confirm: –

kubectl get vm

So now we’re ready to start the VM and install windows: –

virtctl start win2025

This will start an instance of the VM we created…to monitor the startup: –

kubectl get vm
kubectl get vmi
kubectl get pods

So we have a virtual machine, an instance of that virtual machine, and a virt-launcher pod…which is actually running the virtual machine by launching the QEMU process for the virtual machine instance.

Once the VM instance has been started, we can connect to it via VNC and run through the Windows installation process. I’m using TigerVNC here.

virtctl vnc win2025 --vnc-path "C:\Tools\vncviewer64-1.15.0.exe" --vnc-type=tiger

Hit any key to boot from the ISO (you’ll need to go into the boot options) but we’re now running through a normal Windows install process!

When the option to select the drive to install Windows appears, we have to load the drivers from the ISO we mounted from the virtio-container-disk:latest container
image: –

Once those are loaded, we’ll be able to see all the disks attached to the VM and continue the install process.

When the install completes, we’ll need to check the drivers in Device Manager: –

Go through and install any missing drivers (check disks and anything under “other devices”).

OK because VNC drives me nuts…once we have Windows installed, we’ll open up remote connections within Windows and then deploy a node port service to the cluster to open up port 3389…which will let us RDP to the VM: –

apiVersion: v1
kind: Service
metadata:
  name: win2025-rdp
spec:
  ports:
  - port: 3389
    protocol: TCP
    targetPort: 3389
  selector:
    vm.kubevirt.io/name: win2025
  type: NodePort

Confirm service and port: –

kubectl get services

Once we can RDP, we can continue to configure Windows (if we want to) but the main thing now is to get SQL Server 2025 installed. Don’t forget to online and format the disks for the SQL Server data and log files!

The ISO file containing the SQL install media is mounted within the VM…so it’s just a normal install. Run through the install and confirm it’s successful: –

Once the installation is complete…let’s deploy another node port service to allow us to connect to SQL in the VM: –

apiVersion: v1
kind: Service
metadata:
  name: win2025-sql
spec:
  ports:
  - port: 1433
    protocol: TCP
    targetPort: 1433
  selector:
    vm.kubevirt.io/name: win2025
  type: NodePort

Confirm the service: –

kubectl get services

And let’s attempt to connect to SQL Server in SSMS: –

And there is SQL Server running in KubeVirt!

Ok, let’s run a performance test to see how it compares with SQL deployed to the same Kubernetes cluster as a statefulset. I used Anthony Nocentino’s containerised HammerDB tool for this…here are the results: –

# Statefulset result
TEST RESULT : System achieved 45319 NOPM from 105739 SQL Server TPM

# KubeVirt result
TEST RESULT : System achieved 5962 NOPM from 13929 SQL Server TPM

OK, well that’s disastrous! 13% of the transaction per minute achieved for the SQL instance in the statefulset on the same cluster!

I also noticed a very high CPU privileged time when running the test against the database in the KubeVirt instance, which indicates that the VM is spending a lot of time in kernel or virtualization overhead. This is more than likely caused by incorrectly configured drivers, so it’s definitely not an optimal setup.

So OK, this might not be a perfectly fair test, but the gap is still significant. And it’s a lot of effort to go through just to get an instance of SQL Server up and running. But now that we do have a VM running SQL Server, I’ll explore how (or if) we can clone that VM so we don’t have to repeat this entire process for each new deployment…I’ll cover that in a later blog post. I’ll also see if I can address the performance issues.

But to round things off…deploying SQL as a statefulset to a Kubernetes cluster would still be my recommendation.

Thanks for reading!

Accelerated Database Recovery for tempdb in SQL Server 2025

Accelerated database recovery was introduced in SQL Server 2019 and provides fast recovery, instantaneous transaction rollback, and aggressive log truncation. A complete overview of how ADR achieves this is documented here.

Now in SQL Server 2025 we can switch on ADR for tempdb! Ok, so the fast recovery part isn’t applicable for tempdb…but the instantaneous transaction rollback and aggressive log truncation 100% are! So let’s have a look at what happens when we switch ADR for tempdb in SQL Server 2025.

Before we run through the test, let’s check how much tempdb log space is in use: –

USE [tempdb];
GO

SELECT database_id, used_log_space_in_percent FROM sys.dm_db_log_space_usage
GO

OK, so not much log in use (as expected).

For this first test, we’ll see what happens without ADR being enabled. To confirm ADR is not enabled: –

SELECT name,is_accelerated_database_recovery_on 
FROM sys.databases
WHERE database_id = 2
GO

Great! So in a new query window, we’ll run: –

USE [tpcc];
GO

SET STATISTICS TIME ON

BEGIN TRANSACTION

SELECT TOP (1000000) * INTO #TempTable
FROM [dbo].[order_line];

UPDATE #TempTable
SET ol_amount = ol_amount + 1;

Just some code to insert data into a temp table and then update…hopefully generating some log for us to analyse.

Btw, the database I’m using here to pull the data from is generated from Anthony Nocentino’s containerised HammerDB instance (really handy, go check it out).

Once that script has been run, now let’s look at the amount of log used in tempdb: –

USE [tempdb];
GO

SELECT database_id, used_log_space_in_percent FROM sys.dm_db_log_space_usage
GO

97%…nearly full. Ok, I admit…I’ve kept the log pretty small on this instance for the purposes of this demo but still…we should see a difference when we re-run this test with ADR enabled.

But first…let’s rollback that transaction: –

ROLLBACK

And the stats from the rollback are: –

SQL Server parse and compile time:
CPU time = 0 ms, elapsed time = 0 ms.

SQL Server Execution Times:
CPU time = 1187 ms, elapsed time = 1342 ms.

Didn’t take too long but something needed to be rolled back.

Now let’s look what difference there is when we enable accelerated database recovery for tempdb.

To enable ADR on tempdb run: –

ALTER DATABASE [tempdb] SET ACCELERATED_DATABASE_RECOVERY = ON
GO

The good news is that this statement does not require an exclusive lock on tempdb to run. The bad news is that the SQL instance needs to be restarted in order for the change to take effect.

Once SQL has been restarted, confirm that ADR is enabled: –

SELECT name,is_accelerated_database_recovery_on 
FROM sys.databases
WHERE database_id = 2
GO

let’s check the space used in the log again: –

SELECT database_id, used_log_space_in_percent FROM sys.dm_db_log_space_usage
GO

Around 4.4%…now run the query in the second window again: –

USE [tpcc];
GO

SET STATISTICS TIME ON

BEGIN TRANSACTION

SELECT TOP (1000000) * INTO #TempTable
FROM [dbo].[order_line];

UPDATE #TempTable
SET ol_amount = ol_amount + 1

Once that has completed, check how much space has been used in the tempdb transaction log: –

SELECT database_id, used_log_space_in_percent FROM sys.dm_db_log_space_usage
GO

56%…way down from the 97% used with ADR disabled. This is because, when ADR is enabled, the transaction log is “aggressively truncated”…even with active transactions! This is because recovery now relies on the persistent version store (PVS), SLOG, and only part of the transaction log since the last checkpoint. Since there’s no longer a need to retain the log for the whole transaction, log can be truncated aggressively as checkpoints and backups occur.

And now let’s see what happens when we rollback that transaction: –

ROLLBACK

SQL Server parse and compile time:
CPU time = 0 ms, elapsed time = 0 ms.

SQL Server Execution Times:
CPU time = 0 ms, elapsed time = 1 ms.

Near instantaneous rollback!

This is because, instead of scanning the transaction log to roll back changes, ADR enables SQL Server to perform a logical revert using the PVS to instantly undo all versioned operations.

So, pretty handy for any workload with heavy use of temporary objects! However, there are a few things to watch out for with ADR…check out the MS docs for the full list.

Thanks for reading!

Deploying SQL Server to Kubernetes via SQL Server 2025

Following on from my previous post about hitting the Kubernetes API from SQL Server 2025 let’s go a little further and deploy SQL Server 2025 to Kubernetes from…SQL Server 2025.

You may be thinking….why? Well…

In all honesty, this is just a bit of fun, I’m just playing around with the sp_invoke_external_rest_endpoint stored procedure, I don’t expect anyone to actually do this in a live environment. Anyway…let’s run through how this works.

First things first, we need to update the role created previously to allow our service account access: –

cat <<EOF | kubectl apply -f -
apiVersion: rbac.authorization.k8s.io/v1
kind: Role
metadata:
  name: pod-reader
  namespace: default
rules:
- apiGroups: [""]
  resources: ["pods", "services", "persistentvolumeclaims","secrets"]
  verbs: ["get", "list", "watch", "create","update","patch"]
- apiGroups: ["apps"]
  resources: ["statefulsets"]
  verbs: ["get", "list", "watch", "create","update","patch"]
EOF

Storage classes are a cluster-scoped resource so we need to create a ClusterRole to be able to create one: –

cat <<EOF | kubectl apply -f -
apiVersion: rbac.authorization.k8s.io/v1
kind: ClusterRole
metadata:
  name: mssql-storageclass-deployer
rules:
- apiGroups: ["storage.k8s.io"]
  resources: ["storageclasses"]
  verbs: ["get", "list", "watch", "create","update","patch"]
EOF

And then we need a ClusterRoleBinding to map the ClusterRole to the service account: –

cat <<EOF | kubectl apply -f -
apiVersion: rbac.authorization.k8s.io/v1
kind: ClusterRoleBinding
metadata:
  name: mssql-storageclass-deployer-binding
subjects:
- kind: ServiceAccount
  name: api-reader
  namespace: default
roleRef:
  kind: ClusterRole
  name: mssql-storageclass-deployer
  apiGroup: rbac.authorization.k8s.io
EOF

Ok, ready to start deploying SQL Server….but before we get to that, we need a storage class. I’ve installed OpenEBS on my cluster so I’ll reference that: –

DECLARE @deploy NVARCHAR(MAX);
EXEC sp_invoke_external_rest_endpoint
    @url = 'https://api.dbafromthecold.local/apis/storage.k8s.io/v1/storageclasses',
    @headers = '{"Authorization":"Bearer eyXXXXX....XXXX"}',
    @method = 'POST',
    @payload = '{
  "apiVersion": "storage.k8s.io/v1",
  "kind": "StorageClass",
  "metadata": {
    "name": "mssql-storage",
    "annotations": {
      "openebs.io/cas-type": "local",
      "cas.openebs.io/config": "- name: StorageType\n  value: hostpath\n- name: BasePath\n  value: /var/local-hostpath"
    }
  },
  "provisioner": "openebs.io/local",
  "reclaimPolicy": "Delete",
  "volumeBindingMode": "WaitForFirstConsumer"
}',
    @response = @deploy OUTPUT

SELECT 
    s.[name]
FROM OPENJSON(@deploy, '$.result')
WITH (
    [name] NVARCHAR(100)           '$.metadata.name'
) AS s;

And we’ll need a secret to store the SQL instance’s sa password: –

DECLARE @deploy NVARCHAR(MAX);
EXEC sp_invoke_external_rest_endpoint
    @url = 'https://api.dbafromthecold.local/api/v1/namespaces/default/secrets',
    @headers = '{"Authorization":"Bearer eyXXXXX....XXXX"}',
    @method = 'POST',
    @payload = '{
  "apiVersion": "v1",
  "kind": "Secret",
  "metadata": {
    "name": "mssql-sa-secret"
  },
  "type": "Opaque",
  "stringData": {
    "MSSQL_SA_PASSWORD": "Testing1122"
  }
}',
    @response = @deploy OUTPUT

SELECT 
    s.[name]
FROM OPENJSON(@deploy, '$.result')
WITH (
    [name] NVARCHAR(100)           '$.metadata.name'
) AS s;

Right! Let’s deploy SQL Server 2025 to Kubernetes with 1 persistent volume claim using the storage class and referencing the secret for the sa password: –

DECLARE @deploy NVARCHAR(MAX);
EXEC sp_invoke_external_rest_endpoint
    @url = 'https://api.dbafromthecold.local/apis/apps/v1/namespaces/default/statefulsets',
    @headers = '{"Authorization":"Bearer eyXXXXX....XXXX"}',
    @method = 'POST',
    @payload = '{
  "apiVersion": "apps/v1",
  "kind": "StatefulSet",
  "metadata": {
    "name": "mssql-statefulset"
  },
  "spec": {
    "serviceName": "mssql",
    "replicas": 1,
    "selector": {
      "matchLabels": {
        "name": "mssql-pod"
      }
    },
    "template": {
      "metadata": {
        "labels": {
          "name": "mssql-pod"
        }
      },
      "spec": {
        "securityContext": {
          "fsGroup": 10001
        },
        "containers": [
          {
            "name": "mssql-container",
            "image": "mcr.microsoft.com/mssql/server:2025-CTP2.0-ubuntu-22.04",
            "ports": [
              {
                "containerPort": 1433,
                "name": "mssql-port"
              }
            ],
            "env": [
              {
                "name": "MSSQL_PID",
                "value": "Developer"
              },
              {
                "name": "ACCEPT_EULA",
                "value": "Y"
              },
              {
                "name": "MSSQL_AGENT_ENABLED",
                "value": "1"
              },
              {
                "name": "MSSQL_SA_PASSWORD",
                "valueFrom": {
                  "secretKeyRef": {
                    "name": "mssql-sa-secret",
                    "key": "MSSQL_SA_PASSWORD"
                  }
                }
              }
            ],
            "volumeMounts": [
              {
                "name": "sqlsystem",
                "mountPath": "/var/opt/mssql"
              }
            ]
          }
        ]
      }
    },
    "volumeClaimTemplates": [
      {
        "metadata": {
          "name": "sqlsystem"
        },
        "spec": {
          "accessModes": [
            "ReadWriteOnce"
          ],
          "resources": {
            "requests": {
              "storage": "1Gi"
            }
          },
          "storageClassName": "mssql-storage"
        }
      }
    ]
  }
}',
    @response = @deploy OUTPUT

SELECT 
    s.[name],
    s.[namespace],
    s.replicas
FROM OPENJSON(@deploy, '$.result')
WITH (
    [name] NVARCHAR(100)           '$.metadata.name',
    [namespace] NVARCHAR(100)      '$.metadata.namespace',
    replicas INT                   '$.spec.replicas'
) AS s;

And finally, we’ll need a load balanced service (using Metallb that I’ve previously installed on the cluster) to connect to SQL Server within Kubernetes: –

DECLARE @deploy NVARCHAR(MAX);
EXEC sp_invoke_external_rest_endpoint
    @url = 'https://api.dbafromthecold.local/api/v1/namespaces/default/services',
    @headers = '{"Authorization":"Bearer eyXXXXX....XXXX"}',
    @method = 'POST',
    @payload = '{
  "apiVersion": "v1",
  "kind": "Service",
  "metadata": {
    "name": "mssql-service"
  },
  "spec": {
    "ports": [
      {
        "name": "mssql-port",
        "port": 1433,
        "targetPort": 1433
      }
    ],
    "selector": {
      "name": "mssql-pod"
    },
    "type": "LoadBalancer"
  }
}',
    @response = @deploy OUTPUT

SELECT 
    s.[name],
    s.[namespace]
FROM OPENJSON(@deploy, '$.result')
WITH (
    [name] NVARCHAR(100)           '$.metadata.name',
    [namespace] NVARCHAR(100)      '$.metadata.namespace'
) AS s;

Cool! Let’s confirm on the cluster: –

kubectl get sc
kubectl get pvc
kubectl get secret
kubectl get all

Final test, connecting to the instance in SSMS: –

Thanks for reading!