A shell for working with Kubernetes

I’m always a fan of tools that can make my life easier.

One tool that I’ve recently come across is kube-shell, an integrated shell for working with Kubernetes. What’s great about it is that it’s cross-platform and has intellisense for kubectl.

Installation is a cinch! The prerequisites are python and pip, which can be downloaded from here.

N.B. – python and pip are also prerequisites for mssql-cli which I also highly recommend you check out.

Make sure that python is added to your path environment variable and then you’re good to go and install kube-shell: –

pip install kube-shell

Once installed, typing kube-shell takes you into the shell…and you’re off!

How cool is that?

Thanks for reading!

Changing the port for SQL Server in Azure Kubernetes Services

I got asked this question last week and it’s a very good one. After all, running Sql Server in Azure Container Services (AKS) does mean exposing a port to the internet to allow connections.


EDIT – Azure Container Services (AKS) has been renamed to Azure Kubernetes Services. Blog title has been updated


So leaving SQL Server listening on the default port can be risky.

Now I know there’s a debate as to whether or not it is worth changing the port that SQL is listening on in order to secure it. My opinion is that it’ll prevent opportunistic attacks by port scanners but would not prevent a directed attack.

So, how do you do it when running SQL Server in Azure Container Services?

Well there’s a couple of options available.

The first one is to change the port that SQL is listening on in the container, open that port on the container, and direct to that port from the service.

The second one is to leave SQL Server listening on the default port and direct a non-default port to port 1433 from the service.

Let’s run through both.

N.B. – Even though I’ll set this up from scratch I’d recommend you read through my previous post on AKS here


In order to set this up, I’ll use the Azure-CLI via Bash for Windows.

First thing to do is install the Azure-CLI: –

echo "deb [arch=amd64] https://packages.microsoft.com/repos/azure-cli/ wheezy main" | \
     sudo tee /etc/apt/sources.list.d/azure-cli.list
      
      
sudo apt-key adv --keyserver packages.microsoft.com --recv-keys 52E16F86FEE04B979B07E28DB02C46DF417A0893
sudo apt-get install apt-transport-https
sudo apt-get update && sudo apt-get install azure-cli

And install Kubectl: –

az aks install-cli

Then login to Azure: –

az login

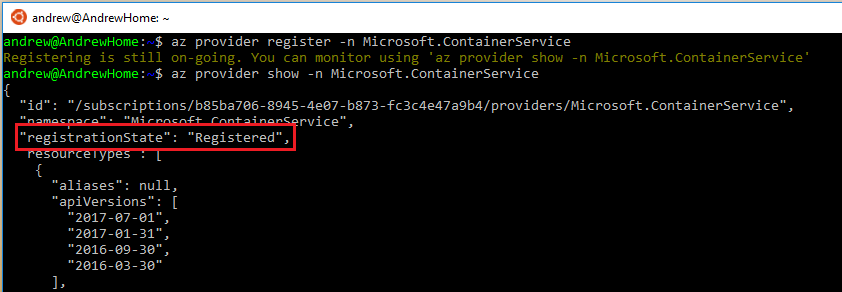
Enable AKS on your Azure subscription: –

az provider register -n Microsoft.ContainerService

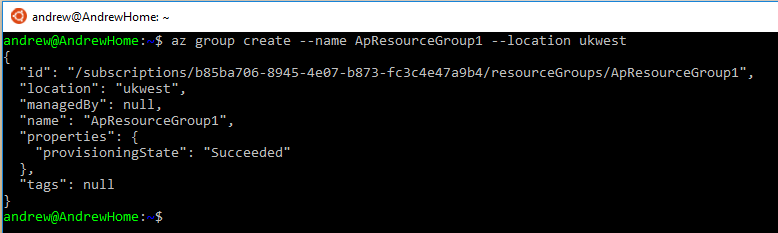
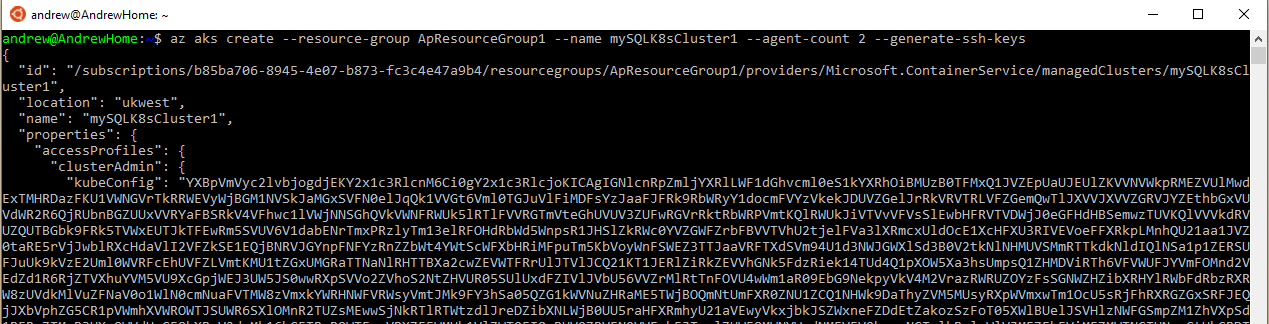
Create a resource group: –

az group create --name ApContainerResGrp1 --location centralus

And now we can create the cluster: –

az aks create --resource-group ApContainerResGrp1 --name mySQLK8sCluster1 --node-count 2 --generate-ssh-keys

N.B. – This can take some time

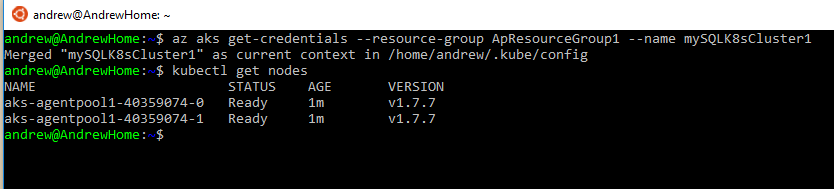
Once that’s complete we need to get credentials to connect to the cluster: –

az aks get-credentials --resource-group ApContainerResGrp1 --name mySQLK8sCluster1

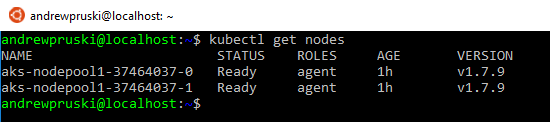
Now test the connection by viewing the nodes in the cluster: –

kubectl get nodes

If both nodes come back with a status of Ready, you’re good to go!

Ok, so now let’s create the yaml file to spin up the container and service: –

nano sqlserver.yml

And drop this code into the file: –

apiVersion: apps/v1beta1
kind: Deployment
metadata:
  name: sqlserver
  labels:
    app: sqlserver
spec:
  replicas: 1
  template:
    metadata:
      labels:
        name: sqlserver
    spec:
      containers:
      - name: sqlserver1
        image: microsoft/mssql-server-linux:latest
        ports:
        - containerPort: 4433
        env:
        - name: SA_PASSWORD
          value: "Testing1122"
        - name: ACCEPT_EULA
          value: "Y"
        - name: MSSQL_TCP_PORT
          value: "4433"
---
apiVersion: v1
kind: Service
metadata:
  name: sqlserver-service
spec:
  ports:
  - name: sqlserver
    port: 4433
    targetPort: 4433
  selector:
    name: sqlserver
  type: LoadBalancer

N.B. – Code is also available here

Note the following code in the deployment section: –

        ports:
        - containerPort: 4433
.
.
.
        - name: MSSQL_TCP_PORT
          value: "4433"

This will use an environment variable to change the port that SQL is listening on to 4433 and open that port on the container.

Also note the following code in the service section: –

  ports:
  - name: sqlserver
    port: 4433
    targetPort: 4433

This will open the port 4433 externally and direct any connections to 4433 on the container.

So let’s deploy!

kubectl create -f sqlserver.yml

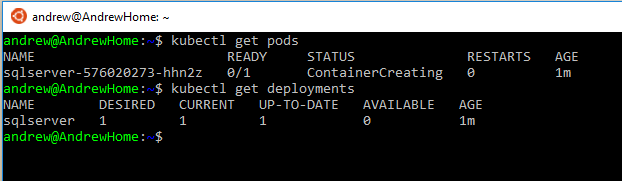
You can check the deployment process by running: –
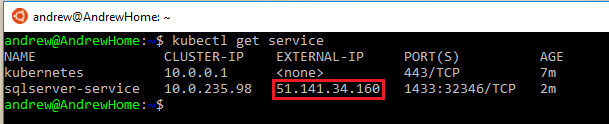
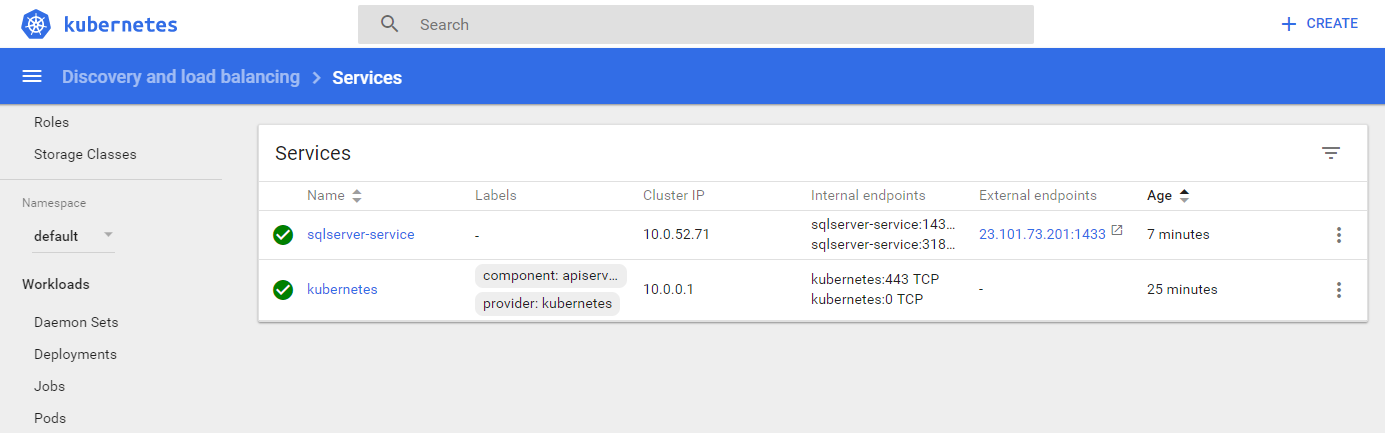
kubectl get pods
kubectl get service

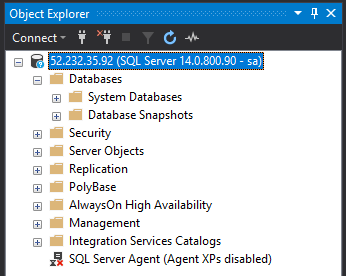
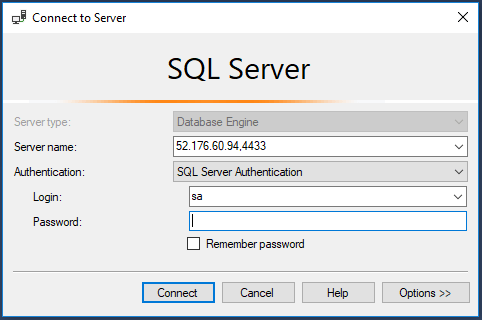
Once the pod has a status of Running and the service has an external IP, we can use the external IP and the port to connect to SQL in SSMS: –

And confirm that Sql is listening on the specified port by checking the log: –

EXEC sp_readerrorlog

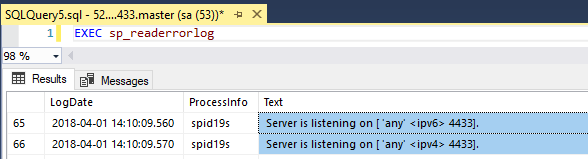
Cool! Sql is listening on a non-default port and we’ve connected to it!

Alright, let’s try the next option.

First thing is to remove the old deployment: –

kubectl delete service sqlserver-service
kubectl delete deployment sqlserver
rm sqlserver.yml

Now let’s create the new yaml file: –

nano sqlsever.yml

And drop the following into it: –

apiVersion: apps/v1beta1
kind: Deployment
metadata:
  name: sqlserver
  labels:
    app: sqlserver
spec:
  replicas: 1
  template:
    metadata:
      labels:
        name: sqlserver
    spec:
      containers:
      - name: sqlserver1
        image: microsoft/mssql-server-linux:latest
        ports:
        - containerPort: 1433
        env:
        - name: SA_PASSWORD
          value: "Testing1122"
        - name: ACCEPT_EULA
          value: "Y"
---
apiVersion: v1
kind: Service
metadata:
  name: sqlserver-service
spec:
  ports:
  - name: sqlserver
    port: 4433
    targetPort: 1433
  selector:
    name: sqlserver
  type: LoadBalancer

N/B. – The code is also available here

Note the following in the service section:-

  ports:
  - name: sqlserver
    port: 4433
    targetPort: 1433

This opens port 4433 on the service and directs it to port 1433 in the container.

Rebuild the deployment: –

kubectl create -f sqlserver.yml

And once that’s created, connect on the service’s external IP and port 4433.

Awesome stuff! SQL is listening on the default port but we’ve connected to the port opened on the service and it has routed it to port 1433 opened on the container.

But which method would I recommend?

How about both! 🙂

Let’s change the default port that SQL is listening on and open a different port in the service!

Again, remove the old deployment: –

kubectl delete service sqlserver-service
kubectl delete deployment sqlserver
rm sqlserver.yml

Recreate the yaml file: –

nano sqlsever.yml

And the drop the following into the file: –

apiVersion: apps/v1beta1
kind: Deployment
metadata:
  name: sqlserver
  labels:
    app: sqlserver
spec:
  replicas: 1
  template:
    metadata:
      labels:
        name: sqlserver
    spec:
      containers:
      - name: sqlserver1
        image: microsoft/mssql-server-linux:latest
        ports:
        - containerPort: 4433
        env:
        - name: SA_PASSWORD
          value: "Testing1122"
        - name: ACCEPT_EULA
          value: "Y"
        - name: MSSQL_TCP_PORT
          value: "4433"
---
apiVersion: v1
kind: Service
metadata:
  name: sqlserver-service
spec:
  ports:
  - name: sqlserver
    port: 15789
    targetPort: 4433
  selector:
    name: sqlserver
  type: LoadBalancer

N.B. – This code is also available here

What’s happening here is that SQL will be configured to listen on port 4433 but we’ll connect externally to the service to port 15789 which is mapped to 4433 on the container.

Now redeploy: –

kubectl create -f sqlserver.yml

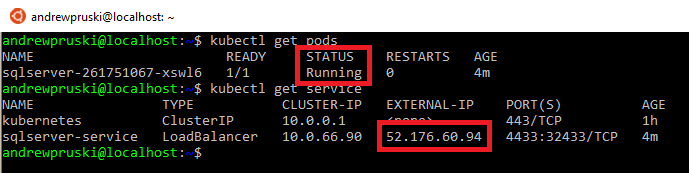
Same as before, wait for the container to be created and the service to have an external IP assigned: –

kubectl get pods
kubectl get service

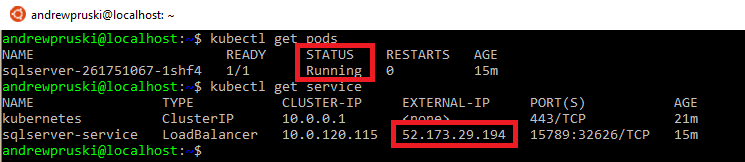
Then use the external IP and the port 15789 to connect in SSMS: –

How cool is that?! SQL is listening on a non-default port and we’ve used a completely different port to connect!

Finally, to tear everything down: –

az group delete --name ApContainerResGrp1

Thanks for reading!

SQL Server in Kubernetes on Docker for Windows

Last week Docker announced a feature that I’ve been looking forward to for a while: –

And sure enough, when I opened Docker for Windows, there was the update: –

Let’s run through the steps to get this setup. First of all, enable the feature in settings: –

Once installed, you’ll be able to confirm that Kubernetes is up and running: –

Awesome stuff, but how do we interact with it?

Now, if this is the first time working with Kubernetes you won’t have to perform the next couple of steps but just to confirm, run the following: –

kubectl config current-context

If your shell cannot find the kubectl command, add
C:\Program Files\Docker\Docker\Resources\bin\
to your PATH environment variable and restart your shell.

If the command outputs anything other than docker-for-desktop you will need to switch to the desktop cluster. To do this run: –

kubectl config use-context docker-for-desktop

In the above screenshot I switched from my mySQLK8sCluster1 (my AKS cluster) to docker-for-desktop and then ran: –

kubectl get nodes

Now we are ready to go and build a pod running SQL Server in Kubernetes on Docker for Windows 🙂

So in C:\temp create a file called sqlserver.yml and drop in: –

apiVersion: apps/v1beta1
kind: Deployment
metadata:
  name: sqlserver
  labels:
    app: sqlserver
spec:
  replicas: 1
  template:
    metadata:
      labels:
        name: sqlserver
    spec:
      containers:
      - name: sqlserver
        image: microsoft/mssql-server-linux:latest
        ports:
        - containerPort: 1433
        env:
        - name: SA_PASSWORD
          value: "Testing1122"
        - name: ACCEPT_EULA
          value: "Y"
---
apiVersion: v1
kind: Service
metadata:
  name: sqlserver-service
spec:
  ports:
  - name: sqlserver
    port: 1433
    targetPort: 1433
  selector:
    name: sqlserver
  type: LoadBalancer

This is a very simple .yml file to create one pod running SQL Server. To create the pod: –

kubectl create -f C:\temp\sqlserver.yml

kubectl get pods

And boom! There we have a pod running SQL Server.

But how are we going to connect to it? OK, the second part of the yaml file defined a service which exposes an endpoint to allow us to connect. We can see the service by running: –

kubectl get services

The service we created is exposed on localhost (127.0.0.1) so we can use that and the port number specified in the yaml file (1433 in this example).

And boom! We are connected 🙂

We can also remote into the pod and verify that SQL is up and running: –

kubectl exec -it sqlserver /bin/bash

ps aux | grep sql

And there’s SQL running in the pod! Cool!

Thanks for reading!

Running SQL Server in Kubernetes on Azure Kubernetes Services (AKS)

I’ve previously blogged about running SQL Server in ACS but Microsoft has now released a new version still called Azure Container Services (AKS instead of ACS however) but now specifically tailored to building Kubernetes clusters.


EDIT – Azure Container Services (AKS) has been renamed to Azure Kubernetes Services. Blog title has been updated


There are some differences to the original ACS (making the process simpler) so let’s run through setting up a Kubernetes cluster running SQL Server in AKS.

Ok, first thing to do is install the CLI (I’m going to work from a Bash shell on my desktop): –

echo "deb [arch=amd64] https://packages.microsoft.com/repos/azure-cli/ wheezy main" | \
     sudo tee /etc/apt/sources.list.d/azure-cli.list
	 
	 
sudo apt-key adv --keyserver packages.microsoft.com --recv-keys 52E16F86FEE04B979B07E28DB02C46DF417A0893
sudo apt-get install apt-transport-https
sudo apt-get update && sudo apt-get install azure-cli

Check the version of the CLI installed (make sure it’s at least version 2.0.20): –

az --version

Then login to Azure in the shell (and follow the instructions): –

az login

As AKS is still in preview a flag needs to be enabled on your Azure subscription.
To do this run: –

az provider register -n Microsoft.ContainerService

You can check that the flag has been successfully enabled by running: –

az provider show -n Microsoft.ContainerService

Cool. Now we’re good to go with setting up a Kubernetes cluster! Same as the original ACS, a resource group needs to be created to hold all the objects in the cloud: –

az group create --name ApResourceGroup1 --location ukwest

And now the cluster can be created. I’m going to create a two node cluster by running: –

az aks create --resource-group ApResourceGroup1 --name mySQLK8sCluster1 --node-count 2 --generate-ssh-keys


EDIT: updated agent-code to node-count has this switch seems to have changed since I wrote this post

What’s cool about this is the amount of objects it’s creating in the background: –

All that from one line of code!

Once that’s complete, Kubectl needs to be installed locally to manage the cluster: –

az aks install-cli

And then I need to connect my local shell to the cluster: –

az aks get-credentials --resource-group ApResourceGroup1 --name mySQLK8sCluster1

Ok, let’s check the nodes in the cluster: –

kubectl get nodes

Awesome, I have two nodes up and running in my cluster!

Next thing to do is spin up SQL Server in a container within the cluster. To do this I’m going to build it from a yaml file: –

nano sqlserver.yml

And drop the following into it: –

apiVersion: apps/v1beta1
kind: Deployment
metadata:
  name: sqlserver
  labels:
    app: sqlserver
spec:
  replicas: 1
  template:
    metadata:
      labels:
        name: sqlserver
    spec:
      containers:
      - name: sqlserver1
        image: microsoft/mssql-server-linux:latest
        ports:
        - containerPort: 1433
        env:
        - name: SA_PASSWORD
          value: "Testing1122"
        - name: ACCEPT_EULA
          value: "Y"
---
apiVersion: v1
kind: Service
metadata:
  name: sqlserver-service
spec:
  ports:
  - name: sqlserver
    port: 1433
    targetPort: 1433
  selector:
    name: sqlserver
  type: LoadBalancer

This will spin up a container within the cluster (as a deployment) and create a load balanced service with an external IP so that I can connect to SQL Server from my desktop. So now run: –

kubectl create -f sqlserver.yml

Once that’s complete we can run some commands to view the objects created. To check the SQL Server container created: –

kubectl get pods

To check on the deployment:-

kubectl get deployments

And finally, to check on the service: –

kubectl get service

Once the service has an external IP, I can use that to connect to SQL Server within my Kubernetes cluster in AKS!

How awesome is that! Microsoft have made this a nice and simple way of getting into running Kubernetes in Azure. I’m going to play around with this some more 🙂

Last thing, to remove all the objects built in this demo you just need to run: –

az group delete --name ApResourceGroup1

Thanks for reading!

Exploring the Kubernetes dashboard in Azure Container Services

Last week I went through how to run SQL Server in Kubernetes on Azure Container Services (ACS)

This week I want to explore the built-in Kubernetes dashboard which is available in ACS by default. (N.B. – You will need to have run through the steps in my last post to follow here)

The Kubernetes dashboard is available in a pod but can only be seen by running an additional flag with the kubectl get pods command: –

kubectl get pods --all-namespaces

In order to access the dashboard the kubectl proxy command needs to be run which starts a proxy to the Kubernetes API server:-

kubectl proxy

The dashboard then becomes available at http://localhost:8001/ui

From the dashboard all the objects that were created in my last post can be viewed, such as the pod created (on the main page): –

The nodes of the cluster: –

And the service created in order to access SQL within the pod: –

But not only can existing objects be viewed, new ones can be created.

In my last post I created a single pod running SQL Server, I want to move on from that as you’d generally never just deploy one pod. Instead you would create what’s called a deployment.

The dashboard makes it really simple to create deployments. Just click Deployments on the right-hand side menu and fill out the details: –

Don’t forget to click on Advanced Details and enter in the environment variables required.

At a minimum variables for ACCEPT_EULA (otherwise the container will not run) and SA_PASSWORD (otherwise you will not be able to connect to SQL Server) need to be specified: –

Hit Deploy and then the following screen will show the progress of the deployment: –

The new objects will have a green tick next to them once the deployment is complete: –

The external IP used to connect to SQL within the pod created can be found by clicking on the newly created service (found on the right-hand side menu).

That IP can then be dropped into SSMS (along with the SA username and password set) and boom! A connection to SQL Server running in a Kubernetes pod that was created via a deployment from the dashboard: –

Thanks for reading!