Building a Raspberry Pi cluster to run Azure SQL Edge on Kubernetes

A project I’ve been meaning to work on for a while has been to build my own Kubernetes cluster running on Raspberry Pis.

I’ve been playing around with Kubernetes for a while now and things like Azure Kubernetes Service are great tools to learn but I wanted something that I’d built from the ground up.

Something that I could tear down, fiddle with, and rebuild to my heart’s content.

So earlier this year I finally got around to doing just that and with Azure SQL Edge going GA with a disconnected mode I wanted to blog about my setup.

Here’s what I bought: –

1 x Raspberry Pi 4 Model B – 8BG RAM
3 x Raspberry Pi 4 Model B – 4GB RAM
4 x SanDisk Ultra 32 GB microSDHC Memory Card
1 x Pi Rack Case for Raspberry Pi 4 Model B
1 x Aukey USB Wall Charger Adapter 6 Ports
1 x NETGEAR GS308 8-Port Gigabit Ethernet Network Switch
1 x Bunch of ethernet cables
1 x Bunch of (short) USB cables

OK, I’ve gone a little overboard with the Pis and the SD cards. You won’t need an 8GB Raspberry Pi for the control node, the 4GB model will work fine. The 2GB model will also probably work but that would be really hitting the limit.

For the SD cards, 16GB will be more than enough (I went with a 64GB card for the control node, which is definite overkill).

In fact, you could just buy one Raspberry Pi and do everything I’m going to run through here on it. I went with a 4 node cluster (1 control node and 3 worker nodes) just because I wanted to tinker.

What follows in this blog is the complete build, from setting up the cluster, configuring the OS, to deploying Azure SQL Edge.

So let’s get to it!

Yay, delivery day!


Flashing the SD Cards

The first thing to do is flash the SD cards. I used Rufus but Etcher would work as well.

Grab the Ubuntu 20.04 ARM image from the website and flash all the cards: –

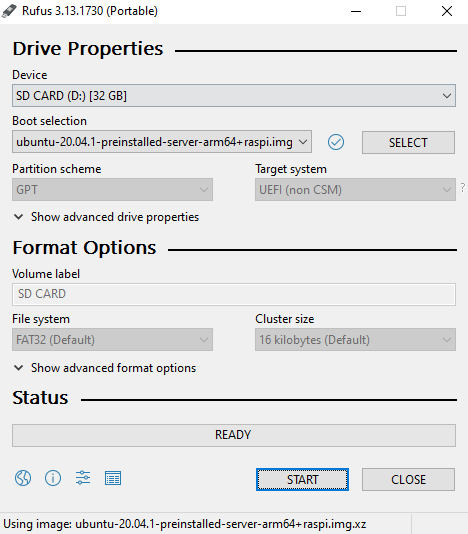
Once that’s done, it’s assembly time!


Building the cluster

So…many…little…screws…

But done! Now it’s time to plug it all in.

Plug all the SD cards into the Pis. Connect the USB hub to the mains and then plug the switch into your router. It’s plug and play so no need to mess around.

Once they’re connected, plug the Pis into the switch and then power them up (plug them into the USB Hub): –

(Ignore the zero in the background, it’s running pi-hole which I also recommend you check out!)


Setting a static IP address for each Raspberry Pi

We’re going to set a static IP address for each Pi on the network. Not doing anything fancy here with subnets, we’re just going to assign the Pis IP addresses that are currently not in use.

To find the Pis on the network with their current IP address we can run: –

nmap -sP 192.168.1.0/24

Tbh – nmap works but I usually use a Network Analyser app on my phone…it’s just easier (the output of nmap can be confusing).

Pick one Pi that’s going to be the control node and let’s ssh into it: –

ssh ubuntu@192.168.1.xx

When we first try to ssh we’ll have to change the ubuntu user password: –

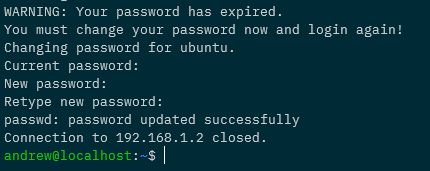
The default password is ubuntu. Change the password to anything you want, we’re going to be disabling the ubuntu user later anyway.

Once that’s done ssh back into the Pi.

Ok, now that we’re back on the Pi run: –

sudo nano /etc/netplan/50-cloud-init.yaml

And update the file to look similar to this: –

network:
ethernets:
  eth0:
    addresses: [192.168.1.53/24]
    gateway4: 192.168.1.254
    nameservers:
      addresses: [192.168.1.5]
  version: 2

192.168.1.53 is the address I’m setting for the Pi, but it can be pretty much anything on your network that’s not already in use. 192.168.1.254 is the gateway on my network, and 192.168.1.5 is my DNS server (the pi-hole), you can use 8.8.8.8 if you want to.

There’ll also be a load of text at the top of the file saying something along the lines of “changes here won’t persist“. Ignore it, I’ve found the changes do persist.

DISCLAIMER – There’s probably another (better?) way of setting a static IP address on Ubuntu 20.04, this is just what I’ve done and works for me.

Ok, once the file is updated we run: –

sudo netplan apply

This will freeze your existing ssh session. So close that and open another terminal…wait for the Pi to come back up on your network on the new IP address.


Creating a custom user on all nodes

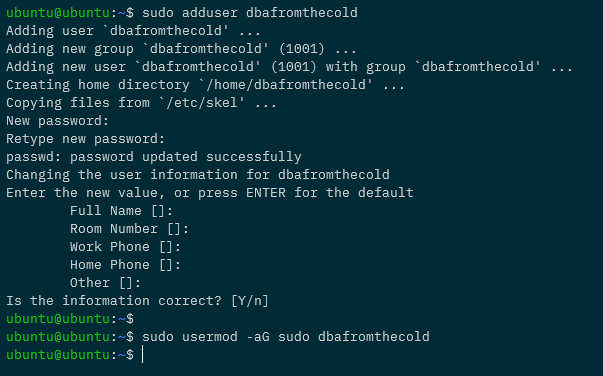
Let’s not use the default ubuntu user anymore (just because). We’re going to create a new user, dbafromthecold (you can call your user anything you want 🙂 ): –

sudo adduser dbafromthecold

Run through the prompts and then add the new user to the sudo group: –

sudo usermod -aG sudo dbafromthecold

Cool, once that’s done, exit out of the Pi and ssh back in with the new user and run: –

sudo usermod --expiredate 1 ubuntu

This way no-one can ssh into the Pi using the default user: –


Setting up key based authentication for all nodes

Let’s now set up key based authentication (as I cannot be bothered typing out a password every time I want to ssh to a Pi).

I’m working in WSL2 here locally (I just prefer it) but a powershell session should work for everything we’re going to be running.

Anyway in WSL2 locally run: –

ssh-keygen

Follow the prompt to create the key. You can add a passphrase if you wish (I didn’t).

Ok, now let’s copy that to the pi: –

cat ./raspberrypi_k8s.pub | ssh dbafromthecold@192.168.1.53 "mkdir -p ~/.ssh && touch ~/.ssh/authorized_keys && chmod -R go= ~/.ssh && cat >> ~/.ssh/authorized_keys"

What this is going to do is copy the public key (raspberrypi_k8s.pub) up to the pi and store it as /home/dbafromthecold/.ssh/authorized_keys

This will allow us to specify the private key when connecting to the pi and use that to authenticate.

We’ll have to log in with the password one more time to get this working, so ssh with the password…and then immediately log out.

Now try to log in with the key: –

ssh -i raspberrypi_k8s dbafromthecold@192.168.1.53

If that doesn’t ask for a password and logs you in, it’s working!

As the Pi has a static IP address we can setup a ssh config file. So run: –

echo "Host k8s-control-1
HostName 192.168.1.53
User dbafromthecold
IdentityFile ~/raspberrypi_k8s" > ~/.ssh/config

I’m going to call this Pi k8s-control-1, and once this file is created, I can ssh it to by: –

ssh k8s-control-1

Awesome stuff! We have setup key based authentication to our Pi!


Configuring the OS on all nodes

Next thing to do is rename the pi (to match the name we’ve given in our ssh config file): –

sudo hostnamectl set-hostname k8s-control-1
sudo reboot

That’ll rename the Pi to k8s-control-1 and then restart it. Wait for it to come back up and ssh in.

And we can see by the prompt and the hostname command…our Pi has been renamed!

Ok, now update the Pi: –

sudo apt-get update
sudo apt-get upgrade

N.B. – This could take a while.

After that completes…we need to enable memory cgroups on the Pi. This is required for the Kubernetes installation to complete successfully so run:-

sudo nano /boot/firmware/cmdline.txt

and add

cgroup_enable=memory

to the end, so it looks like this: –

and then reboot again: –

sudo reboot

Installing Docker on all nodes

Getting there! Ok, let’s now install our container runtime…Docker.

sudo apt-get install -y docker.io

Then set docker to start on server startup: –

sudo systemctl enable docker

And then, so that we don’t have to use sudo each time we want to run a docker command: –

sudo usermod -aG docker dbafromthecold

Log out and then log back into the Pi for that to take effect. To confirm it’s working run: –

docker version

And now…let’s go ahead and install the components for kubernetes!


UPDATE – As of Kubernetes v1.20 Docker is deprecated as a container runtime. Containerd or CRI-O are the recommended container runtimes. I ran through the process of updating this cluster to containerd here


Installing Kubernetes components on all nodes

So we’re going to use kubeadm to install kubernetes but we also need kubectl (to admin the cluster) and the kubelet (which is an agent that runs on each Kubernetes node and isn’t installed via kubeadm).

So make sure the following are installed: –

sudo apt-get install -y apt-transport-https curl

Then add the Kubernetes GPG key: –

curl -s https://packages.cloud.google.com/apt/doc/apt-key.gpg | sudo apt-key add -

Add Kubernetes to the sources list: –

cat <<EOF | sudo tee /etc/apt/sources.list.d/kubernetes.list
deb https://apt.kubernetes.io/ kubernetes-xenial main
EOF

Ok, I know that the 20.04 code name isn’t xenial, it’s focal but if you use kubernetes-focal you’ll get this when running apt-get update: –

E: The repository ‘https://apt.kubernetes.io kubernetes-focal Release’ does not have a Release file.

So to avoid that error, we’re using xenial.

Anyway, now update sources on the box: –

sudo apt-get update

And we’re good to go and install the Kubernetes components: –

sudo apt-get install -y kubelet=1.19.2-00 kubeadm=1.19.2-00 kubectl=1.19.2-00

Going for version 1.19.2 for this install….absolutely no reason for it other than to show you that you can install specific versions!

Once the install has finished run the following: –

sudo apt-mark hold kubelet kubeadm kubectl

That’ll prevent the applications from being accidentally updated.


Building the Control Node

Right, we are good to go and create our control node! Kubeadm makes this simple! Simply run: –

sudo kubeadm init | tee kubeadm-init.out

What’s happening here is we’re creating our control node and saving the output to kubeadm-init.out.

This’ll take a few minutes to complete but once it does, we have a one node Kubernetes cluster!

Ok, so that we can use kubectl to admin the cluster: –

mkdir -p $HOME/.kube
sudo cp -i /etc/kubernetes/admin.conf $HOME/.kube/config
sudo chown $(id -u):$(id -g) $HOME/.kube/config

And now…we can run: –

kubectl get nodes

Don’t worry about the node being in a status of NotReady…it’ll come online after we deploy a pod network.

So let’s setup that pod network to allow the pods to communicate with each other. We’re going to use Weave for this: –

kubectl apply -f "https://cloud.weave.works/k8s/net?k8s-version=$(kubectl version | base64 | tr -d '\n')"

A couple of minutes after that’s deployed, we’ll see the node becoming Ready: –

And we can check all the control plane components are running in the cluster: –

kubectl get pods -n kube-system

Now we have a one node Kubernetes cluster up and running!


Deploying a test application on the control node

Now that we have our one node cluster, let’s deploy a test nginx application to make sure all is working.

The first thing we need to do is remove the taint from the control node that prevents user applications (pods) from being deployed to it. So run: –

kubectl taint nodes $(hostname) node-role.kubernetes.io/master:NoSchedule-

And now we can deploy nginx: –

kubectl run nginx --image=nginx

Give that a few seconds and then confirm that the pod is up and running: –

kubectl get pods -o wide

Cool, the pod is up and running with an IP address of 10.32.0.4. We can run curl against it to confirm the application is working as expected: –

curl 10.32.0.4

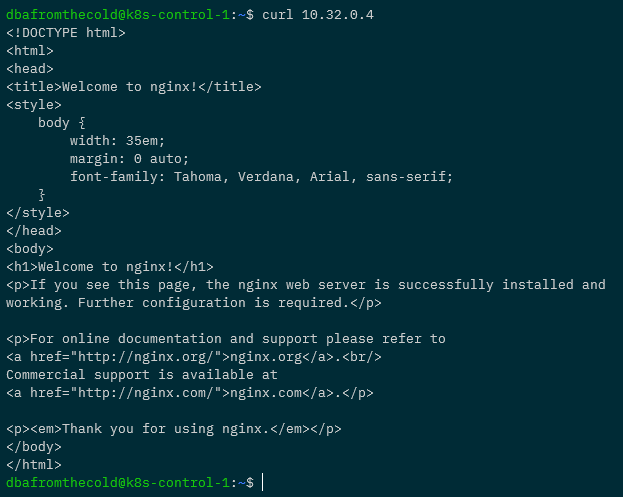
Boom! We have the correct response so we know we can deploy applications into our Kubernetes cluster! Leave the pod running as we’re going to need it in the next section.

Don’t do this now but if you want to add the taint back to the control node, run: –

kubectl taint nodes $(hostname) node-role.kubernetes.io/master:NoSchedule

Deploying MetalLb on the control node

There are no SQL client tools that’ll run on ARM infrastructure (at present) so we’ll need to connect to Azure SQL Edge from outside of the cluster. The way we’ll do that is with an external IP provided by a load balanced service.

In order for us to get those IP addresses we’ll need to deploy MetalLb to our cluster. MetalLb provides us with external IP addresses from a range we specify for any load balanced services we deploy.

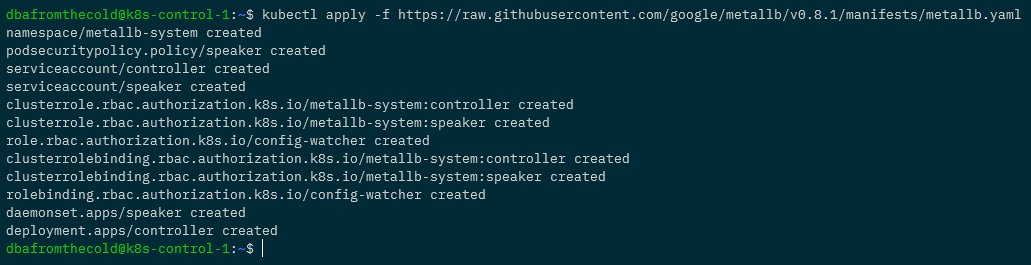
To deploy MetalLb, run: –

kubectl apply -f https://raw.githubusercontent.com/google/metallb/v0.8.1/manifests/metallb.yaml

And now we need to create a config map specifying the range of IP addresses that MetalLb can use: –

apiVersion: v1
kind: ConfigMap
metadata:
  namespace: metallb-system
  name: config
data:
  config: |
    address-pools:
    - name: default
      protocol: layer2
      addresses:
        - 192.168.1.100-192.168.1.110

What we’re doing here is specifying the IP range that MetalLb can assign to load balanced services as 192.168.1.100 to 192.168.1.110

You can use any range you want, just make sure that the IPs are not in use on your network.

Create the file as metallb-config.yaml and then deploy into the cluster: –

kubectl apply -f metallb-config.yaml

OK, to make sure everything is working…check the pods in the metallb-system namespace: –

kubectl get pods -n metallb-system

If they’re up and running we’re good to go and expose our nginx pod with a load balanced service:-

kubectl expose pod nginx --type=LoadBalancer --port=80 --target-port=80

Then confirm that the service created has an external IP: –

kubectl get services

Awesome! Ok, to really confirm everything is working…try to curl against that IP address from outside of the cluster (from our local machine): –

curl 192.168.1.100

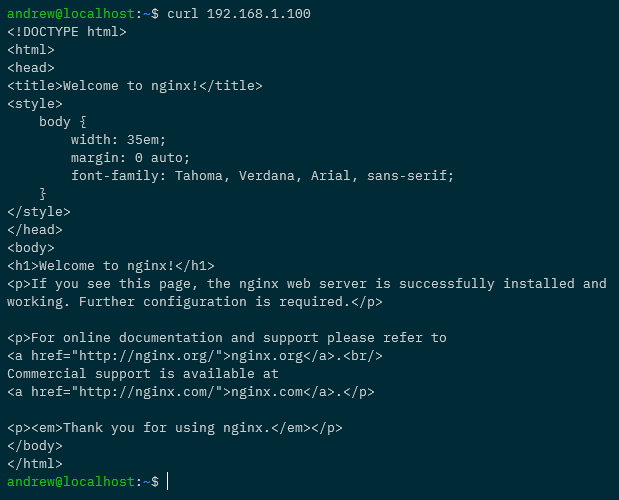
Woo hoo! All working, we can access applications running in our cluster externally!

Ok, quick tidy up…remove the pod and the service: –

kubectl delete pod nginx
kubectl delete service nginx

And now we can add the taint back to the control node: –

kubectl taint nodes $(hostname) node-role.kubernetes.io/master:NoSchedule

Joining the other nodes to the cluster

Now that we have the control node up and running, and the worker nodes ready to go…let’s add them into the cluster!

First thing to do (on all the nodes) is add entries for each node in the /etc/hosts file. For example on my control node I have the following: –

192.168.1.54 k8s-node-1
192.168.1.55 k8s-node-2
192.168.1.56 k8s-node-3

Make sure each node has entries for all the other nodes in the cluster in the file…and then we’re ready to go!

Remember when we ran kubeadm init on the control node to create the cluster? At the end of the output there was something similar to: –

sudo kubeadm join k8s-control-1:6443 --token f5e0m6.u6hx5k9rekrt1ktk \
--discovery-token-ca-cert-hash sha256:fd3bed4669636d1f2bbba0fd58bcddffe6dd29bde82e0e80daf985a77d96c37b

Don’t worry if you didn’t save it, it’s in the kubeadm-init.out file we created. Or you can run this on the control node to regenerate the command: –

kubeadm token create --print-join-command

So let’s run that join command on each of the nodes: –

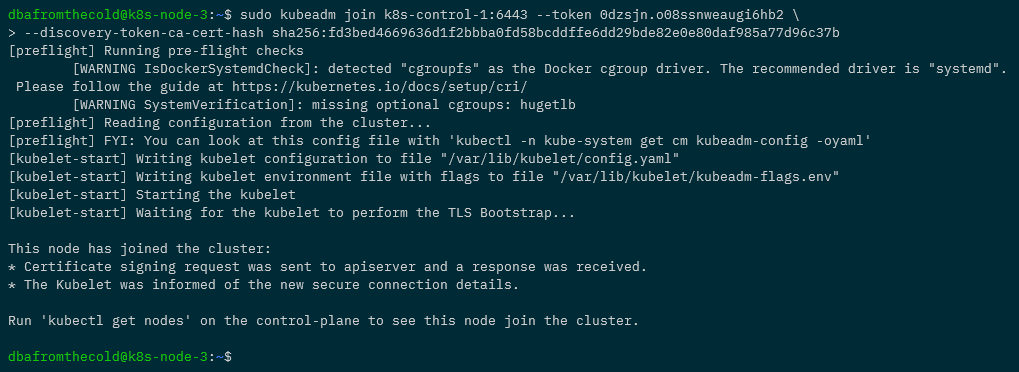
Once that’s done, we can confirm that all the nodes have joined and are ready to go by running: –

kubectl get nodes

Fantastic stuff, we have a Kubernetes cluster all built!


External kubectl access to cluster

Ok, we don’t want to be ssh’ing into the cluster each time we want to work with it, so let’s setup kubectl access from our local machine. What we’re going to do is grab the config file from the control node and pull it down locally.

Kubectl can be installed locally from here

Now on our local machine run: –

mkdir $HOME/.kube

And then pull down the config file: –

scp k8s-control-1:/home/dbafromthecold/.kube/config $HOME/.kube/

And to confirm that we can use kubectl locally to administer the cluster: –

kubectl get nodes

Wooo! Ok, phew…still with me? Right, it’s now time to (finally) deploy Azure SQL Edge to our cluster.


Running Azure SQL Edge

Alrighty, we’ve done a lot of config to get to this point but now we can deploy Azure SQL Edge. Here’s the yaml file to deploy: –

apiVersion: apps/v1
kind: Deployment
metadata:
  name: sqledge-deployment
spec:
  replicas: 1
  selector:
    matchLabels:
      app: sqledge
  template:
    metadata:
      labels:
        app: sqledge
    spec:
      containers:
        - name: azuresqledge
          image: mcr.microsoft.com/azure-sql-edge:latest
          ports:
            - containerPort: 1433
          env:
            - name: MSSQL_PID
              value: "Developer"
            - name: ACCEPT_EULA
              value: "Y"
            - name: SA_PASSWORD
              value: "Testing1122"
            - name: MSSQL_AGENT_ENABLED
              value: "TRUE"
            - name: MSSQL_COLLATION
              value: "SQL_Latin1_General_CP1_CI_AS"
            - name: MSSQL_LCID
              value: "1033"
      terminationGracePeriodSeconds: 30
      securityContext:
        fsGroup: 10001
---
apiVersion: v1
kind: Service
metadata:
  creationTimestamp: null
  name: sqledge-deployment
spec:
  ports:
  - port: 1433
    protocol: TCP
    targetPort: 1433
  selector:
    app: sqledge
  type: LoadBalancer

What this is going to do is create a deployment called sqledge-deployment with one pod running Azure SQL Edge and expose it with a load balanced service.

We can either create a deployment.yaml file or deploy it from a Gist like this: –

kubectl apply -f https://gist.githubusercontent.com/dbafromthecold/1a78438bc408406f341be4ac0774c2aa/raw/9f4984ead9032d6117a80ee16409485650258221/azure-sql-edge.yaml

Give it a few minutes for the Azure SQL Edge deployment to be pulled down from the MCR and then run: –

kubectl get all

If all has gone well, the pod will have a status of Running and we’ll have an external IP address for our service.

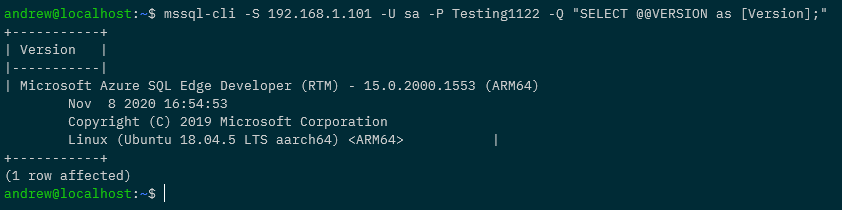
Which means we can connect to it and run a SQL command: –

mssql-cli -S 192.168.1.101 -U sa -P Testing1122 -Q "SELECT @@VERSION as [Version];"


N.B. – I’m using the mssql-cli here but you can use SSMS or ADS.

And that’s it! We have Azure SQL Edge up and running in our Raspberry Pi Kubernetes cluster and we can connect to it externally!

Thanks for reading!

Differences between using a Load Balanced Service and an Ingress in Kubernetes

What is the difference between using a load balanced service and an ingress to access applications in Kubernetes?

Basically, they achieve the same thing. Being able to access an application that’s running in Kubernetes from outside of the cluster, but there are differences!

The key difference between the two is that ingress operates at networking layer 7 (the application layer) so routes connections based on http host header or url path. Load balanced services operate at layer 4 (the transport layer) so can load balance arbitrary tcp/udp/sctp services.

Ok, that statement doesn’t really clear things up (for me anyway). I’m a practical person by nature…so let’s run through examples of both (running everything in Kubernetes for Docker Desktop).

What we’re going to do is spin up two nginx pages that will serve as our applications and then firstly use load balanced services to access them, followed by an ingress.

So let’s create two nginx deployments from a custom image (available on the GHCR): –

kubectl create deployment nginx-page1 --image=ghcr.io/dbafromthecold/nginx:page1
kubectl create deployment nginx-page2 --image=ghcr.io/dbafromthecold/nginx:page2

And expose those deployments with a load balanced service: –

kubectl expose deployment nginx-page1 --type=LoadBalancer --port=8000 --target-port=80
kubectl expose deployment nginx-page2 --type=LoadBalancer --port=9000 --target-port=80

Confirm that the deployments and services have come up successfully: –

kubectl get all

Ok, now let’s check that the nginx pages are working. As we’ve used a load balanced service in k8s in Docker Desktop they’ll be available as localhost:PORT: –

curl localhost:8000
curl localhost:9000

Great! So we’re using the external IP address (local host in this case) and a port number to connect to our applications.

Now let’s have a look at using an ingress.

First, let’s get rid of those load balanced services: –

kubectl delete service nginx-page1 nginx-page2

And create two new cluster IP services: –

kubectl expose deployment nginx-page1 --type=ClusterIP --port=8000 --target-port=80
kubectl expose deployment nginx-page2 --type=ClusterIP --port=9000 --target-port=80

So now we have our pods running and two cluster IP services, which aren’t accessible from outside of the cluster: –

The services have no external IP so what we need to do is deploy an ingress controller.

An ingress controller will provide us with one external IP address, that we can map to a DNS entry. Once the controller is up and running we then use an ingress resources to define routing rules that will map external requests to different services within the cluster.

Kubernetes currently supports GCE and nginx controllers, we’re going to use an nginx ingress controller.

To spin up the controller run: –

kubectl apply -f https://raw.githubusercontent.com/kubernetes/ingress-nginx/controller-v0.40.2/deploy/static/provider/cloud/deploy.yaml

We can see the number of resources that’s going to create its own namespace, and to confirm they’re all up and running: –

kubectl get all -n ingress-nginx

Note the external IP of “localhost” for the ingress-nginx-controller service.

Ok, now we can create an ingress to direct traffic to our applications. Here’s an example ingress.yaml file: –

apiVersion: networking.k8s.io/v1
kind: Ingress
metadata:
  name: ingress-testwebsite
  annotations:
    kubernetes.io/ingress.class: "nginx"
spec:
  rules:
  - host: www.testwebaddress.com
    http:
      paths:
       - path: /pageone
         pathType: Prefix
         backend:
           service:
             name: nginx-page1
             port:
               number: 8000
       - path: /pagetwo
         pathType: Prefix
         backend:
           service:
             name: nginx-page2
             port:
               number: 9000

Watch out here. In Kubernetes v1.19 ingress went GA so the apiVersion changed. The yaml above won’t work in any version prior to v1.19.

Anyway, the main points in this yaml are: –

  annotations:
    kubernetes.io/ingress.class: "nginx"

Which makes this ingress resource use our ingress nginx controller.

  rules:
  - host: www.testwebaddress.com

Which sets the URL we’ll be using to access our applications to http://www.testwebaddress.com

       - path: /pageone
         pathType: Prefix
         backend:
           service:
             name: nginx-page1
             port:
               number: 8000
       - path: /pagetwo
         pathType: Prefix
         backend:
           service:
             name: nginx-page2
             port:
               number: 9000

Which routes our requests to the backend cluster IP services depending on the path (e.g. – http://www.testwebaddress.com/pageone will be directed to the nginx-page1 service)

You can create the ingress.yaml file manually and then deploy to Kubernetes or just run: –

kubectl apply -f https://gist.githubusercontent.com/dbafromthecold/a6805ca732eac278e902bbcf208aef8a/raw/e7e64375c3b1b4d01744c7d8d28c13128c09689e/testnginxingress.yaml

Confirm that the ingress is up and running (it’ll take a minute to get an address): –

kubectl get ingress


N.B. – Ignore the warning (if you get one like in the screen shot above), we’re using the correct API version

Finally, we now also need to add an entry for the web address into our hosts file (simulating a DNS entry): –

127.0.0.1 www.testwebaddress.com

And now we can browse to the web pages to see the ingress in action!

And that’s the differences between using load balanced services or an ingress to connect to applications running in a Kubernetes cluster. The ingress allows us to only use the one external IP address and then route traffic to different backend services whereas with the load balanced services, we would need to use different IP addresses (and ports if configured that way) for each application.

Thanks for reading!

New Pluralsight Course – Kubernetes Package Administration with Helm

My first course Kubernetes Package Administration with Helm has been published on Pluralsight and is now available!

Check out the course overview here

This course is aimed at anyone who wants to get into working with Helm to deploy and manage applications running on Kubernetes.

It’s divided into three modules covering: –

Helm Overview

  • A guide to what Helm is and its history
  • Setting up your local environment to work with Helm
  • Installing Helm and adding the Stable Helm repository

Exploring Helm Releases

  • Deploying a Helm Chart to Kubernetes
  • Retrieving information about a Helm Release
  • Upgrading a Helm Release
  • Rolling back a Helm Release
  • Downloading and exploring a Helm Chart

Configuring Helm Repositories

  • How to create and package a Helm Chart
  • Pushing a Chart to a local/remote Helm repository

All modules are accompanied with demos to take you through each topic discussed. The code for the demos is available on Github here

By the end of the course you’ll have the skills to confidently work with applications deployed to Kubernetes with Helm.

A kubectl plugin to decode secrets created by Helm

Last week I wrote a blog post about Decoding Helm Secrets.

The post goes through deploying a Helm Chart to Kubernetes and then running the following to decode the secrets that Helm creates in order for it to be able to rollback a release: –

kubectl get secret sh.helm.release.v1.testchart.v1 -o jsonpath="{ .data.release }" | base64 -d | base64 -d | gunzip -c | jq '.chart.templates[].data' | tr -d '"' | base64 -d

But that’s a bit long winded eh? I don’t really fancy typing that every time I want to have a look at those secrets. So I’ve created a kubectl plugin that’ll do it for us!

Here’s the code: –

#!/bin/bash

# get helm secrets from Kubernetes cluster
SECRET=$(kubectl get secret $1 -o jsonpath='{ .data.release }' ) 

# decode the secrets
DECODED_SECRET=$(echo $SECRET | base64 -d | base64 -d | gunzip -c )

# parse the decoded secrets, pulling out the templates and removing whitespace
DATA=$(echo $DECODED_SECRET | jq '.chart.templates[]' | tr -d '[:space:]' )

# assign each entry in templates to an array
ARRAY=($(echo $DATA | tr '} {' '\n'))

# loop through each entry in the array
for i in "${ARRAY[@]}"
do
        # splitting name and data into separate items in another array
        ITEMS=($(echo $i | tr ',' '\n'))

        # parsing the name field
        echo "${ITEMS[0]}" | sed -e 's/name/""/g; s/templates/""/g' | tr -d '/:"'

        # decoding and parsing the data field
        echo "${ITEMS[1]}" | sed -e 's/data/""/g' | tr -d '":' | base64 -d

        # adding a blank line at the end
        echo ''
done  

It’s up in Github as a Gist but to use the plugin, pull it down with curl and drop it into a file in your PATH environment variable. Here I’m dropping it into /usr/local/bin: –

curl https://gist.githubusercontent.com/dbafromthecold/fdd1bd8b7e921075d3d37fcb8eb9a025/raw/afa873b0ef343859ed4119eeb9f41bf733e8cea2/DecodeHelmSecrets.sh > /usr/local/bin/kubectl-decodehelm

Make it executable: –

chmod +x /usr/local/bin/kubectl-decodehelm

Now confirm that the plugin is there: –

sudo kubectl plugin list


N.B. – I’m running this with sudo as I’m in WSL which will error out when checking my Windows paths if I don’t use sudo

Let’s test it out! I’m going to deploy the mysql chart from the stable repository: –

helm install mysql stable/mysql

Once deployed, we’ll have one secret created by Helm: –

kubectl get secrets

Now let’s use the plugin to decode the information in that secret: –

kubectl decodehelm sh.helm.release.v1.mysql.v1

And there’s the decoded secret! Well, just a sample of it in that screenshot as the mysql Chart contains a few yaml files.

The format of the output is: –

  • Filename (in the above example… NOTES.txt
  • Decoded file (so we’re seeing the text in the notes file for the mysql Chart)

Thanks for reading!

Decoding Helm Secrets

Helm is a great tool for deploying applications to Kubernetes. We can bundle up all our yaml files for deployments, services etc. and deploy them to a cluster with one easy command.

But another really cool feature of Helm, the ability to easily upgrade and roll back a release (the term for an instance of a Helm chart running in a cluster).

Now, you can do this with kubectl. If I upgrade a deployment with kubectl apply I can then use kubectl rollout undo to roll back that upgrade. That’s great! And it’s one of the best features of Kubernetes.

What happens when you upgrade a deployment is that a new replicaset is created for that deployment, which is running the upgraded application in a new set of pods.

If we rollback with kubectl rollout undo the pods in the newest replicaset are deleted, and pods in an older replicaset are spun back up, rolling back the upgrade.

But there’s a potential problem here. What happens if that old replicaset is deleted?

If that happens, we wouldn’t be able to rollback the upgrade. Well we wouldn’t be able to roll it back with kubectl rollout undo, but what happens if we’re using Helm?

Let’s run through a demo and have a look.

So I’m on Windows 10, running in WSL 2, my distribution is Ubuntu: –

ubuntu

N.B. – The below code will work in a powershell session on Windows, apart from a couple of commands where I’m using Linux specific command line tools, hence why I’m in my WSL 2 distribution. (No worries if you’re on a Mac or native Linux distro)

Anyway I’m going to navigate to Helm directory on my local machine, where I am going to create a test chart: –

cd /mnt/c/Helm

Create a chart called testchart: –

helm create testchart

Remove all unnecessary files in the templates directory: –

rm -rf ./testchart/templates/*

Create a deployment yaml file: –

kubectl create deployment nginx \
--image=nginx:1.17 \
--dry-run=client \
--output=yaml > ./testchart/templates/deployment.yaml

Which will create the following yaml and save it as deployment.yaml in the templates directory: –

apiVersion: apps/v1
kind: Deployment
metadata:
  creationTimestamp: null
  labels:
    app: nginx
  name: nginx
spec:
  replicas: 1
  selector:
    matchLabels:
      app: nginx
  strategy: {}
  template:
    metadata:
      creationTimestamp: null
      labels:
        app: nginx
    spec:
      containers:
      - image: nginx:1.17
        name: nginx
        resources: {}
status: {}

Now create the deployment so we can run the expose command below: –

kubectl create deployment nginx --image=nginx:1.17 

Generate the yaml for the service with the kubectl expose command: –

kubectl expose deployment nginx \
--type=LoadBalancer \
--port=80 \
--dry-run=client \
--output=yaml > ./testchart/templates/service.yaml

Which will give us the following yaml and save it as service.yaml in the templates directory: –

apiVersion: v1
kind: Service
metadata:
  creationTimestamp: null
  labels:
    app: nginx
  name: nginx
spec:
  ports:
  - port: 80
    protocol: TCP
    targetPort: 80
  selector:
    app: nginx
  type: LoadBalancer
status:
  loadBalancer: {}

Delete the deployment, it’s not needed: –

kubectl delete deployment nginx

Recreate the values.yaml file with a value for the container image: –

rm ./testchart/values.yaml
echo "containerImage: nginx:1.17" > ./testchart/values.yaml

Then replace the hard coded container image in the deployment.yaml with a template directive: –

sed -i 's/nginx:1.17/{{ .Values.containerImage }}/g' ./testchart/templates/deployment.yaml

So the deployment.yaml file now looks like this: –

apiVersion: apps/v1
kind: Deployment
metadata:
  creationTimestamp: null
  labels:
    app: nginx
  name: nginx
spec:
  replicas: 1
  selector:
    matchLabels:
      app: nginx
  strategy: {}
  template:
    metadata:
      creationTimestamp: null
      labels:
        app: nginx
    spec:
      containers:
      - image: {{ .Values.containerImage }}
        name: nginx
        resources: {}
status: {}

Which means that the container image is not hard coded. It’ll take the value of nginx:1.17 from the values.yaml file or we can override it with the set flag (which we’ll do in a minute).

But first, deploy the chart to my local Kubernetes cluster running in Docker Desktop: –

helm install testchart ./testchart

Confirm release: –

helm list


N.B. – That app version is the default version set in the Chart.yaml file (which I haven’t updated)

Check image running in deployment: –

kubectl get deployment -o jsonpath='{ .items[*].spec.template.spec.containers[*].image }{"\n"}'

Great. That’s deployed and the container image is the one set in the values.yaml file in the Chart.

Now upgrade the release, replacing the default container image value with the set flag: –

helm upgrade testchart ./testchart --set containerImage=nginx:1.18

Confirm release has been upgraded (check the revision number): –

helm list

Also, confirm with the release history: –

helm history testchart

So we can see the initial deployment of the release and then the upgrade. App version remains the same as I haven’t changed the value in the Chart.yaml file. However, the image has been changed and we can see that with: –

kubectl get deployment -o jsonpath='{ .items[*].spec.template.spec.containers[*].image }{"\n"}'

So we’ve upgraded the image that’s running for the one pod in the deployment.

Let’s have a look at the replicasets of the deployment: –

kubectl get replicasets

So we have two replicasets for the deployment created by our Helm release. The inital one running nginx v1.17 and the newest one running nginx v1.18.

If we wanted to rollback the upgrade with kubectl, this would work (don’t run this code!): –

kubectl rollout undo deployment nginx

What would happen here is the that the pod under the newset replicaset would be deleted and a pod under the old replicaset would be spun up, rolling back nginx to v1.17.

But we’re not going to do that, as we’re using Helm.

Let’s grab the oldest replicaset name: –

REPLICA_SET=$(kubectl get replicasets -o jsonpath='{.items[0].metadata.name }' --sort-by=.metadata.creationTimestamp)

And delete it: –

kubectl delete replicasets $REPLICA_SET

So we now only have the one replicaset: –

kubectl get replicasets

Now try to rollback using the kubectl rollout undo command: –

kubectl rollout undo deployment nginx

The reason that failed is that we deleted the old replicaset, so there’s no history for that deployment, which we can see with: –

kubectl rollout history deployment nginx

But Helm has the history: –

helm history testchart

So we can rollback: –

helm rollback testchart 1

View release status: –

helm list

View release history: –

helm history testchart

View replicasets: –

kubectl get replicasets

The old replicaset is back! How? Let’s have a look at secrets within the cluster: –

kubectl get secrets

Ahhh, bet you anything the Helm release history is stored in those secrets! The initial release (v1), the upgrade (v2), and the rollback (v3).

Let’s have a closer look at the first one: –

kubectl get secret sh.helm.release.v1.testchart.v1 -o json

Hmm, that release field looks interesting. What we could do is base64 decode it and then run it through decompression on http://www.txtwizard.net/compression which would give us: –

{
"name":"testchart",
"info":
	{
		"first_deployed":"2020-08-09T11:21:20.4665817+01:00",
		"last_deployed":"2020-08-09T11:21:20.4665817+01:00",
		"deleted":"",
		"description":"Install complete",
		"status":"superseded"},
		"chart":{"metadata":
	{
		"name":"testchart",
		"version":"0.1.0",
		"description":"A Helm chart for Kubernetes",
		"apiVersion":"v2",
		"appVersion":"1.16.0",
		"type":"application"},
		"lock":null,
		"templates":[
			{
				"name":
				"templates/deployment.yaml",
				"data":"YXBpVmVyc2lvbjogYXBwcy92MQpraW5kOiBEZXBsb3ltZW50Cm1ldGFkYXRhOgogIGNyZWF0aW9uVGltZXN0YW1wOiBudWxsCiAgbGFiZWxzOgogICAgYXBwOiBuZ2lueAogIG5hbWU6IG5naW54CnNwZWM6CiAgcmVwbGljYXM6IDEKICBzZWxlY3RvcjoKICAgIG1hdGNoTGFiZWxzOgogICAgICBhcHA6IG5naW54CiAgc3RyYXRlZ3k6IHt9CiAgdGVtcGxhdGU6CiAgICBtZXRhZGF0YToKICAgICAgY3JlYXRpb25UaW1lc3RhbXA6IG51bGwKICAgICAgbGFiZWxzOgogICAgICAgIGFwcDogbmdpbngKICAgIHNwZWM6CiAgICAgIGNvbnRhaW5lcnM6CiAgICAgIC0gaW1hZ2U6IHt7IC5WYWx1ZXMuY29udGFpbmVySW1hZ2UgfX0KICAgICAgICBuYW1lOiBuZ2lueAogICAgICAgIHJlc291cmNlczoge30Kc3RhdHVzOiB7fQo="},{"name":"templates/service.yaml","data":"YXBpVmVyc2lvbjogdjEKa2luZDogU2VydmljZQptZXRhZGF0YToKICBjcmVhdGlvblRpbWVzdGFtcDogbnVsbAogIGxhYmVsczoKICAgIGFwcDogbmdpbngKICBuYW1lOiBuZ2lueApzcGVjOgogIHBvcnRzOgogIC0gcG9ydDogODAKICAgIHByb3RvY29sOiBUQ1AKICAgIHRhcmdldFBvcnQ6IDgwCiAgc2VsZWN0b3I6CiAgICBhcHA6IG5naW54CiAgdHlwZTogTG9hZEJhbGFuY2VyCnN0YXR1czoKICBsb2FkQmFsYW5jZXI6IHt9Cg=="}],"values":{"containerImage":"nginx:1.17"},"schema":null,"files":[{"name":".helmignore","data":"IyBQYXR0ZXJucyB0byBpZ25vcmUgd2hlbiBidWlsZGluZyBwYWNrYWdlcy4KIyBUaGlzIHN1cHBvcnRzIHNoZWxsIGdsb2IgbWF0Y2hpbmcsIHJlbGF0aXZlIHBhdGggbWF0Y2hpbmcsIGFuZAojIG5lZ2F0aW9uIChwcmVmaXhlZCB3aXRoICEpLiBPbmx5IG9uZSBwYXR0ZXJuIHBlciBsaW5lLgouRFNfU3RvcmUKIyBDb21tb24gVkNTIGRpcnMKLmdpdC8KLmdpdGlnbm9yZQouYnpyLwouYnpyaWdub3JlCi5oZy8KLmhnaWdub3JlCi5zdm4vCiMgQ29tbW9uIGJhY2t1cCBmaWxlcwoqLnN3cAoqLmJhawoqLnRtcAoqLm9yaWcKKn4KIyBWYXJpb3VzIElERXMKLnByb2plY3QKLmlkZWEvCioudG1wcm9qCi52c2NvZGUvCg=="}]},
				"manifest":"---\n# 
					Source: testchart/templates/service.yaml\n
					apiVersion: v1\n
					kind: Service\nmetadata:\n  
					creationTimestamp: null\n  
					labels:\n    
					app: nginx\n  
					name: nginx\n
					spec:\n  
					ports:\n  
					- port: 80\n    
					protocol: TCP\n    
					targetPort: 80\n  
					selector:\n    
					app: nginx\n  
					type: LoadBalancer\n
					status:\n  loadBalancer: {}\n---\n# 
					
					Source: testchart/templates/deployment.yaml\n
					apiVersion: apps/v1\n
					kind: Deployment\n
					metadata:\n  
					creationTimestamp: null\n  
					labels:\n    
					app: nginx\n  
					name: nginx\nspec:\n  
					replicas: 1\n  
					selector:\n    
					matchLabels:\n      
					app: nginx\n  
					strategy: {}\n  
					template:\n    
					metadata:\n      
					creationTimestamp: null\n      
					labels:\n        
					app: nginx\n    
					spec:\n      
					containers:\n      
					- image: nginx:1.17\n        
					name: nginx\n        
					resources: {}\n
					status: {}\n",
					"version":1,
					"namespace":"default"
			}

BOOM! That look like our deployment and service manifests! We can see all the information contained in our initial Helm release (confirmed as the container image is nginx:1.17)!

So by storing this information as secrets in the target Kubernetes cluster, Helm can rollback an upgrade even if the old replicaset has been deleted! Pretty cool!

Not very clean though, eh? And have a look at that data field…that looks suspiciously like more encrypted information (well, because it is 🙂 ).

Let’s decrypt it! This time on the command line: –

kubectl get secret sh.helm.release.v1.testchart.v1 -o jsonpath="{ .data.release }" | base64 -d | base64 -d | gunzip -c | jq '.chart.templates[].data' | tr -d '"' | base64 -d

Ha! There’s the deployment and service yaml files!

By using Helm we can rollback a release even if the old replicaset of the deployment has been deleted as Helm stores the history of a release in secrets in the target Kubernetes cluster. And by using the code above, we can decrypt those secrets and have a look at the information they contain.

Thanks for reading!