In a previous post we went through how to setup a Kubernetes cluster on Raspberry Pis and then deploy Azure SQL Edge to it.
In this post I want to go through how to configure a NFS server so that we can use that to provision persistent volumes in the Kubernetes cluster.
Once again, doing this on a Raspberry Pi 4 with an external USB SSD. The kit I bought was: –
1 x Raspberry Pi 4 Model B – 2GB RAM
1 x SanDisk Ultra 16 GB microSDHC Memory Card
1 x SanDisk 128 GB Solid State Flash Drive
The initial set up steps are the same as the previous posts, but we’re going to run through them here (as I don’t just want to link back to the previous blog).
So let’s go ahead and run through setting up a Raspberry Pi NFS server and then deploying persistent volumes for Azure SQL Edge.
Flashing the OS
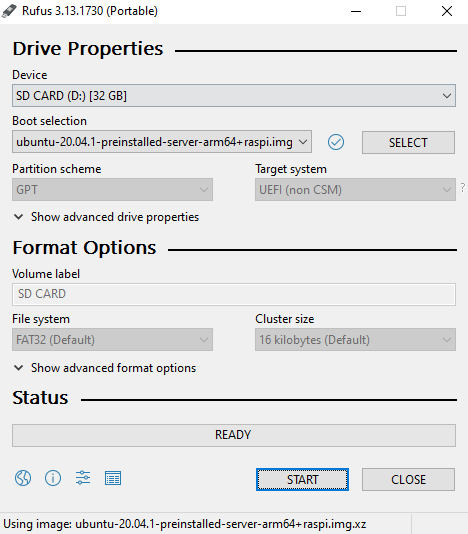
The first thing to do is flash the SD card using Rufus: –
Grab the Ubuntu 20.04 ARM image from the website and flash the SD card: –

Once that’s done, connect the Pi to an internet connection, plug in the USB drive, and then power the Pi on.
Setting a static IP
Once the Pi is powered on, find it’s IP address on the network. Nmap can be used for this: –
nmap -sP 192.168.1.0/24
Or use a Network Analyzer application on your phone (I find the output of nmap can be confusing at times).
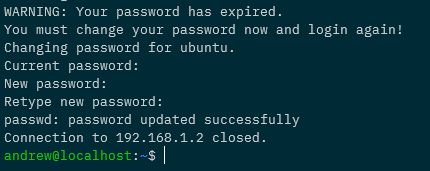
Then we can ssh to the Pi: –
ssh pi@192.168.1.xx
And then change the password of the default ubuntu user (default password is ubuntu): –

Ok, now we can ssh back into the Pi and set a static IP address. Edit the file /etc/netplan/50-cloud-init.yaml to look something like this: –
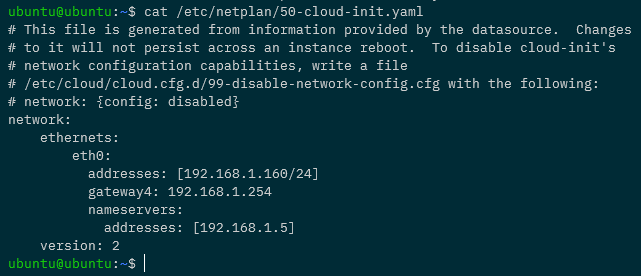
eth0 is the network the Pi is on (confirm with ip a), 192.168.1.160 is the IP address I’m setting, 192.168.1.254 is the gateway on my network, and 192.168.1.5 is my dns server (my pi-hole).
There is a warning there about changes not persisting, but they do 🙂
Now that the file is configured, we need to run: –
sudo netplan apply
Once this is executed it will break the current shell, wait for the Pi to come back on the network on the new IP address and ssh back into it.
Creating a custom user
Let’s now create a custom user, with sudo access, and diable the default ubuntu user.
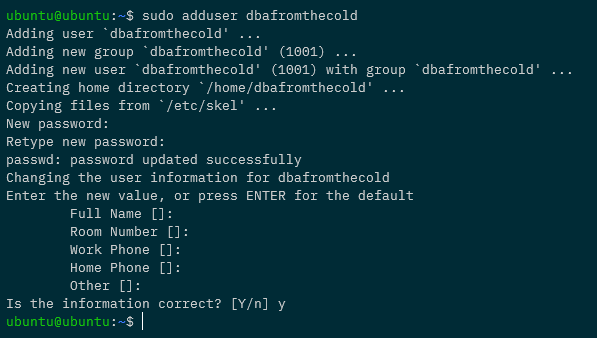
To create a new user: –
sudo adduser dbafromthecold

Add to the sudo group: –
sudo usermod -aG sudo dbafromthecold
Then log out of the Pi and log back in with the new user. Once in, disable the default ubuntu user: –
sudo usermod --expiredate 1 ubuntu
Cool! So we’re good to go to set up key based authentication into the Pi.
Setting up key based authentication
In the post about creating the cluster we already created an ssh key pair to use to log into the Pi but if we needed to create a new key we could just run: –
ssh-keygen
And follow the prompts to create a new key pair.
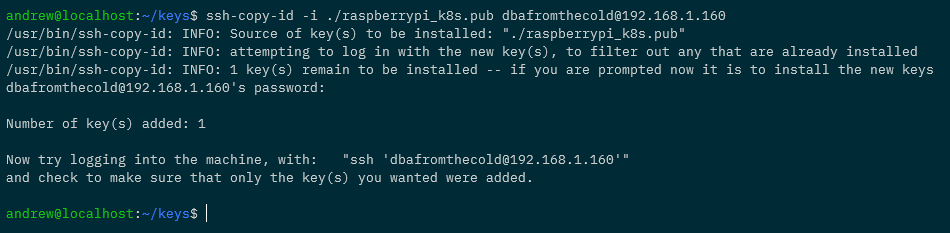
Now we can copy the public key to the Pi. Log out of the Pi and navigate to the location of the public key: –
ssh-copy-id -i ./raspberrypi_k8s.pub dbafromthecold@192.168.1.160

Once the key has been copied to the Pi, add an entry for the Pi into the ssh config file: –
Host pi-nfs-server
    HostName 192.168.1.160
    User dbafromthecold
    IdentityFile ~/raspberrypi_k8s
To make sure that’s all working, try logging into the Pi with: –
ssh dbafromthecold@pi-nfs-server
Installing and configuring the NFS server
Great! Ok, now we can configure the Pi. First thing, let’s rename it to pi-nfs-server and bounce: –
sudo hostnamectl set-hostname pi-nfs-server
sudo reboot
Once the Pi comes back up, log back in and install the nfs server itself: –
sudo apt-get install -y nfs-kernel-server
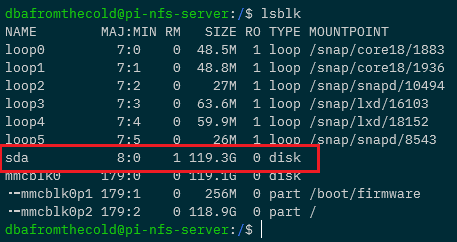
Now we need to find the USB drive on the Pi so that we can mount it: –
lsblk
And here you can see the USB drive as sda: –

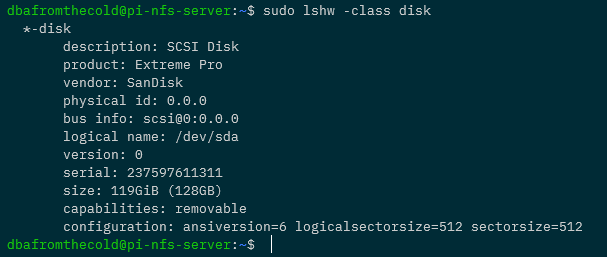
Another way to find the disk is to run: –
sudo lshw -class disk

So we need to get some more information about /dev/sda it in order to mount it: –
sudo blkid /dev/sda

Here you can see the UUID of the drive and that it’s got a type of NTFS.
Now we’re going to create a folder to mount the drive (/mnt/sqledge): –
sudo mkdir /mnt/sqledge/
And then add a record for the mount into /etc/fstab using the UUID we got earlier for the drive: –
sudo vim /etc/fstab
And add (changing the UUID to the value retrieved earlier): –
UUID=242EC6792EC64390 /mnt/sqledge ntfs defaults 0 0

Then mount the drive to /mnt/sqledge: –
sudo mount -a
To confirm the disk is mounted: –
df -h
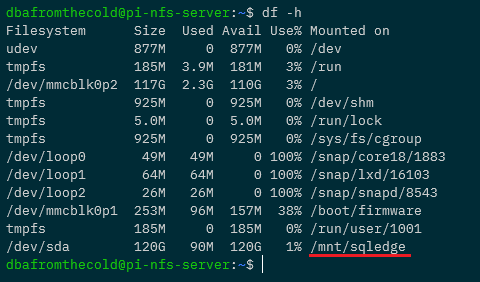
Great! We have our disk mounted. Now let’s create some subfolders for the SQL system, data, and log files: –
sudo mkdir /mnt/sqledge/{sqlsystem,sqldata,sqllog}
Ok, now we need to modify the export file so that the server knows which directories to share. Get your user and group ID using the id command: –

The edit the /etc/exports file: –
sudo vim /etc/exports
Add the following to the file: –
/mnt/sqledge *(rw,all_squash,insecure,async,no_subtree_check,anonuid=1001,anongid=1001)
N.B. – Update the final two numbers with the values from the id command. A full break down of what’s happening in this file is detailed here.
And then update: –
sudo exportfs -ra
Configuring the Kubernetes Nodes
Each node in the cluster needs to have the nfs tools installed: –
sudo apt-get install nfs-common
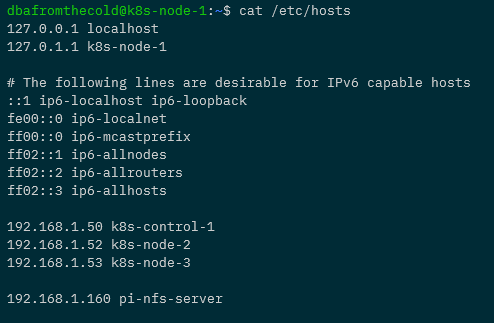
And each one will need a reference to the NFS server in its /etc/hosts file. Here’s what the hosts file on k8s-node-1 now looks like: –
Creating a persistent volume
Excellent stuff! Now we’re good to go to create three persistent volumes for our Azure SQL Edge pod: –
apiVersion: v1
kind: PersistentVolume
metadata:
  name: sqlsystem-pv
spec:
  capacity:
    storage: 1024Mi
  accessModes:
    - ReadWriteOnce
  nfs:
    server: pi-nfs-server
    path: "/mnt/sqledge/sqlsystem"
---
apiVersion: v1
kind: PersistentVolume
metadata:
  name: sqldata-pv
spec:
  capacity:
    storage: 1024Mi
  accessModes:
    - ReadWriteOnce
  nfs:
    server: pi-nfs-server
    path: "/mnt/sqledge/sqldata"
---
apiVersion: v1
kind: PersistentVolume
metadata:
  name: sqllog-pv
spec:
  capacity:
    storage: 1024Mi
  accessModes:
    - ReadWriteOnce
  nfs:
    server: pi-nfs-server
    path: "/mnt/sqledge/sqllog"
What this file will do is create three persistent volumes, 1GB in size (although that will kinda be ignored as we’re using NFS shares), in the ReadWriteOnce access mode, pointing at each of the folders we’ve created on the NFS server.
We can either create the file and deploy or run (do this locally with kubectl pointed at the Pi K8s cluster): –
kubectl apply -f https://gist.githubusercontent.com/dbafromthecold/da751e8c93a401524e4e59266812dc63/raw/d97c0a78887b6fcc41d0e48c46f05fe48981c530/azure-sql-edge-pv.yaml
To confirm: –
kubectl get pv

Now we can create three persistent volume claims for the persistent volumes: –
apiVersion: v1
kind: PersistentVolumeClaim
metadata:
  name: sqlsystem-pvc
spec:
  volumeName: sqlsystem-pv
  accessModes:
    - ReadWriteOnce
  resources:
    requests:
      storage: 1024Mi
---
apiVersion: v1
kind: PersistentVolumeClaim
metadata:
  name: sqldata-pvc
spec:
  volumeName: sqldata-pv
  accessModes:
    - ReadWriteOnce
  resources:
    requests:
      storage: 1024Mi
---
apiVersion: v1
kind: PersistentVolumeClaim
metadata:
  name: sqllog-pvc
spec:
  volumeName: sqllog-pv
  accessModes:
    - ReadWriteOnce
  resources:
    requests:
      storage: 1024Mi
Each one with the same AccessMode and size as the corresponding persistent volume.
Again, we can create the file and deploy or just run: –
kubectl apply -f https://gist.githubusercontent.com/dbafromthecold/0c8fcd74480bba8455672bb5f66a9d3c/raw/f3fdb63bdd039739ef7d7b6ab71196803bdfebb2/azure-sql-edge-pvc.yaml
And confirm with: –
kubectl get pvc

The PVCs should all have a status of Bound, meaning that they’ve found their corresponding PVs. We can confirm this with: –
kubectl get pv

Deploying Azure SQL Edge with persistent storage
Awesome stuff! Now we are good to go and deploy Azure SQL Edge to our Pi K8s cluster with persistent storage! Here’s the yaml file for Azure SQL Edge: –
apiVersion: apps/v1
kind: Deployment
metadata:
  name: sqledge-deployment
spec:
  replicas: 1
  selector:
    matchLabels:
      app: sqledge
  template:
    metadata:
      labels:
        app: sqledge
    spec:
      volumes:
        - name: sqlsystem
          persistentVolumeClaim:
            claimName: sqlsystem-pvc
        - name: sqldata
          persistentVolumeClaim:
            claimName: sqldata-pvc
        - name: sqllog
          persistentVolumeClaim:
            claimName: sqllog-pvc
      containers:
        - name: azuresqledge
          image: mcr.microsoft.com/azure-sql-edge:latest
          ports:
            - containerPort: 1433
          volumeMounts:
            - name: sqlsystem
              mountPath: /var/opt/mssql
            - name: sqldata
              mountPath: /var/opt/sqlserver/data
            - name: sqllog
              mountPath: /var/opt/sqlserver/log
          env:
            - name: MSSQL_PID
              value: "Developer"
            - name: ACCEPT_EULA
              value: "Y"
            - name: SA_PASSWORD
              value: "Testing1122"
            - name: MSSQL_AGENT_ENABLED
              value: "TRUE"
            - name: MSSQL_COLLATION
              value: "SQL_Latin1_General_CP1_CI_AS"
            - name: MSSQL_LCID
              value: "1033"
            - name: MSSQL_DATA_DIR
              value: "/var/opt/sqlserver/data"
            - name: MSSQL_LOG_DIR
              value: "/var/opt/sqlserver/log"
      terminationGracePeriodSeconds: 30
      securityContext:
        fsGroup: 10001
So we’re referencing our three persistent volume clams and mounting them as
- sqlsystem-pvc – /var/opt/mssql
- sqldata-pvc – /var/opt/sqlserver/data
- sqllog-pvc – /var/opt/sqlserver/log
We’re also setting environment variables to set the default data and log paths to the paths mounted by persistent volume claims.
To deploy: –
kubectl apply -f https://gist.githubusercontent.com/dbafromthecold/92ddea343d525f6c680d9e3fff4906c9/raw/4d1c071e9c515266662361e7c01a27cc162d08b1/azure-sql-edge-persistent.yaml
To confirm: –
kubectl get all
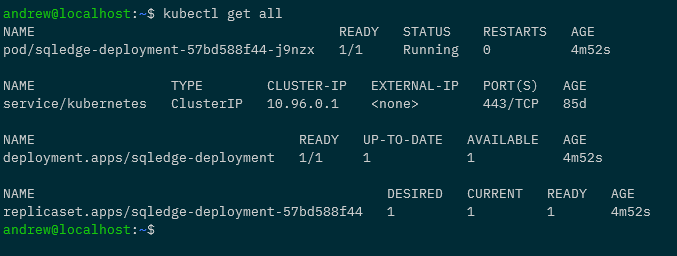
All looks good! To dig in a little deeper: –
kubectl describe pods -l app=sqledge

Testing the persistent volumes
But let’s not take Kubernetes’ word for it! Let’s create a database and see it persistent across pods.
So expose the deployment: –
kubectl expose deployment sqledge-deployment --type=LoadBalancer --port=1433 --target-port=1433
Get the External IP of the service created (provided by MetalLb configured in the previous post): –
kubectl get services

And now create a database with the mssql-cli: –
mssql-cli -S 192.168.1.101 -U sa -P Testing1122 -Q "CREATE DATABASE [testdatabase];"
Confirm the database is there: –
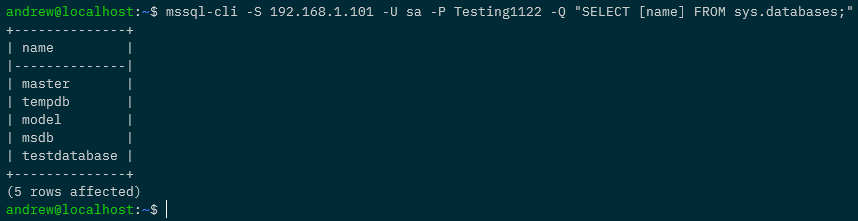
mssql-cli -S 192.168.1.101 -U sa -P Testing1122 -Q "SELECT [name] FROM sys.databases;"

Confirm the database files: –
mssql-cli -S 192.168.1.101 -U sa -P Testing1122 -Q "USE [testdatabase]; EXEC sp_helpfile;"

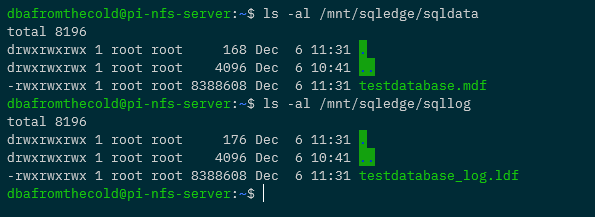
We can even check on the NFS server itself: –
ls -al /mnt/sqledge/sqldata
ls -al /mnt/sqledge/sqllog

Ok, so the “real” test. Let’s delete the existing pod in the deployment and see if the new pod has the database: –
kubectl delete pod -l app=sqledge
Wait for the new pod to come up: –
kubectl get pods -o wide
And then see if our database is in the new pod: –
mssql-cli -S 192.168.1.101 -U sa -P Testing1122 -Q "SELECT [name] FROM sys.databases;"

And that’s it! We’ve successfully built a Pi NFS server to deploy persistent volumes to our Raspberry Pi Kubernetes cluster so that we can persist databases from one pod to another! Phew!
Thanks for reading!