Use port forwarding to access SQL Server running in Kubernetes

A really handy feature in Kubernetes is port forwarding. This can be used to narrow down an issue when connections are failing to SQL Server running in a cluster.

Say we have deployed the following to a Kubernetes cluster: –

apiVersion: apps/v1beta1
kind: Deployment
metadata:
  name: sqlserver
spec:
  replicas: 1
  template:
    metadata:
      labels:
        name: sqlserver
    spec:
      containers:
      - name: sqlserver1
        image: mcr.microsoft.com/mssql/server:2019-RC1-ubuntu
        ports:
        - containerPort: 1433
        env:
        - name: SA_PASSWORD
          value: "Testing1122"
        - name: ACCEPT_EULA
          value: "Y"
---
apiVersion: v1
kind: Service
metadata:
  name: sqlserver-service
spec:
  ports:
  - name: sqlserver
    port: 1433
    targetPort: 1433
  selector:
    name: sqlserver
  type: LoadBalancer

This will create the following in the Kubernetes cluster: –

The load balanced service’s IP can be usually be used to connect into the SQL instance running in the pod, but what if we’re unable to connect? Does the issue lie with the service or the pod?

In order to narrow this down, port forwarding can be used to directly connect to the pod: –

kubectl port-forward pod/sqlserver-889b56d7b-nb2b4 15789:1433

This will allow us to use 127.0.0.1,15789 (localhost won’t work) and connect from our local machine to the pod running in the Kubernetes cluster (in a separate window): –

mssql-cli -S 127.0.0.1,15789 -U sa

We can use the same port to connect via ADS and SSMS as well: –

If a connection can be established to the pod via the forwarded port then we know that the issue doesn’t lie with the pod but with the service or the connection from the service to the pod.

Thanks for reading!

Chaos engineering for SQL Server running on AKS using KubeInvaders


UPDATE – March 2022
I have publised an updated guide to deploying KubeInvaders on AKS here: –
Space Invaders on Kubernetes


A couple of weeks ago I came across an awesome GitHub repo called KubeInvaders which is the brilliant work of Eugenio Marzo (b|t)

KubeInvaders allows you to play Space Invaders in order to kill pods in Kubernetes and watch new pods be created (this actually might be my favourite github repo of all time).

I demo SQL Server running in Kubernetes a lot so really wanted to get this working in my Azure Kubernetes Service cluster. Here’s how you get this up and running.


Prerequisites

1. A DockerHub repository
2. An Azure Kubernetes Service cluster – I blogged about spinning one up here
3. A HTTPS ingress controller on AKS with a FQDN for the ingress controller IP. I didn’t have to change anything in the instructions in the link but don’t worry if the final test doesn’t work…it didn’t work for me either.


Building the image

First, clone the repo:-

git clone https://github.com/lucky-sideburn/KubeInvaders.git

Switch to the AKS branch:-

cd KubeInvaders
git checkout aks

Build the image:-

docker build -t kubeinvaders .

Once the image has built, tag it with a public repository name and then push:-

docker tag kubeinvaders dbafromthecold/kubeinvaders:aks
docker push

Deploying to AKS

Now that the image is in a public repository, we can deploy to Kubernetes. Eugenio has provided all the necessary yaml files, so it’s really easy! Only a couple of changes are needed.

First one is the the kubeinvaders-deployment.yaml file, the image name needs to be updated:-

    spec:
      containers:
      - image: dbafromthecold/kubeinvaders:aks

And the host in the kubeinvaders-ingress.yaml file needs to be set to the FQDN of your ingress (set when following the MS docs): –

spec:
  tls:
  - hosts:
    - apruski-aks-ingress.eastus.cloudapp.azure.com
  rules:
  - host: apruski-aks-ingress.eastus.cloudapp.azure.com

Cool. So now each of the files can be deployed to your cluster: –

kubectl apply -f kubernetes/kubeinvaders-namespace.yml

kubectl apply -f kubernetes/kubeinvaders-deployment.yml -n kubeinvaders

kubectl expose deployment kubeinvaders --type=NodePort --name=kubeinvaders -n kubeinvaders --port 8080

kubectl apply -f kubernetes/kubeinvaders-ingress.yml -n kubeinvaders

kubectl create sa kubeinvaders -n foobar 

kubectl apply -f kubernetes/kubeinvaders-role.yml

kubectl apply -f kubernetes/kubeinvaders-rolebinding.yml

Finally, set some environment variables: –

TARGET_NAMESPACE='foobar'
TOKEN=`kubectl describe secret $(kubectl get secret -n foobar | grep 'kubeinvaders-token' | awk '{ print $1}') -n foobar | grep 'token:' | awk '{ print $2}'`
ROUTE_HOST=apruski-aks-ingress.eastus.cloudapp.azure.com

kubectl set env deployment/kubeinvaders TOKEN=$TOKEN -n kubeinvaders
kubectl set env deployment/kubeinvaders NAMESPACE=$TARGET_NAMESPACE -n kubeinvaders
kubectl set env deployment/k/ubeinvaders ROUTE_HOST=$ROUTE_HOST -n kubeinvaders

Now navigate to the FQDN of the ingress in a browser and you should see…


Testing the game!

By default KubeInvaders points to a namespace called foobar so we need to create it: –

kubectl create namespace foobar

And now create a deployment running 10 SQL Server pods within the foobar namespace: –

kubectl run sqlserver --image=mcr.microsoft.com/mssql/server:2019-CTP3.1-ubuntu --replicas=10 -n foobar

Now the game will have 10 invaders which represent the pods!

Let’s play! Watch the pods and kill the invaders!

kubectl get pods -n foobar --watch

How awesome is that! You can even hit a to switch to automatic mode!

What a cool way to demo pod regeneration in Kubernetes.

Thanks for reading!

Creating a custom kubectl plugin to connect to SQL Server in Kubernetes

One of the really cool things about kubectl (pronounced cube control) is the ability to extend it’s functionality with custom plugins.

These plugins are simply files named kubectl-xxx dropped into a PATH directory on your local machine that contain some code. Let’s have a go building a couple here.


N.B. – Try as I might I could not get this to work from a powershell session (where I usually run all my kubectl commands). It either wouldn’t recognise the new plugin or threw unsupported on windows at me. To get plugins to work on Windows I used the Windows Subsystem for Linux


OK, let’s create a file called kubectl-foo that’ll return Hello SQL Server folks! when executed: –

echo '#!/bin/bash
echo "Hello SQL Server folks!"' > kubectl-foo

Make the file executable: –

chmod +x kubectl-foo

And then copy it into one of your PATH locations (I’m using /usr/local/bin): –

sudo cp kubectl-foo /usr/local/bin

Now we can test to see if kubectl is picking it up: –

kubectl plugin list

Cool! Now we can run it: –

kubectl foo

Great stuff! Let’s build another one but this time a little more complicated.

When I deploy SQL Server to Kubernetes I usually create a load balanced service so that I can get an external IP to connect from my local machine to SQL running in the cluster. So how about creating a plugin that will grab that external IP and drop it into mssql-cli?

Let’s have a go at creating that now.

Create a file called kubectl-prusk 🙂 and open it in your favourite editor (I’m using nano): –

touch kubectl-prusk

nano kubectl-prusk

Then drop the following into it: –

#!/bin/bash

ExternalIP=$(kubectl get services -o=jsonpath='{..status.loadBalancer.ingress[*].ip}' $1)

mssql-cli -S $ExternalIP -U sa -P  $2

EDIT – 2019-09-12

David Barbarin (b|t) advised that the following can be used to grab the port of the service:-

ExternalPort=$(kubectl get services -o=jsonpath='{..ports[*].port}' $1)

And then connect in by: –

mssql-cli -S $ExternalIP,$ExternalPort -U sa -P $2

Thanks David!


What we’re doing here is parsing the output of kubectl get services (I use http://jsonpath.com/ as a guide), collecting the external IP of the service, and then passing it into mssql-cli.

$1 and $2 are variables for the service name and SQL sa password that will be passed in when we call the plugin.

Now, same as before, we need to make the file executable: –

chmod +x kubectl-prusk

And copy it to a PATH location: –

sudo cp kubectl-prusk /usr/local/bin

Check that it’s there: –

kubectl plugin list

Awesome. Ok, I’ve already got a SQL deployment and load balanced service running
in my K8s cluster up in AKS (check out how to do that here): –

kubectl get all

So let’s try out the new kubectl prusk plugin.

The plugin will grab the external IP of the service (called sqlserver-service) and drop it into mssql-cli with the sa password that we pass in (Testing1122 in this case): –

kubectl prusk sqlserver-service Testing1122

And boom! We’re connected into SQL running in our cluster. 🙂

That was a couple of really simple examples but I hope they showed the power of kubectl plugins, we can write some really cool things with them.

Thanks for reading!


N.B. – You may get the following error when running the plugin


It’s intermittent so try re-running the command


Creating custom SQL Server Helm charts

In my previous post I went through how to deploy SQL Server to Kubernetes using Helm in which I used the SQL Server chart that is available in the Helm Hub.

That’s great but what if we want to create our own charts? Let’s run through creating a simple SQL Server chart and deploying to Kubernetes (AKS).

First, ensure that Tiller (the server-side component of Helm) is installed on your cluster: –

helm init

Then create a directory to deploy the new chart into: –

mkdir C:\Helm

Navigate to the new directory: –

cd C:\Helm

And now create the new chart!

helm create testsqlchart

OK, what that has done is create an empty chart so we need to drop in our yaml configuration files.

Navigate to templates directory: –

cd testsqlchart/templates

Remove the template yaml files: –

rm deployment.yaml
rm service.yaml
rm ingress.yaml

Re-create deployment.yaml: –

apiVersion: apps/v1beta1
kind: Deployment
metadata:
  name: sqlserver
spec:
  replicas: 1
  template:
    metadata:
      labels:
        name: sqlserver
    spec:
      containers:
      - name: sqlserver1
        image: mcr.microsoft.com/mssql/server:2019-CTP2.2-ubuntu
        ports:
        - containerPort: 1433
        env:
        - name: SA_PASSWORD
          value: "Testing1122"
        - name: ACCEPT_EULA
          value: "Y"

Re-create service.yaml file: –

apiVersion: v1
kind: Service
metadata:
  name: sqlserver-service
spec:
  ports:
  - name: sqlserver
    port: 1433
    targetPort: 1433
  selector:
    name: sqlserver
  type: LoadBalancer

N.B. – Be careful when doing this, I’ve found that sometimes that Helm doesn’t like the format of the files. Re-creating in VS Code seems to do the trick.

Go back one directory: –

cd C:\Helm

And now we can test a deployment with –dry-run: –

helm install --dry-run --debug ./testsqlchart

If you get the following error: –

Tiller needs to be re-initialised: –

# delete current tiller deployment
kubectl delete deployment tiller-deploy --namespace kube-system

# create a service account
kubectl create serviceaccount --namespace kube-system tiller

# create clusterrolebinding
kubectl create clusterrolebinding tiller-cluster-rule --clusterrole=cluster-admin --serviceaccount=kube-system:tiller

# re-initialise tiller
helm init --service-account tiller --upgrade

Once the dry run returns no errors, you’re good to go!

helm install ./testsqlchart --name testsqlserver

To check the status: –

helm list

And you can monitor the creation of the deployment/service by running the usual kubectl commands: –

kubectl get deployments

kubectl get pods

kubectl get services

And that’s a custom SQL Server chart deployed into Kubernetes. SQL can be accessed by using the external IP of the service created.

Finally, to delete the deployed chart: –

helm delete testsqlserver

Thanks for reading!

Azure Kubernetes Service Error – LoadBalancer type service external IP stays pending

Last week I was working on my Azure Kubernetes Service cluster when I ran into a rather odd issue. I’d created a service with a type of LoadBalancer in order to get an external IP to connect to SQL Server running in a pod from my local machine.

I’ve done this quite a few times at this point so wasn’t expecting anything out of the ordinary.

However, my service never got it’s external IP address. It remained in a state of pending: –

N.B. – The images in this post are taken after the issue was resolved as I didn’t think at the time to screen shot everything 😦

I knew something was wrong after about 20 minutes as the IP should have definitely come up by then.

So I delved into the service by running: –

kubectl describe service sqlserver-service

And was greeted with the following: –

Error creating load balancer (will retry): failed to ensure load balancer for service default/sqlserver-service: azure.BearerAuthorizer#WithAuthorization: Failed to refresh the Token for request to https://management.azure.com/subscriptions/subscriptionID/resourceGroups/MC_containers1_SQLK8sCluster1_eastus/providers/Microsoft.Network/loadBalancers?api-version=2017-09-01: StatusCode=0 — Original Error: adal: Refresh request failed. Status Code = ‘401’. Response body: {“error”:”invalid_client”,”error_description”:”AADSTS70002: Error validating credentials. AADSTS50012: Invalid client secret is provided.\r\nTrace ID: 17d1f0ce-6c11-4f8e-895d-29194d973900\r\nCorrelation ID: 3e11d85c-77bf-4041-a41d-267bfd5f066c\r\nTimestamp: 2019-01-23 18:58:59Z”,”error_codes”:[70002,50012],”timestamp”:”2019-01-23 18:58:59Z”,”trace_id”:”17d1f0ce-6c11-4f8e-895d-29194d973900″,”correlation_id”:”3e11d85c-77bf-4041-a41d-267bfd5f066c”}

Yikes! What’s happened there?

I logged a case with MS Support and when they came back to me, they advised that the service principal that is spun up in the background had expired. This service principal is required to allow the cluster to interact with the Azure APIs in order to create other Azure resources.

When a service is created within AKS with a type of LoadBalancer, a Load Balancer is created in the background which provides the external IP I was waiting on to allow me to connect to the cluster.

Because this principal had expired, the cluster was unable to create the Load Balancer and the external IP of the service remained in the pending state.

So I needed to update the service principal so that it was no longer expired. In order to update the service principal I needed two pieces of information. The clientId of the cluster and a secret used for the service principal password. This wasn’t the easiest process in the world so I’ll run through how to do it here.

First, log into Azure:-

az login

Then get the clientId of your cluster: –

az aks show --resource-group RESOURCEGROUPNAME --name CLUSTERNAME --query "servicePrincipalProfile.clientId" --output tsv

To confirm that the principal is expired: –

az ad sp credential list --id CLIENTID

Check the endDate value highlighted above. If it’s past the current date, that’s your issue!

You may have noticed that mine is set 10 years from now. This is because I’m running these commands to get screenshots after I’ve fixed the issue…I figured 10 years should be long enough 🙂

The way I got the secret was to ssh onto one of the nodes in my cluster. This is a little involved but I’ll go through it step-by-step.

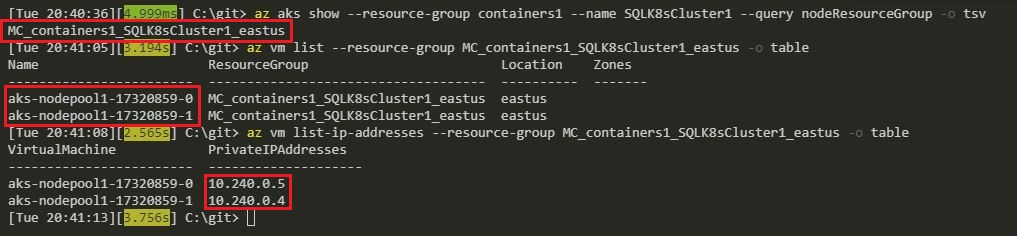
Resources for an AKS cluster are created in a separate resource group (for….reasons). To get that resource group name run: –

az aks show --resource-group RESOURCEGROUPNAME --name CLUSTERNAME --query nodeResourceGroup -o tsv

Then grab the nodes in the cluster (RESOURCEGROUPNAME2 is the output of the above command): –

az vm list --resource-group RESOURCEGROUPNAME2 -o table

And then get the IP address of each node: –

az vm list-ip-addresses --resource-group RESOURCEGROUPNAME2 -o table

OK, now that I had the node details I could copy my SSH public key into one of them.

The ssh keys were generated when I created the cluster using the –generate-ssh-keys flag. If you didn’t specify this you’ll need to generate the keys before continuing on.

So I copied my public key into one of the nodes: –

az vm user update \
  --resource-group RESOURCEGROUPNAME2 \
  --name NODENAME \
  --username azureuser \
  --ssh-key-value id_rsa.pub

N.B. – I found it easiest to navigate to the directory that held my ssh keys before running this script

Then I spun up a pod with openssh-client installed so that I could ssh into one of the nodes from within the cluster (the nodes aren’t accessible externally).

To do this I created a docker image from the Alpine:latest image and installed the client. Pushed it to the Docker Hub and then ran: –

kubectl run -it --rm aks-ssh --image=dbafromthecold/alpine_ssh:latest

N.B. – the dbafromthecold/alpine_ssh:latest image is public so this will work for you as well

In a separate command prompt I got the name of the pod:-

kubectl get pods

And then copied my private ssh key into the pod:-

kubectl cp id_rsa PODNAME:/id_rsa

Once the key was copied in, I closed that window and went back to the original window where I had run the pod and changed the permissions on the private key: –

chmod 0600 id_rsa

And then I was able to ssh into one of the nodes:-

ssh -i id_rsa azureuser@NODEIPADDRESS

The secret is contained in a json file (as aadClientSecret). To grab it I ran: –

sudo cat /etc/kubernetes/azure.json

Once I had that information I could exit the node, then the pod, and update the service principal: –

az ad sp credential reset --name CLIENTID--password SECRET --years 10

I confirmed that the service principal had been updated: –

az ad sp credential list --id CLIENTID

And was then able to deploy a loadbalancer type service, and get an external IP!

kubectl get services

Phew 🙂

Hope that helps anyone who runs into the same issue!