VMUG Ireland End of Year Event

This Thursday, November 30th, is the next VMUG Ireland event…our end of year social meetup!

We’re going to be down in BrewDog Dublin: –
THREE LOCKS SQUARE, 4, DUBLIN DOCKLANDS, DUBLIN 2, D02 E5R7 Dublin

This is a more informal event to round the year out. We’ll have two amazing speakers and then break out into groups to focus on specific tech areas, each hosted by an expert in the field (and yours truly! 🙂 )

The full agenda is: –

Time Session
14:00 – 14:30 Registration, Welcome Refreshments & Networking
14:30 – 15:15 VMware, Ed Hoppitt- VMware Explore 2023 – “Behind the Headlines”
15:15 – 16:00 Sponsor Session – Runecast
16:00 – 16:45 Round Table Breakout Groups
16:45 – 17:00 Raffle Results and Wrap Up
17:00 vBeers

Registration is completely free and available here: –
https://my.vmug.com/s/community-event?id=a1Y4x000003rmAOEAY

Hope to see you there!

Persisting data for SQL Server on Docker Swarm with Portworx

In my last couple of blog posts (here and here) I talked about how to get SQL Server running in Docker Swarm. But there is one big (and show-stopping) issue that I have not covered. How do we persist data for SQL Server in Docker Swarm?

Docker Swarm, like Kubernetes, has no native method to persist data across nodes…so we need another option and one of the options available to us is Portworx.

So how can we use Portworx to persist SQL Server databases in the event of a node failure in Docker Swarm?

There are three steps to get this working: –

  1. Install a key value store that can be accessed by Portworx on each cluster node
  2. Install and configure Portworx on each of the nodes
  3. Deploy a volume for SQL Server using the Portworx driver

Let’s run through each of those steps.


Installing etcd

Portworx needs a key value store to be installed and reachable from all the nodes in the Docker Swarm cluster.

So what we’re going to do is install ETCD on the manager node of the cluster and configure it so that all the other nodes in the cluster can talk to it.

First thing to do is download a sample config file and the etcd binaries: –

ETCD_VER=v3.4.27
DOWNLOAD_URL=https://github.com/etcd-io/etcd/releases/download

curl -L https://raw.githubusercontent.com/etcd-io/etcd/main/etcd.conf.yml.sample -o /tmp/etcd-download-test/etcd.conf.yml
curl -L ${DOWNLOAD_URL}/${ETCD_VER}/etcd-${ETCD_VER}-linux-amd64.tar.gz -o /tmp/etcd-${ETCD_VER}-linux-amd64.tar.gz
tar xzvf /tmp/etcd-${ETCD_VER}-linux-amd64.tar.gz -C /tmp/etcd-download-test --strip-components=1

Move files to a location in our PATH environment variable: –

sudo cp /tmp/etcd-download-test/etcd /tmp/etcd-download-test/etcdctl /tmp/etcd-download-test/etcd.conf.yml /usr/local/bin 
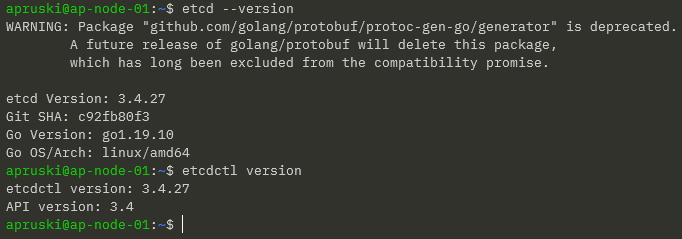
Confirm versions: –

etcd --version
etcdctl version

Create etcd user and group: –

sudo groupadd --system etcd
sudo useradd -s /sbin/nologin --system -g etcd etcd

Create etcd data and wal directories and configure permissions: –

sudo mkdir -p /var/lib/etcd/wal
sudo chown -R etcd:etcd /var/lib/etcd
sudo chmod -R 700 /var/lib/etcd

Update the sample configuration file: –

sudo vim /usr/local/bin/etcd.conf.yml

Here we are updating the following: –

  • line 4 – change name of etcd member to the server name
  • line 7 – add /var/lib/etcd as the data-dir
  • line 10 – add /var/lib/etcd/wal as the wal-dir
  • line 26/29/42/46 – change localhost to server IP address
  • line 62 – add initial-cluster: SERVERNAME=http://IPADDRESS:2380

The next thing to do is create a service to run etcd. So create a etcd.service file: –

echo "[Unit]
Description=etcd key-value store
Documentation=https://github.com/etcd-io/etcd
After=network.target

[Service]
User=etcd
Type=notify
ExecStart=/usr/local/bin/etcd --config-file=/usr/local/bin/etcd.conf.yml
Restart=always
RestartSec=10s
LimitNOFILE=40000

[Install]
WantedBy=multi-user.target" > etcd.service

And move it to the correct location: –

sudo mv etcd.service /etc/systemd/system

Reload systemd: –

sudo systemctl daemon-reload

Start etcd: –

sudo systemctl enable etcd
sudo systemctl start etcd
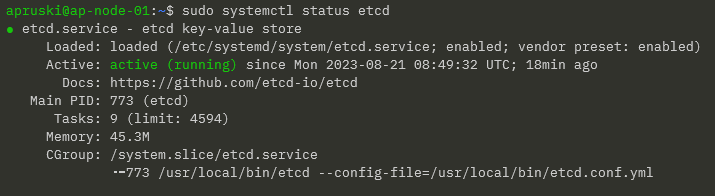
Confirm service: –

sudo systemctl status etcd

To check the endpoint and status of etcd: –

etcdctl --endpoints=10.0.0.40:2379 endpoint health
etcdctl --endpoints=10.0.0.40:2379 endpoint status

Great! That’s etcd up and running. Now we can install and configure Portworx.


Installing portworx

In order to get Portworx up and running, there are a couple of pre-requisities we need to consider: –

  • Swap is recommended to be disabled on each of the nodes
  • Each node should have a min of 4GB RAM
  • A block device available to be used as a storage pool for Portworx

Right, now we can install the Portworx binaries on our nodes To do this, we run a container with /opt/pwx and /etc/pwx mounted: –

REL="/3.0"  # Portworx v3.0 release

latest_stable=$(curl -fsSL "https://install.portworx.com$REL/?type=dock&stork=false&aut=false" | awk '/image: / {print $2}' | head -1)

sudo docker run --entrypoint /runc-entry-point.sh \
--rm -i --privileged=true \
-v /opt/pwx:/opt/pwx -v /etc/pwx:/etc/pwx \
$latest_stable

Once that’s complete we can finish the install with: –

sudo /opt/pwx/bin/px-runc install -k etcd://10.0.0.40:2379 -c AP-SWARM-01 -s /dev/sdb

Breaking this statement down: –

  • -k etcd://IPADDRESS:2379 – endpoint for our etcd cluster that we configured earlier
  • -c AP-SWARM-01 – name that we’re going to call our cluster in Portworx
  • -s /dev/sdb – block device on each node that will be used as a Portworx storage pool

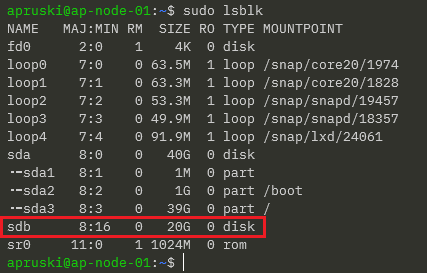
When I created my hyper-v VMs I added a 20GB disk, /dev/sdb, that will be used as the storage pool.

You can see the available devices on a server by running: –

sudo lsblk

So on my server: –

OK. Once the above statement has completed on all nodes of our cluster, we need to restart the Portworx service: –

sudo systemctl restart portworx

Then confirm the service status: –

sudo systemctl status portworx

Then enable the service to start on server reboot: –

sudo systemctl enable portworx

And finally, confirm the status of Portworx itself: –

sudo /opt/pwx/bin/pxctl status

NOTE – Portworx will take around 5 minutes to come online.

Fantastic stuff! We have etcd and Portworx up and running. Now we can look at deploying SQL Server.


Deploying SQL Server

Ok phew…we’ve done all the hard work! Let’s have a look at deploying SQL Server using storage provisioned via Portworx in our Docker Swarm cluster.

So we need a volume to persist our data on: –

docker volume create -d pxd --name mssql_vol --opt repl=3 --opt fs=ext4 --opt sharedv4=true

Here we’re deploying a volume using the Portworx driver and using a replica count of 3 so that our volume is being replicated to each node in the cluster.

To confirm this, run: –

sudo /opt/pwx/bin/pxctl volume inspect mssql_vol

Here we can see the replica sets of the volume on each node and the node that the volume is currently attached to.

Now we can deploy SQL Server referencing that volume in the –mount flag: –

docker service create \
--name sqlswarm1 \
--replicas 1 \
--publish 15789:1433 \
--env ACCEPT_EULA=Y \
--env MSSQL_SA_PASSWORD=Testing1122 \
--mount type=volume,src=mssql_vol,dst=/var/opt/mssql,volume-driver=pxd \
mcr.microsoft.com/mssql/server:2022-CU4-ubuntu-20.04

We’re mounting the volume under /var/opt/mssql in the container, which is the default location for database data and log files.

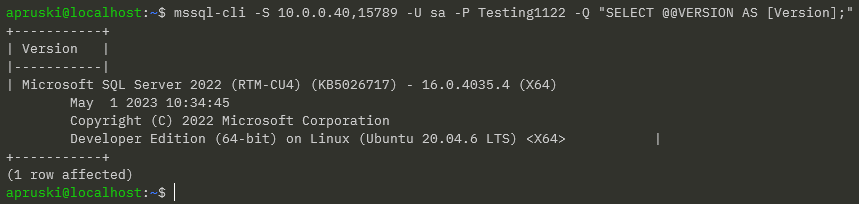
So let’s create a database! I’m going to use the mssql-cli to do this but you can do this in SSMS using an IP address of a node in the cluster (I usually use the manager node’s IP address) and port 15789: –

mssql-cli -S 10.0.0.40,15789 -U sa -P Testing1122 -Q "CREATE DATABASE [testdatabase];"

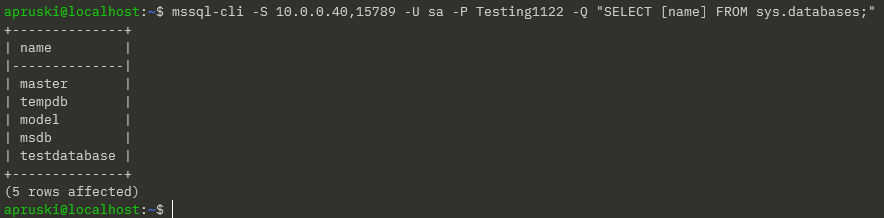
Confirm the database: –

mssql-cli -S 10.0.0.40,15789 -U sa -P Testing1122 -Q "SELECT [name] FROM sys.databases;"

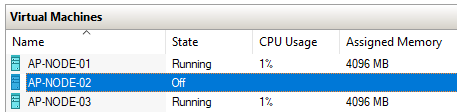
OK, now that we have a database in our SQL instance…let’s test failover! What we’re going to do is shut down the node that the container is running on and see what happens.

To find the node that the container is running on: –

docker service ps sqlswarm1

It’s running on AP-NODE-02, so let’s shut that node down!

Let’s see what happened to our SQL container: –

docker service ps sqlswarm1

It’s now running on AP-NODE-03! But has our database survived?

mssql-cli -S 10.0.0.40,15789 -U sa -P Testing1122 -Q "SELECT [name] FROM sys.databases;"

Yes! It’s there! We have persisted our database from one node to another in our Docker Swarm cluster!

Thanks for reading!

Using Secrets in Docker Swarm for SQL Server

In a previous post I went through how to run SQL Server in Docker Swarm and in this post I want to continue delving into the Docker Swarm platform by looking at secrets.

Like Kubernetes, Docker Swarm has functionality to store sensitive data in secrets. When running SQL Server in containers we usually have to manually type out the environment variable for the MSSQL_SA_PASSWORD which isn’t great if we want to store that code in a public repository so being able to obfuscate that password is great!

Let’s have a look how it works. I’m going to use my lab detailed in the previous post.

First thing to do is create the secret: –

printf "Testing1122" | docker secret create mssql_sa_secret -

And confirm that the secret has been created: –

docker secret ls


WARNING – the first docker service create statement below doesn’t work! I’ve included it to show how I ended up at my end solution!


Ok, now we can reference the secret in our docker service create statement by using the –secret flag. This mounts the secret in the container at /run/secrets/secret_name which we can then reference in a –env flag.

Now we can create a service in Docker Swarm to run SQL Server, referencing that secret: –

docker service create \
--name sqlswarm1 \
--replicas 1 \
--publish 15789:1433 \
--secret source=mssql_sa_secret \
--env MSSQL_SA_PASSWORD=/run/secrets/mssql_sa_secret \
--env ACCEPT_EULA=Y \
mcr.microsoft.com/mssql/server:2022-CU4-ubuntu-20.04

Confirm that the service is up: –

docker service ls

And let’s connect to SQL from our local machine using the IP address of the manager node in the swarm and the port we specified in the docker service create statement (15789): –

mssql-cli -S 10.0.0.40,15789 -U sa -P Testing1122 -Q "SELECT @@VERSION AS [Version];"

Ah, that didn’t work! Let’s have a look why…

The password should be stored as an environment variable in the container so let’s find the node in the swarm that the container is running on: –

docker service ps sqlswarm1

And then run the following on the node: –

docker exec $(docker ps -aq) printenv

DOH!

It hasn’t taken the values within the file, it’s just taken the text that we entered into the container run statement!

Urgh, this is my fault. I’m referencing the documentation here but the docker service run statement I’m using as a guide is for a mysql container. MySQL has an environment variable that can reference a password file, no such luck with SQL Server.

So how do we reference the password within the file?

NOTE – there might be a better way to do this but this is the way I’ve come up with 🙂

Ok, so let’s get rid of that service: –

docker service rm sqlswarm1

Create an environmentvars.sh file: –

#!/bin/bash

export MSSQL_SA_PASSWORD=$(cat /run/secrets/mssql_sa_password)

In this file we reference the password file and set the environment variable.

Now create a custom image from a dockerfile: –

FROM mcr.microsoft.com/mssql/server:2022-CU4-ubuntu-20.04

USER root

COPY environmentvars.sh /var/opt/mssql/

RUN chown mssql /var/opt/mssql/environmentvars.sh

RUN chmod +x /var/opt/mssql/environmentvars.sh

USER mssql

CMD . /var/opt/mssql/environmentvars.sh && /opt/mssql/bin/sqlservr

Build the custom image: –

docker build -t customsqlimage .

NOTE – As this is a custom image not in a repository we’ll have to build the image on each of the nodes in the cluster

Ok, now we can recreate the service: –

docker service create \
--name sqlswarm1 \
--replicas 1 \
--publish 15789:1433 \
--secret source=mssql_sa_secret,target=mssql_sa_password \
--env ACCEPT_EULA=Y \
customsqlimage

NOTE – We’re removing the ENV for the MSSQL_SA_PASSWORD as it’s handled in the environmentvars.sh file. We also get a warning that the customsqlimage is not available in a registry so Docker will look for local images on each node (which could lead to a mismatch of image versions).

We have our service up so let’s try connect to SQL again: –

mssql-cli -S 10.0.0.40,15789 -U sa -P Testing1122 -Q "SELECT @@VERSION AS [Version];"

Ah ha! Success!

OK, I admit…not the greatest solution! BUT, we could use that environmentvars.sh file to create more environment variables than just MSSQL_SA_PASSWORD so it could (possibly) be useful?

Thanks for reading!

Running SQL Server in Docker Swarm

I haven’t touched Docker Swarm for a looooong time but I was asked about running SQL Server in Swarm at a conference a while back…so here’s how it can be done!

I have a lab setup on my local machine which consists of three Hyper-V VMs with static IP addresses, that can all communicate with each other: –

  • AP-NODE-01
  • AP-NODE-02
  • AP-NODE-03

So, first thing to do is install docker on each node: –

sudo apt install -y docker.io

Then add our user to the docker group: –

sudo usermod -aG docker apruski

Now we can initialise the “manager” node, aka which node will manage the cluster. This can be thought of as like the control plane in a Kubernetes cluster. Much like a Kubernetes cluster…there are two types of node in Docker Swarm…managers and workers. Again like Kubernetes, a node can perform both roles.

On the VM that’s going to manage the cluster, run the following: –

docker swarm init --advertise-addr <VM IP ADDRESS>

Grab the join script from the output of the previous command and add each node to the cluster: –

docker swarm join \
--token SWMTKN-1-4c6pchrpjf0e35h4wvpq1otjkgc6thrpiriq6pndg8811bxorn-7qxoxclibjlz5nejj027q34yv \
10.0.0.40:2377

Then run the following on the leader node to confirm the cluster: –

docker node ls

And there we have our cluster setup! Pretty simple, eh?

Ok…now let’s look at deploying SQL Server to our cluster. In Docker Swarm, we deploy services to the cluster.

Services in Docker Swarm (unlike services in Kubernetes) define everything that we want to deploy…so we include what we usually would have in a docker container run statement: –

docker service create \
    --name sqlswarm1 \
    --replicas 1 \
    --publish 15789:1433 \
    --env ACCEPT_EULA=Y \
    --env MSSQL_SA_PASSWORD=Testing1122 \
    mcr.microsoft.com/mssql/server:2022-CU4-ubuntu-20.04

Looks pretty much like a docker container run statement yeah? The only difference really is the –replicas=1 statement. This essentially is how many containers we want to run in our service (called tasks in Docker Swarm). As we’re running SQL Server, we only want one running for this service.

Once deployed, we can verify with: –

docker service ls

And if we want some more info (like which node the service is running on), we can run: –

docker service ps sqlswarm1

Cool! So we can see which node in the cluster our SQL container is running on.

If we jump on that node, we can run: –

docker container ls

Which is pretty much what we’re used to seeing when we run SQL Server in a Docker container.

Ok, but how can we connect to SQL in Docker Swarm?

Our container was run with the –publish 15789:1433 flag. This means that we can connect to SQL in the Swarm via any of the nodes’ IP addresses and the port 15789 (kinda like a NodePort service in Kubernetes).

So for example, using the mssql-cli from my laptop: –

mssql-cli -S 10.0.0.40,15789 -U sa -P Testing1122 -Q "SELECT @@VERSION"

But I can use any node IP address: –

Ok, that’s all well and good…but what about the main reason for running in Docker Swarm?

What about high availability?

My service is running on AP-NODE-01…that’s the manager node for the cluster so we probably don’t want our service running there. Let’s move it to another node.

To do that, let’s drain the manager node: –

docker node update --availability drain ap-node-01

Then confirm where the service has moved to: –

docker service ps sqlswarm1

Cool! Our service has moved to AP-NODE-02 and we can see a history of where it has been placed in the Swarm.

We can also confirm that AP-NODE-01 is no longer available to host services: –

docker node ls

Alright, manually moving a service works…but what about a node failure?

The service is running on AP-NODE-02 so let’s shut that node down: –

Let’s see what happened: –

docker service ps sqlswarm1

Haha! Our service has moved to AP-NODE-03! Cool!

So that’s how to get SQL Server running in Docker Swarm and tested for high availability!

Ok, there’s a whole bunch of other stuff that we need to consider (persistent storage for example) which we’ll have a look at in future posts.

Thanks for reading!

Running SQL Server in a container with sqlcmd

One of the options that I completely missed with the new go-sqlcmd CLI tool is the ability to spin up a container running SQL Server.

Let’s have a look at how it works. It’s nice and easy to install with winget package manager tool: –

winget install sqlcmd

Once installed we can easily run a container (make sure your container runtime is up, in my case I’m using Docker): –

sqlcmd create mssql --accept-eula

Note that we still have to accept the end user license agreement, like when running a container via Docker. Thankfully we can set an environment variable now so that we don’t have to include –accept-eula every time we run a container: –

[System.Environment]::SetEnvironmentVariable('SQLCMD_ACCEPT_EULA','YES', 'Machine')

Let’s have a look at the container it’s spun up: –

docker container ls

Pretty standard…the output of the sqlcmd create command told us that it was using the latest image tag but we can also see that the container has port 1435 on the host mapped to port 1433 in the container. This is so that multiple containers can be run on the same host.

There’s a command to see what images are available: –

sqlcmd create mssql get-tags

Which will give us a big long list of all the tags available for SQL Server in the Microsoft Container Registry (MCR).

If we want to run a container from a different image, we can do this: –

sqlcmd create mssql --tag 2022-CU1-ubuntu-20.04

Cool! And if we want to query that instance we can just say: –

sqlcmd query "SELECT @@VERSION"

Good stuff. OK, when we created the containers the output mentioned a context file, created in our user home directory. Let’s have a look: –

cat C:\Users\dbafromthecold\.sqlcmd\sqlconfig
accept_eula: "YES"
contexts:
    - context:
        endpoint: mssql
        user: dbafromthecold@mssql
      name: mssql
    - context:
        endpoint: mssql2
        user: dbafromthecold@mssql2
      name: mssql2
currentcontext: mssql2
endpoints:
    - asset:
        container:
            id: 5b4118f61d6e68ae7c9a92d3b6f163e40053d84a2e4d27ec4f710cc01fde4949
            image: mcr.microsoft.com/mssql/server:latest
      endpoint:
        address: 127.0.0.1
        port: 1435
      name: mssql
    - asset:
        container:
            id: 2d694f1b1517fd4e6145855ce63df2b8c624ee5dbe81a58227b9d6f0249d91d1
            image: mcr.microsoft.com/mssql/server:2022-CU3-ubuntu-20.04
      endpoint:
        address: 127.0.0.1
        port: 1436
      name: mssql2
users:
    - authentication-type: basic
      basic-auth:
        password: M3ckVDNWKlgkNiE2UHdMNkghdDRZWkszJVRTMiFKIU9DVSRMV2pyMnBHIyNGIyoySTc=
        password-encryption: none
        username: dbafromthecold
      name: dbafromthecold@mssql
    - authentication-type: basic
      basic-auth:
        password: N1AqVTFQJFlAciQzWjVRNlkqMTI4S0U1I1dUNSNLblpVekBGTSUkNDdUISRNKmY3QTQ=
        password-encryption: none
        username: dbafromthecold
      name: dbafromthecold@mssql2
version: v1

In here we can see the details (image, port) of the containers that we spun up. Exactly like working with Kubernetes, sqlcmd uses contexts to connect to different instances.

So if we want to switch to the original container that we spun up: –

sqlcmd config use-context mssql

sqlcmd query "SELECT @@VERSION"

One thing I did notice about the config file was these lines for each container: –

basic-auth:
        password: M3ckVDNWKlgkNiE2UHdMNkghdDRZWkszJVRTMiFKIU9DVSRMV2pyMnBHIyNGIyoySTc=
        password-encryption: none
        username: dbafromthecold

So the password for our custom user is not encrypted by default. Which means if you want to get the password created for the user, it just needs to be decoded. The password can be encrypted, it’s one of the options that we have when running a container.

To view all the options, run: –

sqlcmd create mssql --help

There’s a whole bunch of options there! We can change the container name, port, etc. but the option that interests me the most is the –using flag.

There’s an example in the docs for this: –

sqlcmd create mssql --accept-eula --using https://aka.ms/AdventureWorksLT.bak

And then, another cool feature, is that we can then open Azure Data Studio and connect to the container: –

sqlcmd open ads

Nice!!! We can also do this with .bak files stored in Github. I have a testdatabase.bak in a repo called testrepository (imaginative naming, I know). To use that we would run: –

sqlcmd create mssql --using https://raw.githubusercontent.com/dbafromthecold/testrepository/main/testdatabase.bak

And then connect in ADS again: –

sqlcmd open ads

And there it is! OK, not going to be quite as quick and easy if that’s a large database but hey, if you’re planning on running large databases in SQL then containers probably aren’t the best solution. Although could possibly be an option in a future release to mount a database from the host?

Another option I’d like to see is the ability to retain data changes from one container to another. This could be tricky however as sqlcmd does seem to be designed to be container runtime agnostic…but there are already checks in place to ensure that we don’t lose data.

If we try to delete a container that has a custom database in it: –

sqlcmd delete

We get an error! So we have to go and remove the database manually before the container can be dropped.

Oh, and make sure you’re in the correct context before dropping anything! 🙂

Thanks for reading!