A storage failover issue with SQL Server on Kubernetes

I’ve been running a proof of concept for SQL Server on Kubernetes over the last year or so (ok, probably longer than that…hey, I’m a busy guy 🙂 ) and have come across an issue that has been sort of a show stopper.


UPDATE – This issue has been resolved in Kubernetes version 1.26.
Details are on this github issue: –
https://github.com/kubernetes/kubernetes/issues/65392

And there’s more on the official Kubernetes blog (when a feature called non-graceful node shutdown when into beta): –
https://kubernetes.io/blog/2022/12/16/kubernetes-1-26-non-graceful-node-shutdown-beta/


There are currently no HA solutions for SQL Server running on plain K8s (not discussing Azure Arc here) so my tests have been relying on the in-built HA that Kubernetes provides but there’s a problem.

Let’s see this in action.

First, as we’re running in AKS for this demo, check the storage classes available: –

kubectl get storageclass

We’re going to be using the default storage class for this demo, note the VOLUMEBINDINGMODE is set to WaitForFirstConsumer

Now create the PVC definitions referencing the default storage class: –

apiVersion: v1
kind: PersistentVolumeClaim
metadata:
  name: mssql-system
spec:
  accessModes:
    - ReadWriteOnce
  storageClassName: default
  resources:
    requests:
      storage: 1Gi
---
apiVersion: v1
kind: PersistentVolumeClaim
metadata:
  name: mssql-data
spec:
  accessModes:
    - ReadWriteOnce
  storageClassName: default
  resources:
    requests:
      storage: 1Gi
---
apiVersion: v1
kind: PersistentVolumeClaim
metadata:
  name: mssql-log
spec:
  accessModes:
    - ReadWriteOnce
  storageClassName: default
  resources:
    requests:
      storage: 1Gi

Save that yaml as sqlserver_pvcs.yaml and deploy: –

kubectl apply -f sqlserver_pvcs.yaml

Confirm the PVCs have been created: –

kubectl get pvc

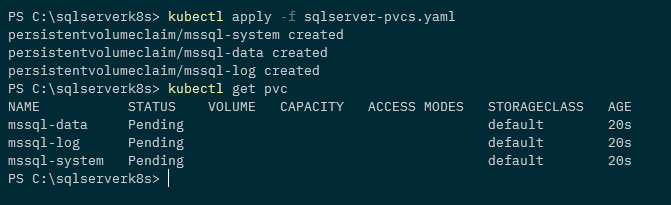
N.B. – The PVCs are in a status of pending as the VOLUMEBINDINGMODE mode of the storage class is set to WaitForFirstConsumer

Now create a sqlserver.yaml file: –

apiVersion: apps/v1
kind: Deployment
metadata:
  creationTimestamp: null
  labels:
    app: sqlserver
  name: sqlserver
spec:
  replicas: 1
  selector:
    matchLabels:
      app: sqlserver
  strategy: {}
  template:
    metadata:
      creationTimestamp: null
      labels:
        app: sqlserver
    spec:
      securityContext:
        fsGroup: 10001
      containers:
      - image: mcr.microsoft.com/mssql/server:2019-CU11-ubuntu-18.04
        name: sqlserver
        resources: {}
        env:
        - name: ACCEPT_EULA
          value: "Y"
        - name: MSSQL_SA_PASSWORD
          value: "Testing1122"
        volumeMounts:
        - name: system
          mountPath: /var/opt/mssql
        - name: user
          mountPath: /var/opt/sqlserver/data
        - name: log
          mountPath: /var/opt/sqlserver/log
      tolerations:
      - key: "node.kubernetes.io/unreachable"
        operator: "Exists"
        effect: "NoExecute"
        tolerationSeconds: 10
      - key: "node.kubernetes.io/not-ready"
        operator: "Exists"
        effect: "NoExecute"
        tolerationSeconds: 10
      volumes:
      - name: system
        persistentVolumeClaim:
          claimName: mssql-system
      - name: user
        persistentVolumeClaim:
          claimName: mssql-data
      - name: log
        persistentVolumeClaim:
          claimName: mssql-log
status: {}

N.B. – Note the tolerations set for this deployment, if you want to learn more you can check out my blog post here
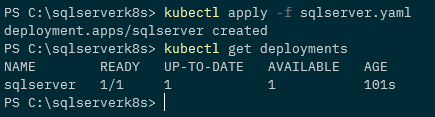
Deploy that: –

kubectl apply -f sqlserver.yaml

And check that the deployment was successful: –

kubectl get deployments

Now the PVCs and corresponding PVs will have been created: –

kubectl get pvc
kubectl get pv

OK let’s have a look at the events of the pod: –

kubectl describe pod -l app=sqlserver

So we had a couple of errors from the scheduler initially, (probably) because the PVCs weren’t created in time…but then the attachdetach-controller kicked in and attached the volumes for the pod to use.

Now that the pod is up and confirm the node that the pod is running on: –

kubectl get pods -o wide

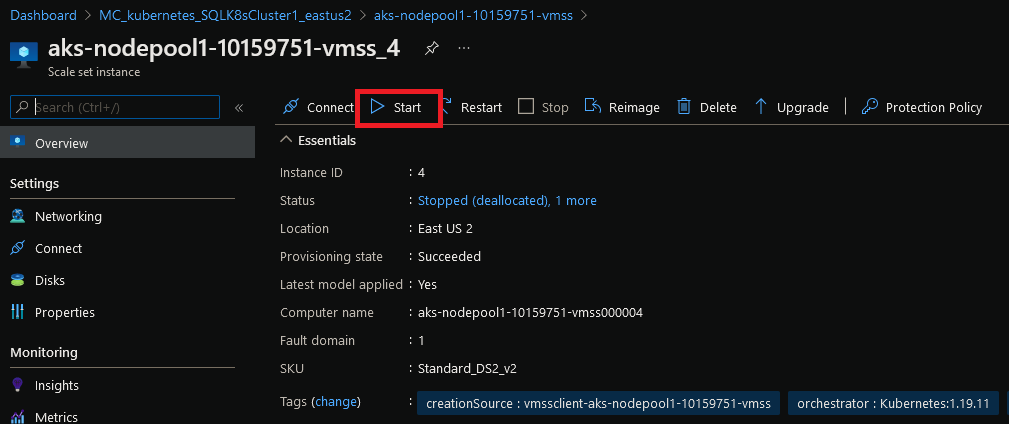
OK, shutdown the node in the Azure portal to simulate a node failure: –

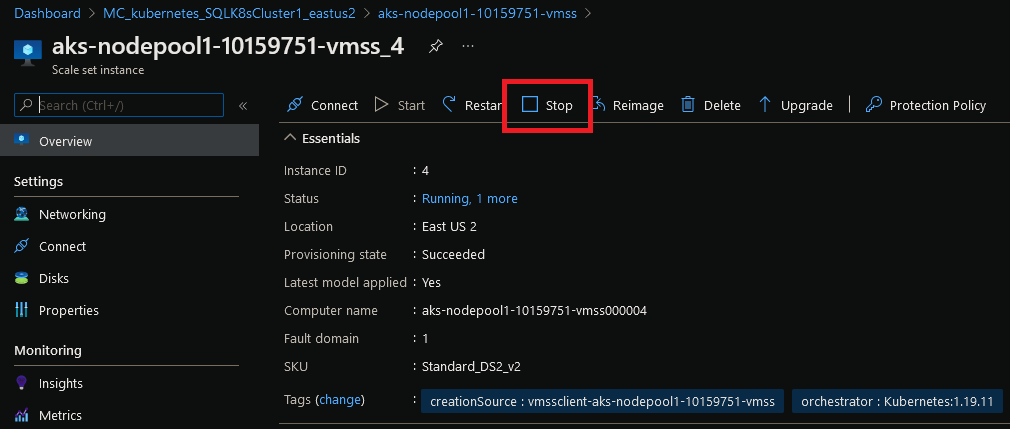
Wait for the node to become unavailable: –

kubectl get nodes --watch

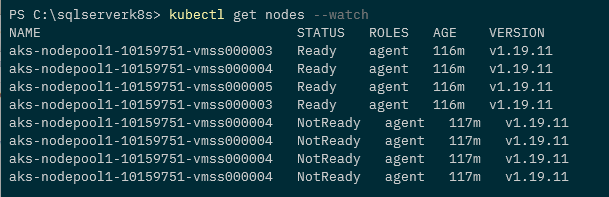
Once the node is reported as unavailable, check the status of the pod. A new one should be spun up on a new, available node:-

kubectl get pods -o wide

The old pod is in a Terminating state, a new one has been created but is in the ContainerCreating state and there it will stay…never coming online.

We can see why if we look at the events of the new pod: –

kubectl describe pod sqlserver-59c78ddc9f-tj9qr

And here’s the issue. The attachdetach-controller cannot move the volumes for the new pod to use as they’re still attached to the old pod.

(EDIT – Technically the volumes are attached to the node but the error reports that the volumes are in use by the old pod)

This is because the node that the old pod is on is in a state of NotReady…so the cluster has no idea of the state of that pod (it’s being reported as terminating but hasn’t been removed completely).

Let’s restart the node: –

And wait for it to come online: –

kubectl get nodes --watch

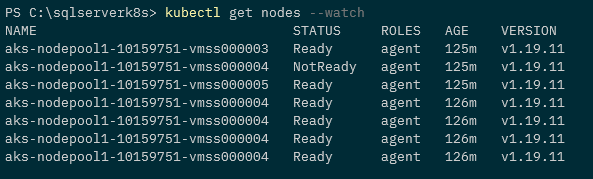
Once the node is online, the old pod will be removed and the new pod will come online: –

kubectl get pods -o wide

Looking at the pod events again: –

kubectl describe pod sqlserver-59c78ddc9f-tj9qr

We can see that once the node came online the attachdetach-controller was able to attach the volumes.

This is an issue as it requires manual intervention for the new pod to come online. Someone has to either bring the node back online or remove it from the cluster completely, not what you want as this will mean extended downtime for SQL Server running in the pod.

So what can we do about this? Well we’ve been looking at a couple of solutions which I’ll cover in upcoming blog posts 🙂

Note, if anyone out there knows how to get around this issue (specifically altering the behaviour of the attachdetach-controller) please get in contact!

Thanks for reading!

EightKB Summer 2021 Edition

The schedule for EightKB Summer 2021 Edition has been announced!

Here’s the schedule: –

N.B. – I particularly like that if you click on the session on the website, it shows the session abstract…nice work Mark!

Once again we have five top class speakers delivering five great, in-depth sessions on various SQL Server internals topics.

As any conference organiser knows, session selection is the worst part of running a conference. We only have five slots in each event which meant we ended up not picking some amazing sessions. BUT…anyone who submitted for this event will automatically go into the selection pool for the next EightKB.

We’ve also opened up registration for the event, it’s completely free and you can sign up here: – https://eightkb.online/

The event will be in Zoom and we’ll have chat going in the EightKB channel in the SQL Community Slack…please come and hang out with us there!

The Mixed Extents podcast is also going strong…we’re 10 episodes in and we’ve had a whole bunch of experts from the industry join us to talk about different topics related to SQL Server. They’re all on YouTube or you can listen to the podcasts wherever you get your podcasts!

Btw, all the sessions from previous EightKB events are also on YouTube so if you can’t wait until the next event to get your mind-melty internals content…check that out 🙂

EightKB and Mixed Extents are 100% community driven with no sponsors so, we have our own Bonfire store selling t-shirts! This year we a limited edition EightKB Summer 2021 range: –

Don’t they look snazzy?!

Any money generated from the store will be put straight back into the events.

EightKB was setup by Anthony Nocentino (b|t), Mark Wilkinson (b|t), and myself as we wanted to put on an event that delved into the internals of SQL Server and we’re having great fun doing just that.

Hope to see you there!

Running a SQL Server container from scratch

I’ve been interested (obsessed?) with running SQL Server in containers for a while now, ever since I saw how quick and easy it was to spin one up. That interest has led me down some rabbit holes for the last few years as I’ve been digging into exactly how containers work.

The weirdest concept I had to get my head around was that containers aren’t actually a thing.

Containers are just processes running on a host that implement a set of Linux constructs in order to achieve isolation.

So if we know what constructs are used…shouldn’t we be able to build our own container from scratch?

Well as we’re about to see, yes we can! But before that…let’s briefly go over exactly how containers achieve isolation. There’s three main Linux constructs that are used: –

  1. Control Groups
  2. Namespaces
  3. Changing the root of the container

Ok, first one…control groups.

Control groups limit the amount of resources of the host that a container can use. So when we use the cpus or memory flags in a docker container run statement…what’s happening in the background is that control groups are created to enforce those limits.

Next one, namespaces.

If control groups control what a container can use, namespaces control what a container can see. There’s a few of them in practice but the ones I want to mention here are the obviously named Unix Timesharing Namespace and the Process ID (PID) Namespace.

The Unix Timesharing Namespace…sounds complicated but in practice all this does is allow the hostname the container sees to be different to the actual host the container is running on.

Run the following against a container: =

docker exec CONTAINERNAME hostname

You’ll see that the output is different (usually the container ID) that the actual name of the host the container is running on. This is due to the container having its own UTS namespace.

The Process ID namespace is implemented to restrict which processes the container can see.

Run this against a container: –

docker exec CONTAINERNAME ps aux

The output will only show the processes running in the container. This is due to the container having its own process ID namespace.

If you run the following on the host, you’ll see the SQL processes of the container: –

ps aux | grep mssql

So there’s the processes on the host! Different process IDs due to the container running in a process ID namespace but there they are!

Ok, final one…changing the root of the container.

Containers can’t see the whole host’s filesystem, they can only see a subset of that file system. That’s because the root of the container is changed upon start up to some location on the host…and the container can only see from that location down.

Anyway, by using control groups, namespaces, and changing the root of the container…processes are isolated on a host and boom! We have a “container”.

So, we know the constructs involved…let’s put this into practice and build our own container from scratch using Go.

Right…let’s go ahead and build a container from scratch….


First thing we’re going to do is pull down the latest SQL Server 2019 container image. Yes I know I said we’d be building a container from scratch but bear with me 🙂

docker pull mcr.microsoft.com/mssql/server:2019-latest

Now run a container: –

docker container run -d \
--publish 1433:1433 \
--env ACCEPT_EULA=Y \
--env MSSQL_SA_PASSWORD=Testing1122 \
--name sqlcontainer1 \
mcr.microsoft.com/mssql/server:2019-latest

Confirm SQL is running within the container (mssql-cli can be installed using these instructions): –

mssql-cli -S localhost -U sa -P Testing1122 -Q "SELECT @@VERSION AS [Version];"

Stop the container: –

docker stop sqlcontainer1

Export the container: –

docker export sqlcontainer1 -o sqlcontainer.tar

Create a directory and extract the .tar file to it: –

mkdir sqlcontainer1
tar -xvf sqlcontainer1 -C ./sqlcontainer1

Then list the contents of the directory: –

ls ./sqlcontainer1

Cool! We have extracted the containers filesystem. So we can now use that as the root of our own container, built from scratch!

We’re going to be using Go to run our container from scratch so we’ll need to install it: –

sudo apt-get install golang-go

And now, here is the code to run our container: –

package main

import (
	"fmt"
	"io/ioutil"
	"os"
	"os/exec"
	"path/filepath"
	"strconv"
	"syscall"
)

// go run main.go run <cmd> <args>
func main() {
	switch os.Args[1] {
	case "run":
		run()
	case "child":
		child()
	default:
		panic("help")
	}
}

func run() {
	fmt.Printf("Running %v \n", os.Args[2:])

	cmd := exec.Command("/proc/self/exe", append([]string{"child"}, os.Args[2:]...)...)
	cmd.Stdin = os.Stdin
	cmd.Stdout = os.Stdout
	cmd.Stderr = os.Stderr
	cmd.SysProcAttr = &syscall.SysProcAttr{
		Cloneflags:   syscall.CLONE_NEWUTS | syscall.CLONE_NEWPID | syscall.CLONE_NEWNS,
		Unshareflags: syscall.CLONE_NEWNS,
	}

	must(cmd.Run())
}

func child() {
	fmt.Printf("Running %v \n", os.Args[2:])

	cg()

	cmd := exec.Command(os.Args[2], os.Args[3:]...)
	cmd.Stdin = os.Stdin
	cmd.Stdout = os.Stdout
	cmd.Stderr = os.Stderr

	must(syscall.Sethostname([]byte("sqlcontainer1")))
	must(syscall.Chroot("/home/dbafromthecold/sqlcontainer1"))
	must(os.Chdir("/"))
	must(syscall.Mount("proc", "proc", "proc", 0, ""))
	must(cmd.Run())

	must(syscall.Unmount("proc", 0))
}

func cg() {
	cgroups := "/sys/fs/cgroup/"
	memory := filepath.Join(cgroups, "memory")
	os.Mkdir(filepath.Join(memory, "sqlcontainer1"), 0755)
	must(ioutil.WriteFile(filepath.Join(memory, "sqlcontainer1/memory.limit_in_bytes"), []byte("2147483648"), 0700))

	cpu := filepath.Join(cgroups, "cpu,cpuacct")
	os.Mkdir(filepath.Join(cpu, "sqlcontainer1), 0755)
	must(ioutil.WriteFile(filepath.Join(cpu, "sqlcontainer1/cpu.cfs_quota_us"), []byte("200000"), 0700))

	// Removes the new cgroup in place after the container exits
	must(ioutil.WriteFile(filepath.Join(memory, "sqlcontainer1/notify_on_release"), []byte("1"), 0700))
	must(ioutil.WriteFile(filepath.Join(memory, "ssqlcontainer1/cgroup.procs"), []byte(strconv.Itoa(os.Getpid())), 0700))

	must(ioutil.WriteFile(filepath.Join(cpu, "sqlcontainer1/notify_on_release"), []byte("1"), 0700))
	must(ioutil.WriteFile(filepath.Join(cpu, "sqlcontainer1/cgroup.procs"), []byte(strconv.Itoa(os.Getpid())), 0700))
}

func must(err error) {
	if err != nil {
		panic(err)
	}
}

Now, this is Liz Rice’s Containers From Scratch code, with a couple of (minor) modifications to run SQL.

I’m not going to go through what all of it does, Liz Rice does a far better job of that in her Building Containers From Scratch session. Highly recommend you check out that session.

However I do want to point a couple of things out.

Firstly here: –

Cloneflags:   syscall.CLONE_NEWUTS | syscall.CLONE_NEWPID

This is where we’re creating a new unix timesharing namespace, so the hostname within the container will be different to the actual host the container is running on. And we’re also creating a new process id namespace, so that the container can only see its own processes.

Then we’re changing the hostname the container sees to sqlcontainer1: –

must(syscall.Sethostname([]byte("sqlcontainer1")))

Then changing the root of the container to the location that we extracted the Docker container’s filesystem to: –

must(syscall.Chroot("/home/dbafromthecold/sqlcontainer1"))

Finally, creating a couple of cgroups: –

must(ioutil.WriteFile(filepath.Join(memory, "sqlcontainer1/memory.limit_in_bytes"), []byte("2147483648"), 0700))
must(ioutil.WriteFile(filepath.Join(cpu, "sqlcontainer1/cpu.cfs_quota_us"), []byte("200000"), 0700))

Here we’re creating cgroups to limit the memory available to the container to 2GB, and limiting the number of CPUs to 2.

Right, let’s pull that code down into a directory: –

mkdir container
cd container
curl https://gist.githubusercontent.com/dbafromthecold/139e93907f7eab45a20944d0eaffeb3a/raw/d1d7b71197d70755bc055b9dd06744e50916d657/main.go -o main.go

Awesome stuff, we are ready to run our container!

Switching to the root user, we can run our container and open a shell into it by running: –

sudo su
go run main.go run /bin/bash

Hmm, ok…the terminal now looks different..are we in our container?

Let’s have a look at the hostname: –

hostname

Ah ha! The hostname is set to sqlcontainer1! We are in our container!

OK, let’s spin up SQL Server within it! Firstly we need to create a special file that SQL requires to run :-

mknod -m 444 /dev/urandom c 1 9

Many thanks to Mark Wilkinson (b|t) who figured that one out!

Right, we are good to go! Let’s run SQL in the background: –

/opt/mssql/bin/sqlservr&> /dev/null &

Err, ok…has that worked? Let’s check the processes in the container: –

ps aux

Cool! We have a couple of SQL processes running! And because the container is in a process id namespace…it can only see its own processes.

If we check the processes on the host: –

ps aux | grep mssql

There they are on the host! With different process IDs because of the namespace.

OK, final thing to have a look at…the control groups. We created one for memory and CPU..so let’s have a look at them.

Running on the host (not in the container)…let’s get the memory limit: –

MEMORYLIMIT=$(cat /sys/fs/cgroup/memory/sqlcontainer1/memory.limit_in_bytes)
expr $MEMORYLIMIT / 1024 / 1024

There is the 2GB memory limit for the container being implemented by a control group!

Ok, let’s check the CPU limit: –

cat /sys/fs/cgroup/cpu,cpuacct/sqlcontainer1/cpu.cfs_quota_us

Cool! There’s the CPU limit that was set.

So by using that little piece of Go code, and some knowledge of how containers work in the background…we can spin up our own container built from scratch!

Ok, I admit…this isn’t exactly going to be as stable as running a container in Docker and there’s a few things still missing (port mapping anyone?) but I think it’s really cool to be able to do this. 🙂

Thanks for reading!

Converting a SQL Server Docker image to a WSL2 Distribution

Windows Subsystem for Linux is probably my favourite feature of Windows 10. It gives us the ability to run full blown linux distributions on our Windows 10 desktop. This allows us to utilise the cool features of linux (grep ftw) on Windows 10.

I’ve been playing around a bit with WSL2 and noticed that you can import TAR files into it to create your own custom distributions.

This means that we can export docker containers and run them as WSL distros!

So, let’s build a custom SQL Server 2019 docker image, run a container, and then import that container into WSL2…so that we have a custom distro running SQL Server 2019.

Note…this is kinda cool as WSL2 is not (currently) a supported platform to install SQL on Linux: –

Anyway, let’s run through the process.

Here’s the dockerfile for the custom SQL Docker image: –

FROM ubuntu:20.04

RUN apt-get update &amp;&amp; apt-get install -y wget software-properties-common apt-transport-https

RUN wget -qO- https://packages.microsoft.com/keys/microsoft.asc | apt-key add -

RUN add-apt-repository "$(wget -qO- https://packages.microsoft.com/config/ubuntu/20.04/mssql-server-2019.list)"

RUN apt-get update &amp;&amp; apt-get install -y mssql-server

CMD /opt/mssql/bin/sqlservr

Pretty standard, following the SQL on Linux install instructions here.

OK, let’s build the image: –

docker build -t sqlserver2019 .

Now run a container from the new custom image: –

docker container run -d `
--publish 1433:1433 `
--env ACCEPT_EULA=Y `
--env MSSQL_SA_PASSWORD=Testing1122 `
--name sqlcontainer1 `
sqlserver2019

Confirm that the container is running: –

docker container ls

OK, now we’re going to rename the instance in the container for no other reason that we want the instance name not to be the container ID when we run it as a WSL2 Distro: –

mssql-cli -S localhost -U sa -P Testing1122 -Q "SELECT @@SERVERNAME AS [InstanceName];"

mssql-cli -S localhost -U sa -P Testing1122 -Q "sp_dropserver [8622203f7381];"

mssql-cli -S localhost -U sa -P Testing1122 -Q "sp_addserver [sqlserver2019], local;"

Stop, then start the container and confirm the rename has been successful: –

docker stop sqlcontainer1

docker start sqlcontainer1

mssql-cli -S localhost -U sa -P Testing1122 -Q "SELECT @@SERVERNAME AS [InstanceName];"

Cool! Now, stop the container again: –

docker stop sqlcontainer1

Right, now we can export the container to a tar file: –

docker export sqlcontainer1 -o C:\temp\sqlcontainer1.tar

Once the export is complete we can then import it into WSL2: –

wsl --import sqlserver2019 C:\wsl-distros\sqlserver2019 C:\temp\sqlcontainer1.tar --version 2

Here’s what the code above is doing…

  • sqlserver2019 – the name of the new WSL distro
  • C:\wsl-distros\sqlserver2019 – The path where the new distro will be stored on disk
  • C:\temp\sqlcontainer1.tar – The location of the tar file we are importing
  • version 2 – WSL version of the new distro

Confirm that the new distro is in WSL2: –

wsl --list --verbose

Great stuff, the distro has been imported. Now we need to start it by running SQL. We’re going to use the setsid command to start up SQL here, as if we didn’t…the SQL log would write to our current session and we’d have to open up another powershell window: –

wsl -d sqlserver2019 bash -c "setsid /opt/mssql/bin/sqlservr"

Verify the distro is running: –

wsl --list --verbose

There’s our distro running! And we also execute ps aux against the distro to see if SQL is running: –

wsl -d sqlserver2019 ps aux

Cool! So now we can connect to SQL running in the distro with (using 127.0.0.1 instead of localhost): –

mssql-cli -S 127.0.0.1 -U sa -P Testing1122 -Q "SELECT @@SERVERNAME"

Excellent stuff! We have a new WSL2 distro running the latest version of SQL Server 2019!

So we can do our work and when we’re finished we can close down the distro with: –

wsl -t sqlserver2019

And if we want to get rid of the new distro completely: –

wsl --unregister sqlserver2019

Pretty cool! Ok, I admit…most people would prefer to run SQL in a container for this kind of stuff BUT it does give us another option…and having more options is always a good thing to have…right?

Right?

Thanks for reading!

Creating presentations with Reveal and Github pages

I really don’t like Powerpoint.

I’ll do pretty much anything to avoid writing a presentation in it. Thankfully for the last few years there’s been a service called GitPitch which allowed me to write presentations in markdown, push to Github, and it publishes the presentation at a custom URL.

I really liked this service as it made updating my presentations really easy and if anyone asked for my slides I could give them the URL.

Unfortunately, GitPitch is shutting down on March 1st so all my presentations will become unavailable after that date.

So I had to find an alternative and as there’s no way I was going to use Powerpoint, I was kinda stuck.

Thankfully, Mark Wilkinson (b|t) came to my rescue and told me about Reveal.

(He also gave me some (ok, a LOT) of pointers in how to get up and running, thank you Mark!)

Reveal combined with Github Pages pretty much gives me the same setup that I had with GitPitch so I was saved from Powerpoint!

Let’s run through how to create a presentation using both.

First, clone down the Reveal repo: –

git clone https://github.com/hakimel/reveal.js.git

Create a directory for the new presentation locally: –

mkdir demopresentation

Navigate to the new directory: –

cd demopresentation

Initialise the repo: –

git init

N.B. – you can confiure git to initialise a main branch instead of master by running: –

git config --global init.defaultBranch main

We need to populate the repo with something before we can do anything else. So create a test file: –

new-item test.txt

Commit test.txt to main branch: –

git add test.txt
git commit -m "added test.txt"

Now go to Github and create the repository that we’re going to push the local one to: –

Once the repo is created, Github will give instructions on how to link and push our local repository to it: –

So run: –

git remote add origin https://github.com/dbafromthecold/demopresentation.git
git branch -M main
git push -u origin main

And there’s the repo with our test file in it on Github: –

Now that the main branch has been initialised and the first commit executed we can create a gh-pages branch.

The gh-pages branch, when pushed to Github, will automatically create a URL that we can use to publish our presentation.

So let’s create the branch: –

git branch gh-pages

Switch to the gh-pages branch: –

git checkout gh-pages

Copy the required files into the gh-pages branch from the Reveal repo: –

copy-item ..\reveal.js\index.html
copy-item ..\reveal.js\css -recurse
copy-item ..\reveal.js\dist -recurse
copy-item ..\reveal.js\js -recurse
copy-item ..\reveal.js\plugin -recurse

Open the index.html file and replace: –

<div class="reveal">
    <div class="slides">
        <section>Slide 1</section>
        <section>Slide 2</section>
    </div>
</div>

With the following: –

<div class="reveal">
    <div class="slides">
        <section data-markdown="slides.md"
                 data-separator="^^\r?\n---\r?\n$"
                 data-separator-vertical="^\r?\n------\r?\n$"
                 data-separator-notes="^Note:"
                 data-charset="iso-8859-15"
                 data-transition="slide">
        </section>
    </div>
</div>

The index.html file should now look like this.

What this is doing is allowing us to use a slides.md file to create our presentation (data-markdown=”slides.md”). Check out this page for what the other lines are doing.

Now create the slides.md file (just going to have a title slide initially): –

echo '## Demo Presentation' > slides.md

Now run a commit on the gh-pages branch: –

git add .
git commit -m "created demo presentation"

And finally, add the remote location for the branch and push: –

git push --set-upstream origin gh-pages

And that’s it! Give it a few minutes and the presentation will be available at dbafromthecold.github.io/demopresentation

The URL can be checked in the settings of the repo: –

And there’s the presentation! To add more slides, simply update the slides.md file. For an example, check out my Docker Deep Dive slides.

DISCLAIMER! – that doesn’t contain the greatest markdown if I’m honest, but it works for what I want 🙂

Finally…what happens if you’re at a conference and the wifi is sketchy? No bother, if you have Python installed you can navigate to where your presentation is locally and run: –

python -m http.server 8080

And the presentation will be available at localhost:8080

Pretty cool eh?

Thanks for reading!