Vertically scaling SQL Server online in Kubernetes


UPDATE – JANUARY 2026 – This feature has now been moved to stable in Kubernetes v1.35…full details are here: –
https://kubernetes.io/docs/tasks/configure-pod-container/resize-container-resources/

Whilst this is great unfortunately I did a bit more digging with regards to SQL Server (which OK, I should have done initially) and it seems that SQL Server will not see the new limits without a restart. So we can increase the limits in the pod without a restart but SQL will not see them.

My recommendation is to set the resizePolicy to RestartContainer in the manifest: –

resizePolicy:
- resourceName: cpu
  restartPolicy: RestartContainer
- resourceName: memory
  restartPolicy: RestartContainer

Then when increasing the memory via: –

kubectl patch pod mssql-statefulset-0 --subresource resize --patch `
'{\"spec\":{\"containers\":[{\"name\":\"mssql-container\", \"resources\":{\"requests\":{\"memory\":\"4096Mi\"}, \"limits\":{\"memory\":\"4096Mi\"}}}]}}'

This will restart the container within the pod, not the whole pod which is quicker but does mean a slight outage.


ORIGINAL ARTICLE

One of the new features in Kubernetes v1.33 is the ability to resize CPU and memory resources for containers online, aka without having to recreate the pod the container is running in. In the past, when adjusting a pod’s resources, Kubernetes would delete the existing pod and create a new one via a controller.

Not a problem for applications that can have multiple replicas running, but for SQL Server this would cause a disruption as we (generally) only have one pod running SQL Server in a statefulset. Let’s see this in action.

First we’ll deploy this simple statefulset to Kubernetes: –

apiVersion: apps/v1
kind: StatefulSet
metadata:
  name: mssql-statefulset
spec:
  serviceName: "mssql"
  replicas: 1
  podManagementPolicy: Parallel
  selector:
    matchLabels:
      name: mssql-pod
  template:
    metadata:
      labels:
        name: mssql-pod
    spec:
      securityContext:
        fsGroup: 10001
      containers:
        - name: mssql-container
          image: mcr.microsoft.com/mssql/server:2022-CU16-ubuntu-20.04
          ports:
            - containerPort: 1433
              name: mssql-port
          env:
            - name: ACCEPT_EULA
              value: "Y"
            - name: MSSQL_SA_PASSWORD
              value: "Testing1122"
          resources:
            requests:
              memory: "2048Mi"
              cpu: "2000m"
            limits:
              memory: "2048Mi"
              cpu: "2000m"

The important part here is the CPU and memory settings: –

          resources:
            requests:
              memory: "2048Mi"
              cpu: "2000m"
            limits:
              memory: "2048Mi"
              cpu: "2000m"

N.B. – you may have noticed that the limits and requests here are the same value. This is to set a “Guaranteed” Quality of Service for the pod…it’s a recommended best practice for SQL Server in Kubernetes, more info is here: –
https://learn.microsoft.com/en-us/sql/linux/sql-server-linux-kubernetes-best-practices-statefulsets

Let’s apply that manifest: –

kubectl apply -f ./sqlserver.yaml

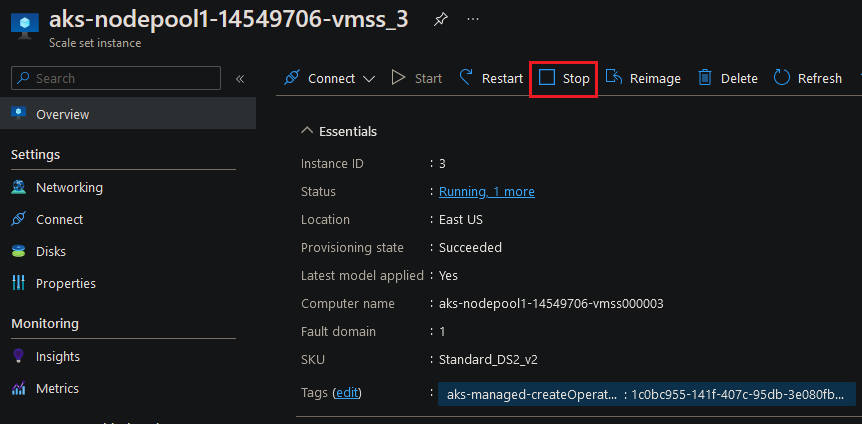
In the past we had to edit our statefulset to increase these values: –

kubectl edit sts mssql-statefulset

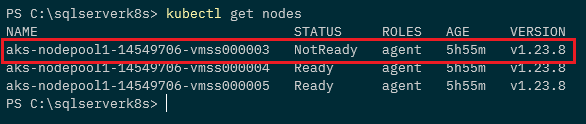
This would recreate the pod with the new limits/requests: –

But now as of Kubernetes v1.33 we can scale pods without a restart! See here for the more info: –
https://kubernetes.io/docs/tasks/configure-pod-container/resize-container-resources/

One thing to note…the code to do this in the official docs will error out if you’re running kubectl on Windows (sigh). In order for this to run successfully on Windows a backslash has to be added before any double quote character.

So in order to increase the memory of the pod running, we would run: –

kubectl patch pod mssql-statefulset-0 --subresource resize --patch `
'{\"spec\":{\"containers\":[{\"name\":\"mssql-container\", \"resources\":{\"requests\":{\"memory\":\"4000Mi\"}, \"limits\":{\"memory\":\"4000Mi\"}}}]}}'

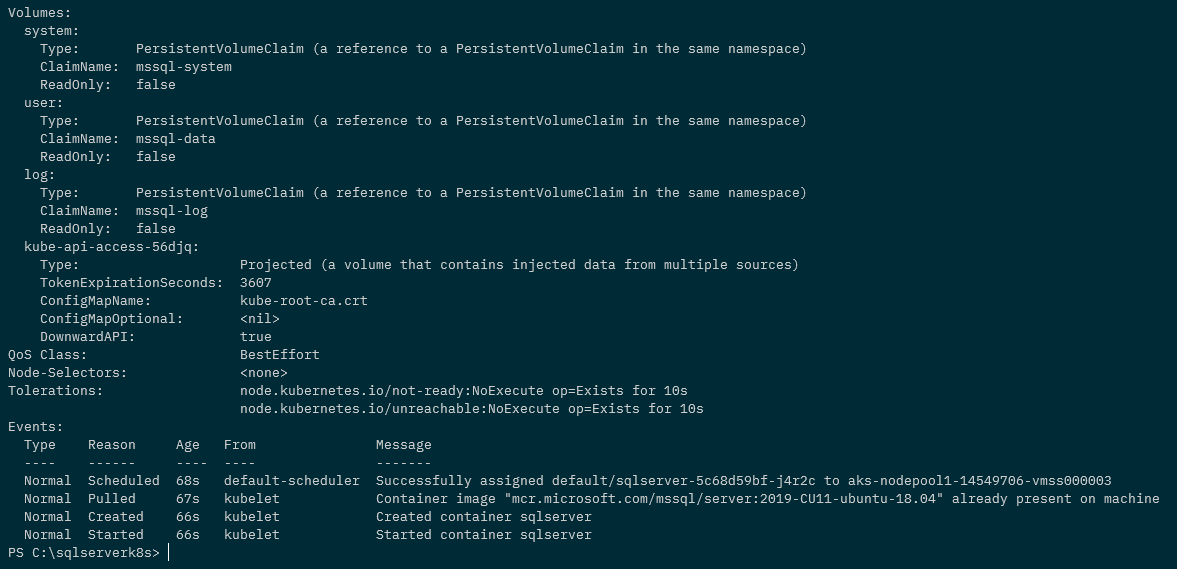
And then if we check out the pod’s yaml: –

kubectl get pod mssql-statefulset-0 -o yaml

And there we are, cool!

So to do this for CPU, we would run: –

kubectl patch pod mssql-statefulset-0 --subresource resize --patch `
'{\"spec\":{\"containers\":[{\"name\":\"mssql-container\", \"resources\":{\"requests\":{\"cpu\":\"4000m\"}, \"limits\":{\"cpu\":\"4000m\"}}}]}}'

Ok, I appreciate this code isn’t exactly the easiest to type out! Thankfully we can now add a –subresource resize flag to an edit command: –

kubectl edit pod mssql-statefulset-0 --subresource resize

And this will allow us to update the CPU and memory limits/requests of the pod without a restart!

Thanks for reading!

Visualising SQL Server in Kubernetes

The other day I came across an interesting repo on github, KubeDiagrams.

What this repo does is generate Kubernetes architecture diagrams from Kubernetes manifest files…nice!

Deploying applications to Kubernetes can get complicated fast…especially with stateful applications such as SQL Server.

So having the ability to easily generate diagrams is really helpful…because we all should be documenting everything, right? 🙂

Plus I’m rubbish at creating diagrams!

So let’s have a look at how this works. First, install the dependencies via pip: –

pip install pyyaml
pip install diagrams

And install graphviz: –

sudo apt install graphviz

Great, now pull down the repo: –

git clone https://github.com/philippemerle/KubeDiagrams.git

And we’re good to go! So here’s an example manifest file to deploy a SQL Server statefulset to Kubernetes: –

apiVersion: v1
kind: Namespace
metadata:
  name: mssql
---
apiVersion: storage.k8s.io/v1
kind: StorageClass
metadata:
  name: mssql-sc
provisioner: docker.io/hostpath
reclaimPolicy: Delete
volumeBindingMode: Immediate
---
apiVersion: v1
kind: Service
metadata:
  name: mssql-headless
  namespace: mssql
spec:
  clusterIP: None
  selector:
    name: mssql-pod
  ports:
    - name: mssql-port
      port: 1433
      targetPort: 1433
---
apiVersion: apps/v1
kind: StatefulSet
metadata:
  name: mssql-statefulset
  namespace: mssql
spec:
  serviceName: "mssql-headless"
  replicas: 1
  podManagementPolicy: Parallel
  selector:
    matchLabels:
      name: mssql-pod
  template:
    metadata:
      labels:
        name: mssql-pod
    spec:
      securityContext:
        fsGroup: 10001
      containers:
        - name: mssql-container
          image: mcr.microsoft.com/mssql/server:2022-CU16-ubuntu-20.04
          ports:
            - containerPort: 1433
              name: mssql-port
          env:
            - name: MSSQL_PID
              value: "Developer"
            - name: ACCEPT_EULA
              value: "Y"
            - name: MSSQL_AGENT_ENABLED
              value: "1"
            - name: MSSQL_SA_PASSWORD
              value: "Testing1122"
          resources:
            requests:
              memory: "1024Mi"
              cpu: "500m"
            limits:
              memory: "2048Mi"
              cpu: "2000m"
          volumeMounts:
            - name: sqlsystem
              mountPath: /var/opt/mssql
            - name: sqldata
              mountPath: /opt/sqlserver/data
            - name: sqllog
              mountPath: /opt/sqlserver/log
  volumeClaimTemplates:
    - metadata:
        name: sqlsystem
        namespace: mssql
      spec:
        accessModes:
         - ReadWriteOncePod
        storageClassName: mssql-sc
        resources:
          requests:
            storage: 25Gi
    - metadata:
        name: sqldata
        namespace: mssql
      spec:
        accessModes:
         - ReadWriteOncePod
        storageClassName: mssql-sc
        resources:
          requests:
            storage: 25Gi
    - metadata:
        name: sqllog
        namespace: mssql
      spec:
        accessModes:
         - ReadWriteOncePod
        storageClassName: mssql-sc
        resources:
          requests:
            storage: 25Gi
---
apiVersion: v1
kind: Service
metadata:
  name: mssql-service
  namespace: mssql
spec:
  ports:
  - name: mssql-ports
    port: 1433
    targetPort: 1433
  selector:
    name: mssql-pod
  type: LoadBalancer

I’m using Docker Desktop here (hence the provisioner: docker.io/hostpath in the storage class). What this’ll create is a namespace, storage class, headless service for the statefulset, the statefulset itself, three persistent volume claims, and a load balanced service to connect to SQL.

Quite a lot of objects for a simple SQL Server deployment, right? (ahh I know it’s a statefulset, but you know what I mean)

So let’s point KubeDiagrams at the manifest: –

./kube-diagrams mssql-statefulset.yaml

And here’s the output!

Pretty cool, eh?

I noticed a couple of quirks. The docs say it’ll work with any version 3 install of python. I had 3.8 installed but had to upgrade to 3.9.

Also I had to add namespace: mssql to the PVCs in the statefulset, otherwise KubeDiagrams threw a warning: –

Error: ‘sqlsystem/mssql/PersistentVolumeClaim/v1’ resource not found!
Error: ‘sqldata/mssql/PersistentVolumeClaim/v1’ resource not found!
Error: ‘sqllog/mssql/PersistentVolumeClaim/v1’ resource not found

But other than those, it works really well and is a great way to visualise objects in Kubernetes.

Massive thank you to the creator, Philippe Merle!

Thanks for reading!

SQL Server Distributed Availability Groups and Kubernetes

A while back I wrote about how to use a Cross Platform (or Clusterless) Availability Group to seed a database from a Windows SQL instance into a pod in Kubernetes.

I was talking with a colleague last week and they asked, “What if the existing Windows instance is already in an Availability Group?”

This is a fair question, as it’s fairly rare (in my experience) to run a standalone SQL instance in production…most instances are in some form of HA setup, be it a Failover Cluster Instance or an Availability Group.

Failover Cluster Instances will work with a clusterless Availability Group but it’s a different story when it comes to existing Availability Groups.

A Linux node cannot be added to an existing Windows Availability Group (trust me, I tried for longer than I’m going to admit) so the only way to do it is to use a Distributed Availability Group.

So let’s run through the process!

Here is the existing Windows Availability Group: –

Just a standard, 2 node AG with one database already synchronized across the nodes. It’s that database we are going to seed over to the pod running on the Kubernetes cluster using a Distributed Availability Group.

So here’s the Kubernetes cluster: –

kubectl get nodes

Four nodes, one control plane node and three worker nodes.

OK, so first thing to do is deploy a statefulset running one SQL Server pod (using a file called sqlserver-statefulset.yaml): –

kubectl apply -f .\sqlserver-statefulset.yaml

Here’s the manifest of the statefulset: –

apiVersion: apps/v1
kind: StatefulSet
metadata:
  name: mssql-statefulset
spec:
  serviceName: "mssql"
  replicas: 1
  podManagementPolicy: Parallel
  selector:
    matchLabels:
      name: mssql-pod
  template:
    metadata:
      labels:
        name: mssql-pod
      annotations:
        stork.libopenstorage.org/disableHyperconvergence: "true"
    spec:
      securityContext:
        fsGroup: 10001
      hostAliases:
      - ip: "10.225.115.129"
        hostnames:
        - "z-ap-sql-10"
      containers:
        - name: mssql-container
          image: mcr.microsoft.com/mssql/server:2022-CU15-ubuntu-20.04
          ports:
            - containerPort: 1433
              name: mssql-port
          env:
            - name: MSSQL_PID
              value: "Developer"
            - name: ACCEPT_EULA
              value: "Y"
            - name: MSSQL_AGENT_ENABLED
              value: "1"
            - name: MSSQL_ENABLE_HADR
              value: "1"
            - name: MSSQL_SA_PASSWORD
              value: "Testing1122"
          volumeMounts:
            - name: sqlsystem
              mountPath: /var/opt/mssql
            - name: sqldata
              mountPath: /var/opt/sqlserver/data
  volumeClaimTemplates:
    - metadata:
        name: sqlsystem
      spec:
        accessModes:
         - ReadWriteOnce
        resources:
          requests:
            storage: 1Gi
        storageClassName: mssql-sc
    - metadata:
        name: sqldata
      spec:
        accessModes:
         - ReadWriteOnce
        resources:
          requests:
            storage: 25Gi
        storageClassName: mssql-sc

Like my last post, this is pretty stripped down. No resources limits, tolerations etc. It has two persistent volumes, one for the system databases and one for the user databases from a storage class already configured in the cluster.

One thing to note: –

hostAliases:
- ip: "10.225.115.129"
  hostnames:
  - "z-ap-sql-10"

Here an entry in the pod’s hosts file is being created for the listener of the Windows Availability Group.

Next thing to do is deploy two services, one so that we can connect to the SQL instance (on port 1433) and one for the AG (port 5022): –

kubectl apply -f .\sqlserver-services.yaml

Here’s the manifest for the services: –

apiVersion: v1
kind: Service
metadata:
  name: mssql-service
spec:
  ports:
  - name: mssql-ports
    port: 1433
    targetPort: 1433
  selector:
    name: mssql-pod
  type: LoadBalancer
---
apiVersion: v1
kind: Service
metadata:
  name: mssql-ha-service
spec:
  ports:
  - name: mssql-ha-ports
    port: 5022
    targetPort: 5022
  selector:
    name: mssql-pod
  type: LoadBalancer

NOTE – We could use just one service with multiple ports configured but I’m keeping them separate here to try and keep things as clear as possible.

Check that everything looks OK: –

kubectl get all

Now we need to create master key, login, and user in all instances: –

CREATE MASTER KEY ENCRYPTION BY PASSWORD = '<C0m9L3xP@55w0rd!>';
CREATE LOGIN [dbm_login] WITH PASSWORD = '<C0m9L3xP@55w0rd!>';
CREATE USER dbm_user FOR LOGIN dbm_login;

Then create a certificate in the SQL instance in the pod: –

CREATE CERTIFICATE dbm_certificate WITH SUBJECT = 'Mirroring_certificate', EXPIRY_DATE = '20301031'

Backup that certificate: –

BACKUP CERTIFICATE dbm_certificate
TO FILE = '/var/opt/mssql/data/dbm_certificate.cer'
WITH PRIVATE KEY (
        FILE = '/var/opt/mssql/data/dbm_certificate.pvk',
        ENCRYPTION BY PASSWORD = '<C0m9L3xP@55w0rd!>'
    );

Copy the certificate locally: –

kubectl cp mssql-statefulset-0:var/opt/mssql/data/dbm_certificate.cer ./dbm_certificate.cer
kubectl cp mssql-statefulset-0:var/opt/mssql/data/dbm_certificate.pvk ./dbm_certificate.pvk

And then copy the files to the Windows boxes: –

Copy-Item dbm_certificate.cer \\z-ap-sql-02\E$\SQLBackup1\ -Force
Copy-Item dbm_certificate.pvk \\z-ap-sql-02\E$\SQLBackup1\ -Force
Copy-Item dbm_certificate.cer \\z-ap-sql-03\E$\SQLBackup1\ -Force
Copy-Item dbm_certificate.pvk \\z-ap-sql-03\E$\SQLBackup1\ -Force

Once the files are on the Windows boxes, we can create the certificate in each Windows SQL instance: –

CREATE CERTIFICATE dbm_certificate
    AUTHORIZATION dbm_user
    FROM FILE = 'E:\SQLBackup1\dbm_certificate.cer'
    WITH PRIVATE KEY (
    FILE = 'E:\SQLBackup1\dbm_certificate.pvk',
    DECRYPTION BY PASSWORD = '<C0m9L3xP@55w0rd!>'
)

OK, great! Now we need to create a mirroring endpoint in the SQL instance in the pod: –

CREATE ENDPOINT [Hadr_endpoint]
    STATE = STARTED
    AS TCP (   
        LISTENER_PORT = 5022,
        LISTENER_IP = ALL)
    FOR DATA_MIRRORING (
        ROLE = ALL,
        AUTHENTICATION = WINDOWS CERTIFICATE [dbm_certificate],
        ENCRYPTION = REQUIRED ALGORITHM AES
        );
ALTER ENDPOINT [Hadr_endpoint] STATE = STARTED;
GRANT CONNECT ON ENDPOINT::[Hadr_endpoint] TO [dbm_login];

There are already endpoints in the Windows instances, but we need to update them to use the certificate for authentication: –

ALTER ENDPOINT [Hadr_endpoint]
    STATE = STARTED
    AS TCP (   
        LISTENER_PORT = 5022,
        LISTENER_IP = ALL)
    FOR DATABASE_MIRRORING (
    AUTHENTICATION = WINDOWS CERTIFICATE [dbm_certificate]
    , ENCRYPTION = REQUIRED ALGORITHM AES
    );
GRANT CONNECT ON ENDPOINT::[Hadr_endpoint] TO [dbm_login];

Now we can create a one node Clusterless Availability Group in the SQL instance in the pod: –

CREATE AVAILABILITY GROUP [AG2]
   WITH (CLUSTER_TYPE=NONE)
   FOR
   REPLICA ON   
      'mssql-statefulset-0' WITH   
         (  
         ENDPOINT_URL = 'TCP://mssql-statefulset-0.com:5022',   
		 FAILOVER_MODE = MANUAL
		,AVAILABILITY_MODE = SYNCHRONOUS_COMMIT
		,BACKUP_PRIORITY = 50
		,SEEDING_MODE = AUTOMATIC
		,SECONDARY_ROLE(ALLOW_CONNECTIONS = NO)
	)    

No listener here, we are going to use the mssql-ha-service as the endpoint for the Distributed Availability Group.

OK, so on the primary node of the Windows Availability Group, we can create the Distributed Availability Group: –

CREATE AVAILABILITY GROUP [DistributedAG]  
   WITH (DISTRIBUTED)   
   AVAILABILITY GROUP ON  
      'AG1' WITH    
      (   
         LISTENER_URL = 'tcp://Z-AP-SQL-10:5022',    
         AVAILABILITY_MODE = ASYNCHRONOUS_COMMIT,   
         FAILOVER_MODE = MANUAL,   
         SEEDING_MODE = AUTOMATIC   
      ),   
      'AG2' WITH    
      (   
         LISTENER_URL = 'tcp://10.225.115.131:5022',   
         AVAILABILITY_MODE = ASYNCHRONOUS_COMMIT,   
         FAILOVER_MODE = MANUAL,   
         SEEDING_MODE = AUTOMATIC   
      );    

We could use a host file entry for the URL in AG2 (I did that in the previous post) but here we’ll just use the IP address of the mssql-ha-service.

OK, nearly there! We now have to join the Availability Group in the SQL instance in the pod: –

ALTER AVAILABILITY GROUP [DistributedAG]  
   JOIN   
   AVAILABILITY GROUP ON  
      'AG1' WITH    
      (   
         LISTENER_URL = 'tcp://Z-AP-SQL-10:5022',    
         AVAILABILITY_MODE = ASYNCHRONOUS_COMMIT,   
         FAILOVER_MODE = MANUAL,   
         SEEDING_MODE = AUTOMATIC   
      ),   
      'AG2' WITH    
      (   
         LISTENER_URL = 'tcp://10.225.115.131:5022',   
         AVAILABILITY_MODE = ASYNCHRONOUS_COMMIT,   
         FAILOVER_MODE = MANUAL,   
         SEEDING_MODE = AUTOMATIC   
      );    

And that should be it! If we now connect to the SQL instance in the pod…the database is there!

There it is! OK, one thing I haven’t gone through here is how to get auto-seeding working from Windows into a Linux SQL instance. I went through how that works in my previous post (here) but the gist is as long as the database data and log files are located under the Windows SQL instance’s default data and log path…they will auto-seed to the Linux SQL instance’s default data and log paths.

So that’s how to seed a database from a SQL instance that is in a Windows Availability Group into a SQL instance running in a pod in a Kubernetes cluster using a Distributed Availability Group!

Phew! Thanks for reading!

SQL Server Cross Platform Availability Groups and Kubernetes

Say we have a database that we want to migrate a copy of into Kubernetes for test/dev purposes, and we don’t want to backup/restore.

How can it be done?

Well, with cross platform availability groups! We can deploy a pod to our Kubernetes cluster, create the availability group, and then auto-seed our database!

We’ll run through how to do this but first, I just want to point out that everything here firmly belongs in this category…

Ok, now that’s out the way…let’s see how this can be done.

We’ll need a “normal” instance of SQL Server running on Windows and a Kubernetes cluster.

Here I have one instance of SQL Server running SQL 2022 CU15 (HA enabled): –

And a Kubernetes cluster running v1.29.4: –

OK, now we need to deploy a SQL instance to the Kubernetes cluster. Going to use a statefulset for this: –

apiVersion: apps/v1
kind: StatefulSet
metadata:
  name: mssql-statefulset
spec:
  serviceName: "mssql"
  replicas: 1
  selector:
    matchLabels:
      name: mssql-pod
  template:
    metadata:
      labels:
        name: mssql-pod
    spec:
      securityContext:
        fsGroup: 10001
      hostAliases:
      - ip: "10.225.115.136"
        hostnames:
        - "z-ap-sql-01"
      containers:
        - name: mssql-container
          image: mcr.microsoft.com/mssql/server:2022-CU15-ubuntu-20.04
          ports:
            - containerPort: 1433
              name: mssql-port
          env:
            - name: MSSQL_PID
              value: "Developer"
            - name: ACCEPT_EULA
              value: "Y"
            - name: MSSQL_AGENT_ENABLED
              value: "1"
            - name: MSSQL_ENABLE_HADR
              value: "1"
            - name: MSSQL_DATA_DIR
              value: /var/opt/sqlserver/data
            - name: MSSQL_LOG_DIR
              value: /var/opt/sqlserver/data
            - name: MSSQL_SA_PASSWORD
              value: "Testing1122"
          volumeMounts:
            - name: sqlsystem
              mountPath: /var/opt/mssql
            - name: sqldata
              mountPath: /var/opt/sqlserver/data
  volumeClaimTemplates:
    - metadata:
        name: sqlsystem
      spec:
        accessModes:
         - ReadWriteOnce
        resources:
          requests:
            storage: 1Gi
        storageClassName: mssql-sc
    - metadata:
        name: sqldata
      spec:
        accessModes:
         - ReadWriteOnce
        resources:
          requests:
            storage: 25Gi
        storageClassName: mssql-sc

This is fairly stripped down for this example. No tolerations, resource limits etc. Two persistent volumes will be created, one for the system databases and one for the user database data and log from a storage class already configured in the cluster.

A couple of things to note…

- name: MSSQL_ENABLE_HADR
              value: "1"

Here, HA is being enabled.

      hostAliases:
      - ip: "10.225.115.136"
        hostnames:
        - "z-ap-sql-01"

And here, an entry in the pod’s hosts file is being added for the SQL instance running on Windows.

OK, let’s deploy that (file is sqlserver-statefulset.yaml): –

kubectl apply -f sqlserver-statefulset.yaml

Next thing to do is deploy two services, one so that we can connect to the SQL instance (on port 1433) and one for the AG (port 5022): –

apiVersion: v1
kind: Service
metadata:
  name: mssql-service
spec:
  ports:
  - name: mssql-ports
    port: 1433
    targetPort: 1433
  selector:
    name: mssql-pod
  type: LoadBalancer
---
apiVersion: v1
kind: Service
metadata:
  name: mssql-ha-service
spec:
  ports:
  - name: mssql-ha-ports
    port: 5022
    targetPort: 5022
  selector:
    name: mssql-pod
  type: LoadBalancer

And let’s deploy that (file is sqlserver-service.yaml): –

kubectl apply -f sqlserver-service.yaml

Check that everything looks OK: –

kubectl get all

Great! Ok, now an entry in the SQL on Windows hosts file needs to be created for the external IP address of the service listening on port 5022.

In this example: –

10.225.115.132 mssql-statefulset-0

Confirm that we can connect to the SQL instance in Kubernetes in SSMS: –

Let’s start building the availability group!

Following the Microsoft guide here: –
https://learn.microsoft.com/en-us/sql/linux/sql-server-linux-availability-group-cross-platform

Create a login and user on the Windows SQL instance: –

CREATE LOGIN dbm_login WITH PASSWORD = '<C0m9L3xP@55w0rd!>';
CREATE USER dbm_user FOR LOGIN dbm_login;
GO

And then a master key and certificate: –

CREATE MASTER KEY ENCRYPTION BY PASSWORD = '<C0m9L3xP@55w0rd!>';
CREATE CERTIFICATE dbm_certificate WITH SUBJECT = 'dbm';
BACKUP CERTIFICATE dbm_certificate
TO FILE = 'C:\Temp\dbm_certificate.cer'
WITH PRIVATE KEY (
        FILE = 'C:\Temp\dbm_certificate.pvk',
        ENCRYPTION BY PASSWORD = '<C0m9L3xP@55w0rd!>'
    );
GO

Grab the dbm_certificate.cer and dbm_certificate.pvk files, copy to your local machine, and then copy them into the Kubernetes pod: –

kubectl cp dbm_certificate.cer mssql-statefulset-0:/var/opt/mssql/data
kubectl cp dbm_certificate.pvk mssql-statefulset-0:/var/opt/mssql/data

One copied, run the following on the SQL instance in the Kubernetes pod to create a login/user, master key, and the certificate: –

CREATE LOGIN dbm_login WITH PASSWORD = '<C0m9L3xP@55w0rd!>';
CREATE USER dbm_user FOR LOGIN dbm_login;
GO
CREATE MASTER KEY ENCRYPTION BY PASSWORD = '<M@st3rKeyP@55w0rD!>'
GO

CREATE CERTIFICATE dbm_certificate
    AUTHORIZATION dbm_user
    FROM FILE = '/var/opt/mssql/data/dbm_certificate.cer'
    WITH PRIVATE KEY (
    FILE = '/var/opt/mssql/data/dbm_certificate.pvk',
    DECRYPTION BY PASSWORD = '<C0m9L3xP@55w0rd!>'
)
GO

And then create the endpoint for the availability group on both the Windows SQL instance and the instance in the Kubernetes pod: –

CREATE ENDPOINT [Hadr_endpoint]
    AS TCP (LISTENER_IP = (0.0.0.0), LISTENER_PORT = 5022)
    FOR DATA_MIRRORING (
        ROLE = ALL,
        AUTHENTICATION = CERTIFICATE dbm_certificate,
        ENCRYPTION = REQUIRED ALGORITHM AES
        );
ALTER ENDPOINT [Hadr_endpoint] STATE = STARTED;
GRANT CONNECT ON ENDPOINT::[Hadr_endpoint] TO [dbm_login];
GO

Fantastic! Now we can create the availability group!

Run on the Windows SQL instance: –

CREATE AVAILABILITY
GROUP [ag1]
WITH (CLUSTER_TYPE = NONE)
FOR REPLICA
    ON N'z-ap-sql-01'
WITH (
    ENDPOINT_URL = N'tcp://z-ap-sql-01:5022',
    AVAILABILITY_MODE = SYNCHRONOUS_COMMIT,
    SEEDING_MODE = AUTOMATIC,
    FAILOVER_MODE = MANUAL,
    SECONDARY_ROLE(ALLOW_CONNECTIONS = ALL)
    ),
    N'mssql-statefulset-0'
WITH (
    ENDPOINT_URL = N'tcp://mssql-statefulset-0:5022',
    AVAILABILITY_MODE = SYNCHRONOUS_COMMIT,
    SEEDING_MODE = AUTOMATIC,
    FAILOVER_MODE = MANUAL,
    SECONDARY_ROLE(ALLOW_CONNECTIONS = ALL)
    )
GO

And then join the SQL instance in the Kubernetes pod: –

ALTER AVAILABILITY GROUP [ag1] JOIN WITH (CLUSTER_TYPE = NONE);
ALTER AVAILABILITY GROUP [ag1] GRANT CREATE ANY DATABASE;
GO

Once that has completed, we have a cross platform availability group!

Right, final thing to do is get our database into the AG! For this, we are going to auto-seed the database to the Linux instance.

However, Windows and Linux have different file paths! But auto-seeding does work across platform, details are here: –
https://learn.microsoft.com/en-us/sql/database-engine/availability-groups/windows/automatic-seeding-secondary-replicas

As long as the database’s data and log files are located under the Windows SQL instance’s default data and log file paths, the database will be seeded to the Linux instance’s default data and log file paths.

Let’s see this in action! The default file paths for my Windows instance are: –

And the database’s files reside on those file paths: –

And the default file paths for the SQL instance in the pod are: –

So now let’s add the database: –

ALTER AVAILABILITY GROUP [AG1] ADD DATABASE [testdatabase1];
GO

And boom! We have the database auto-seeded into the SQL instance running in the Kubernetes pod: –

Interestingly, if we look at the database’s file paths in SSMS for the instance in the pod: –

SQL in the pod thinks that the files are located at the Windows locations…but that can’t be true…it’s running on Linux!

If we go and check the actual location of the files…they are located at the default file paths for the SQL instance in the pod: –

OK, I fully admit this pretty out there…but it’s just a bit of fun to see what we can do with SQL Server Availability Groups and Kubernetes.

Thanks for reading!

Overcoming a storage failover issue with SQL Server on Kubernetes using Portworx

In a previous post I talked about an issue with storage failover when a Kubernetes node goes offline.

In a nutshell, the issue is that the attachdetach-controller in Kubernetes won’t detach storage from an offline node until that node is either brought back online or is removed from the cluster. What this means is that a pod spinning up on a new node that requires that storage can’t come online.


UPDATE – This issue has been resolved in Kubernetes version 1.26. Details are on this github issue: –
https://github.com/kubernetes/kubernetes/issues/65392

And there’s more on the official Kubernetes blog (when a feature called non-graceful node shutdown when into beta): –
https://kubernetes.io/blog/2022/12/16/kubernetes-1-26-non-graceful-node-shutdown-beta/


Aka, if you’re running SQL Server in Kubernetes and a node fails, SQL won’t be able to come back online until someone manually brings the node online or deletes the node.

Not great tbh, and it’s been a blocker for my PoC testing.

However, there are ways around this…one of them is by a product called Portworx which I’m going to demo here.


DISCLAIMER – I now work for Pure Storage who own Portworx…there are other options to get around this issue (Azure Arc Data Services being one) but I’ve found Portworx to be the simplest solution and everything I’m demoing here is completely free so you can go and test it for yourself


So let’s run through using Portworx to first create storage in Kubernetes for SQL Server, and then test a node failure.

First thing to do is log into Azure using the azure-cli: –

az login

Then create a role for portworx in Azure: –

az role definition create --role-definition '{
    "Name": "portworx",
    "Description": "",
    "AssignableScopes": [
        "/subscriptions/<subscription-id>"
    ],
    "Actions": [
        "Microsoft.ContainerService/managedClusters/agentPools/read",
        "Microsoft.Compute/disks/delete",
        "Microsoft.Compute/disks/write",
        "Microsoft.Compute/disks/read",
        "Microsoft.Compute/virtualMachines/write",
        "Microsoft.Compute/virtualMachines/read",
        "Microsoft.Compute/virtualMachineScaleSets/virtualMachines/write",
        "Microsoft.Compute/virtualMachineScaleSets/virtualMachines/read"
    ],
    "NotActions": [],
    "DataActions": [],
    "NotDataActions": []
}'

Then grab the resource group that the Kubernetes cluster resources are in: –

az aks show --name <cluster-name> --resource-group <cluster-resource-group> | jq -r '.nodeResourceGroup'

Then create a service principal in Azure dropping the subscription ID and Kubernetes resource group in: –

az ad sp create-for-rbac --role="portworx" --scopes="/subscriptions/<subscription-id>/resourceGroups/<resource-group>"

Now create secret for portworx to access Azure APIs using the service principal’s details: –

kubectl create secret generic -n kube-system px-azure --from-literal=AZURE_TENANT_ID=<tenant> \
                                                      --from-literal=AZURE_CLIENT_ID=<appId> \
                                                      --from-literal=AZURE_CLIENT_SECRET=<password>

Now we need to go to the Portworx Portal to generate a yaml file to deploy to the AKS cluster: –
https://central.portworx.com

Create an account and once in, select Portworx Enterprise (don’t worry there’s a free option coming): –

Now select Portworx Essentials and click Continue: –

On the next page, leave everything as the default and click Next: –

Then on the Storage page, select the Cloud option, then Azure, and pick a size for the disks (I went with 50GB): –

Leave everything as the default settings on the next page (the Network page) and click Next.

And on the final, Customise page, select AKS and hit Finish: –

N.B. – you can also go into the Advanced Settings section and choose what options to deploy for Portworx here. I disabled pretty much everything for this demo but you can leave the defaults.

Ok, on the next page we have some instructions. The first thing to do is deploy the Portworx operator: –

kubectl apply -f 'https://install.portworx.com/2.10?comp=pxoperator'

Once that’s deployed we can download the spec generated: –

Great! We are ready to deploy Portworx to the cluster: –

kubectl apply -f portworx_essentials_sql_demo.yaml

Let’s have a look at some of the resource that deployed. View the Portworx pods: –

kubectl get pods -n=kube-system -l name=portworx -o wide

N.B. – These may take around 5 minutes to come online

To confirm Portworx’s status: –

PX_POD=$(kubectl get pods -l name=portworx -n kube-system -o jsonpath='{.items[0].metadata.name}')
kubectl exec $PX_POD -n kube-system -- /opt/pwx/bin/pxctl status

Now we can create a Portworx storage class. Create the following px_storageclass.yaml file: –

kind: StorageClass
apiVersion: storage.k8s.io/v1
metadata:
    name: px-mssql-sc
provisioner: kubernetes.io/portworx-volume
parameters:
   repl: "3"
   io_profile: "db_remote"
   priority_io: "high"
allowVolumeExpansion: true

Then deploy to the cluster: –

kubectl apply -f .\px_storageclass.yaml

Confirm the storage class is now available: –

kubectl get storageclass

Now create a px_pvc.yaml file referencing the Portworx storage class: –

apiVersion: v1
kind: PersistentVolumeClaim
metadata:
   name: mssql-system
   annotations:
     volume.beta.kubernetes.io/storage-class: px-mssql-sc
spec:
   accessModes:
     - ReadWriteOnce
   resources:
     requests:
       storage: 1Gi
---
apiVersion: v1
kind: PersistentVolumeClaim
metadata:
   name: mssql-data
   annotations:
     volume.beta.kubernetes.io/storage-class: px-mssql-sc
spec:
   accessModes:
     - ReadWriteOnce
   resources:
     requests:
       storage: 1Gi
---
apiVersion: v1
kind: PersistentVolumeClaim
metadata:
   name: mssql-log
   annotations:
     volume.beta.kubernetes.io/storage-class: px-mssql-sc
spec:
   accessModes:
     - ReadWriteOnce
   resources:
     requests:
       storage: 1Gi

Create the PVCs: –

kubectl apply -f .\px_pvc.yaml.yaml

Confirm the PVCs: –

kubectl get pvc

And the corresponding PVs: –

kubectl get pv

Now we can deploy SQL Server using the PVCs. Create the following px_sqlserver.yaml file: –

apiVersion: apps/v1
kind: Deployment
metadata:
  creationTimestamp: null
  labels:
    app: sqlserver
  name: sqlserver
spec:
  replicas: 1
  selector:
    matchLabels:
      app: sqlserver
  template:
    metadata:
      creationTimestamp: null
      labels:
        app: sqlserver
    spec:
      securityContext:
        fsGroup: 10001
      containers:
      - image: mcr.microsoft.com/mssql/server:2019-CU11-ubuntu-18.04
        name: sqlserver
        env:
        - name: ACCEPT_EULA
          value: "Y"
        - name: MSSQL_SA_PASSWORD
          value: "Testing1122"
        resources:
          requests:
            memory: "1024Mi"
            cpu: "1000m"
          limits:
            memory: "2048Mi"
            cpu: "2000m"
        volumeMounts:
        - name: system
          mountPath: /var/opt/mssql
        - name: user
          mountPath: /var/opt/sqlserver/data
        - name: log
          mountPath: /var/opt/sqlserver/log
      tolerations:
      - key: "node.kubernetes.io/unreachable"
        operator: "Exists"
        effect: "NoExecute"
        tolerationSeconds: 10
      - key: "node.kubernetes.io/not-ready"
        operator: "Exists"
        effect: "NoExecute"
        tolerationSeconds: 10
      volumes:
      - name: system
        persistentVolumeClaim:
          claimName: mssql-system
      - name: user
        persistentVolumeClaim:
          claimName: mssql-data
      - name: log
        persistentVolumeClaim:
          claimName: mssql-log
  strategy:
    type: Recreate

And deploy: –

kubectl apply -f .\px_sqlserver.yaml

Confirm the deployment: –

kubectl get deployments

View pod created: –

kubectl get pods

View pod events: –

kubectl describe pods

N.B. – Note that we have the PVCs attached to the pod but there are no events for the attachdetach-controller in the pod events

Ok, now that we have a pod running SQL Server in the cluster…let’s see what happens when we shut down the node the pod is running on.

Confirm the node that the pod is running on: –

kubectl get pods -o wide

And then shut that node down in the portal: –

Confirm the node is down: –

kubectl get nodes

And then watch the pods: –

kubectl get pods --watch

A new pod is spun up and goes into the running status on another node: –

kubectl get pods -o wide

Ok, the old pod will stay in the terminated status until the offline node is either brought back online or removed from the cluster…but we have SQL Server up and running!

So Portworx fixes the issue that we saw in my previous post…which was a show stopper when I was running a proof of concept for SQL Server in Azure Kubernetes Service.

Thanks for reading!