Helm is a great tool for deploying applications to Kubernetes. We can bundle up all our yaml files for deployments, services etc. and deploy them to a cluster with one easy command.
But another really cool feature of Helm, the ability to easily upgrade and roll back a release (the term for an instance of a Helm chart running in a cluster).
Now, you can do this with kubectl. If I upgrade a deployment with kubectl apply I can then use kubectl rollout undo to roll back that upgrade. That’s great! And it’s one of the best features of Kubernetes.
What happens when you upgrade a deployment is that a new replicaset is created for that deployment, which is running the upgraded application in a new set of pods.
If we rollback with kubectl rollout undo the pods in the newest replicaset are deleted, and pods in an older replicaset are spun back up, rolling back the upgrade.
But there’s a potential problem here. What happens if that old replicaset is deleted?
If that happens, we wouldn’t be able to rollback the upgrade. Well we wouldn’t be able to roll it back with kubectl rollout undo, but what happens if we’re using Helm?
Let’s run through a demo and have a look.
So I’m on Windows 10, running in WSL 2, my distribution is Ubuntu: –
ubuntu
N.B. – The below code will work in a powershell session on Windows, apart from a couple of commands where I’m using Linux specific command line tools, hence why I’m in my WSL 2 distribution. (No worries if you’re on a Mac or native Linux distro)
Anyway I’m going to navigate to Helm directory on my local machine, where I am going to create a test chart: –
cd /mnt/c/Helm
Create a chart called testchart: –
helm create testchart
Remove all unnecessary files in the templates directory: –
rm -rf ./testchart/templates/*
Create a deployment yaml file: –
kubectl create deployment nginx \
--image=nginx:1.17 \
--dry-run=client \
--output=yaml > ./testchart/templates/deployment.yaml
Which will create the following yaml and save it as deployment.yaml in the templates directory: –
apiVersion: apps/v1
kind: Deployment
metadata:
  creationTimestamp: null
  labels:
    app: nginx
  name: nginx
spec:
  replicas: 1
  selector:
    matchLabels:
      app: nginx
  strategy: {}
  template:
    metadata:
      creationTimestamp: null
      labels:
        app: nginx
    spec:
      containers:
      - image: nginx:1.17
        name: nginx
        resources: {}
status: {}
Now create the deployment so we can run the expose command below: –
kubectl create deployment nginx --image=nginx:1.17
Generate the yaml for the service with the kubectl expose command: –
kubectl expose deployment nginx \
--type=LoadBalancer \
--port=80 \
--dry-run=client \
--output=yaml > ./testchart/templates/service.yaml
Which will give us the following yaml and save it as service.yaml in the templates directory: –
apiVersion: v1
kind: Service
metadata:
  creationTimestamp: null
  labels:
    app: nginx
  name: nginx
spec:
  ports:
  - port: 80
    protocol: TCP
    targetPort: 80
  selector:
    app: nginx
  type: LoadBalancer
status:
  loadBalancer: {}
Delete the deployment, it’s not needed: –
kubectl delete deployment nginx
Recreate the values.yaml file with a value for the container image: –
rm ./testchart/values.yaml
echo "containerImage: nginx:1.17" > ./testchart/values.yaml
Then replace the hard coded container image in the deployment.yaml with a template directive: –
sed -i 's/nginx:1.17/{{ .Values.containerImage }}/g' ./testchart/templates/deployment.yaml
So the deployment.yaml file now looks like this: –
apiVersion: apps/v1
kind: Deployment
metadata:
  creationTimestamp: null
  labels:
    app: nginx
  name: nginx
spec:
  replicas: 1
  selector:
    matchLabels:
      app: nginx
  strategy: {}
  template:
    metadata:
      creationTimestamp: null
      labels:
        app: nginx
    spec:
      containers:
      - image: {{ .Values.containerImage }}
        name: nginx
        resources: {}
status: {}
Which means that the container image is not hard coded. It’ll take the value of nginx:1.17 from the values.yaml file or we can override it with the set flag (which we’ll do in a minute).
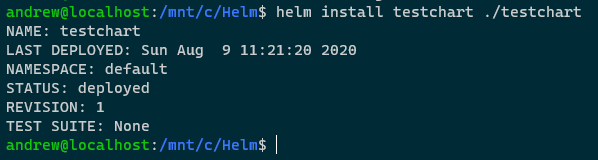
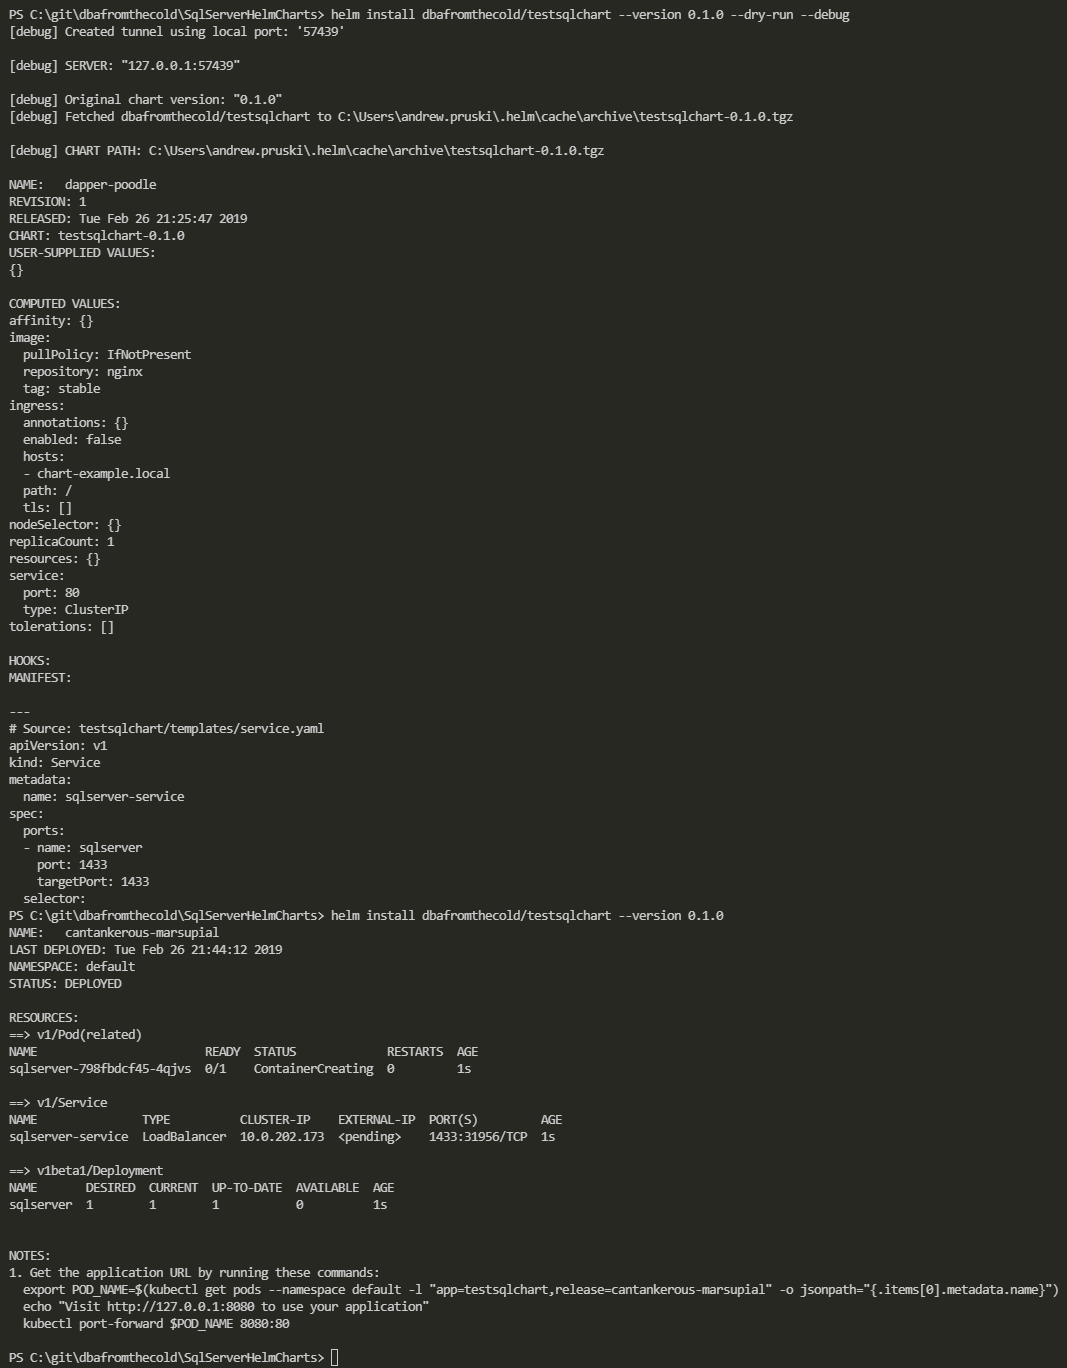
But first, deploy the chart to my local Kubernetes cluster running in Docker Desktop: –
helm install testchart ./testchart

Confirm release: –
helm list

N.B. – That app version is the default version set in the Chart.yaml file (which I haven’t updated)
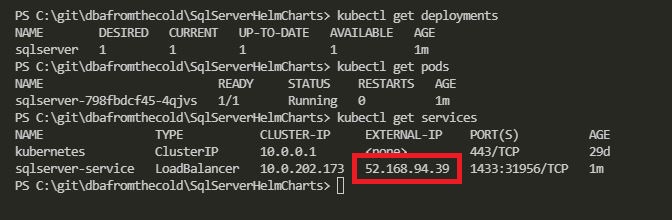
Check image running in deployment: –
kubectl get deployment -o jsonpath='{ .items[*].spec.template.spec.containers[*].image }{"\n"}'

Great. That’s deployed and the container image is the one set in the values.yaml file in the Chart.
Now upgrade the release, replacing the default container image value with the set flag: –
helm upgrade testchart ./testchart --set containerImage=nginx:1.18
Confirm release has been upgraded (check the revision number): –
helm list

Also, confirm with the release history: –
helm history testchart

So we can see the initial deployment of the release and then the upgrade. App version remains the same as I haven’t changed the value in the Chart.yaml file. However, the image has been changed and we can see that with: –
kubectl get deployment -o jsonpath='{ .items[*].spec.template.spec.containers[*].image }{"\n"}'

So we’ve upgraded the image that’s running for the one pod in the deployment.
Let’s have a look at the replicasets of the deployment: –
kubectl get replicasets
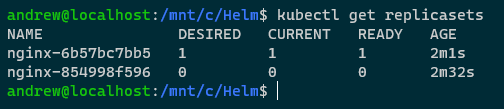
So we have two replicasets for the deployment created by our Helm release. The inital one running nginx v1.17 and the newest one running nginx v1.18.
If we wanted to rollback the upgrade with kubectl, this would work (don’t run this code!): –
kubectl rollout undo deployment nginx

What would happen here is the that the pod under the newset replicaset would be deleted and a pod under the old replicaset would be spun up, rolling back nginx to v1.17.
But we’re not going to do that, as we’re using Helm.
Let’s grab the oldest replicaset name: –
REPLICA_SET=$(kubectl get replicasets -o jsonpath='{.items[0].metadata.name }' --sort-by=.metadata.creationTimestamp)
And delete it: –
kubectl delete replicasets $REPLICA_SET
So we now only have the one replicaset: –
kubectl get replicasets

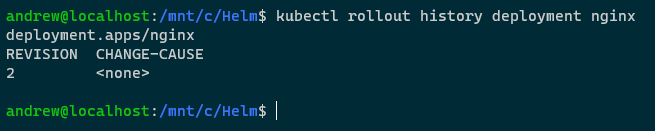
Now try to rollback using the kubectl rollout undo command: –
kubectl rollout undo deployment nginx

The reason that failed is that we deleted the old replicaset, so there’s no history for that deployment, which we can see with: –
kubectl rollout history deployment nginx

But Helm has the history: –
helm history testchart

So we can rollback: –
helm rollback testchart 1

View release status: –
helm list

View release history: –
helm history testchart

View replicasets: –
kubectl get replicasets

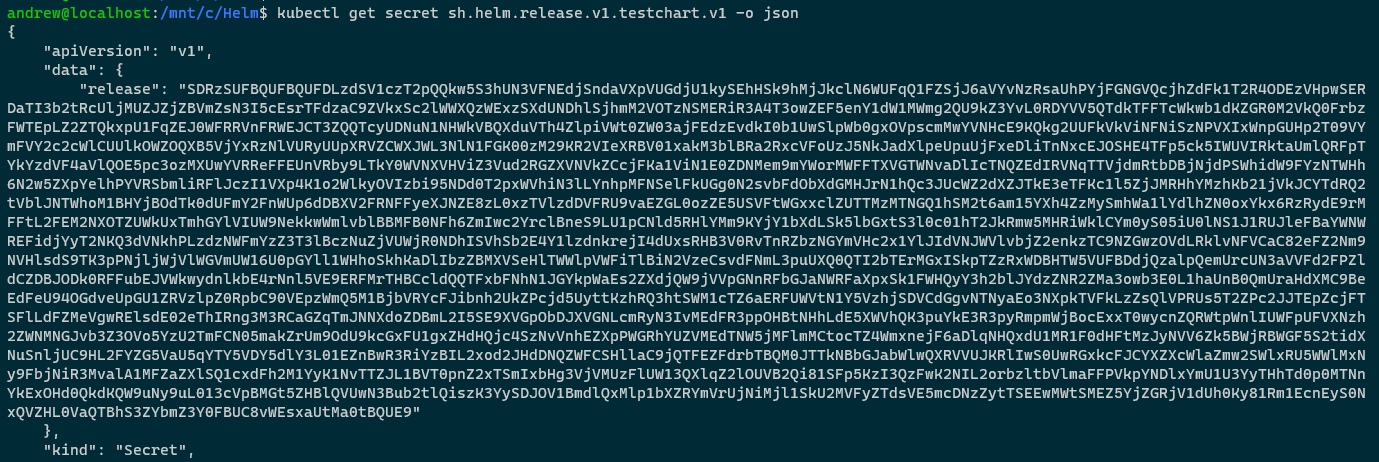
The old replicaset is back! How? Let’s have a look at secrets within the cluster: –
kubectl get secrets

Ahhh, bet you anything the Helm release history is stored in those secrets! The initial release (v1), the upgrade (v2), and the rollback (v3).
Let’s have a closer look at the first one: –
kubectl get secret sh.helm.release.v1.testchart.v1 -o json

Hmm, that release field looks interesting. What we could do is base64 decode it and then run it through decompression on http://www.txtwizard.net/compression which would give us: –
{
"name":"testchart",
"info":
	{
		"first_deployed":"2020-08-09T11:21:20.4665817+01:00",
		"last_deployed":"2020-08-09T11:21:20.4665817+01:00",
		"deleted":"",
		"description":"Install complete",
		"status":"superseded"},
		"chart":{"metadata":
	{
		"name":"testchart",
		"version":"0.1.0",
		"description":"A Helm chart for Kubernetes",
		"apiVersion":"v2",
		"appVersion":"1.16.0",
		"type":"application"},
		"lock":null,
		"templates":[
			{
				"name":
				"templates/deployment.yaml",
				"data":"YXBpVmVyc2lvbjogYXBwcy92MQpraW5kOiBEZXBsb3ltZW50Cm1ldGFkYXRhOgogIGNyZWF0aW9uVGltZXN0YW1wOiBudWxsCiAgbGFiZWxzOgogICAgYXBwOiBuZ2lueAogIG5hbWU6IG5naW54CnNwZWM6CiAgcmVwbGljYXM6IDEKICBzZWxlY3RvcjoKICAgIG1hdGNoTGFiZWxzOgogICAgICBhcHA6IG5naW54CiAgc3RyYXRlZ3k6IHt9CiAgdGVtcGxhdGU6CiAgICBtZXRhZGF0YToKICAgICAgY3JlYXRpb25UaW1lc3RhbXA6IG51bGwKICAgICAgbGFiZWxzOgogICAgICAgIGFwcDogbmdpbngKICAgIHNwZWM6CiAgICAgIGNvbnRhaW5lcnM6CiAgICAgIC0gaW1hZ2U6IHt7IC5WYWx1ZXMuY29udGFpbmVySW1hZ2UgfX0KICAgICAgICBuYW1lOiBuZ2lueAogICAgICAgIHJlc291cmNlczoge30Kc3RhdHVzOiB7fQo="},{"name":"templates/service.yaml","data":"YXBpVmVyc2lvbjogdjEKa2luZDogU2VydmljZQptZXRhZGF0YToKICBjcmVhdGlvblRpbWVzdGFtcDogbnVsbAogIGxhYmVsczoKICAgIGFwcDogbmdpbngKICBuYW1lOiBuZ2lueApzcGVjOgogIHBvcnRzOgogIC0gcG9ydDogODAKICAgIHByb3RvY29sOiBUQ1AKICAgIHRhcmdldFBvcnQ6IDgwCiAgc2VsZWN0b3I6CiAgICBhcHA6IG5naW54CiAgdHlwZTogTG9hZEJhbGFuY2VyCnN0YXR1czoKICBsb2FkQmFsYW5jZXI6IHt9Cg=="}],"values":{"containerImage":"nginx:1.17"},"schema":null,"files":[{"name":".helmignore","data":"IyBQYXR0ZXJucyB0byBpZ25vcmUgd2hlbiBidWlsZGluZyBwYWNrYWdlcy4KIyBUaGlzIHN1cHBvcnRzIHNoZWxsIGdsb2IgbWF0Y2hpbmcsIHJlbGF0aXZlIHBhdGggbWF0Y2hpbmcsIGFuZAojIG5lZ2F0aW9uIChwcmVmaXhlZCB3aXRoICEpLiBPbmx5IG9uZSBwYXR0ZXJuIHBlciBsaW5lLgouRFNfU3RvcmUKIyBDb21tb24gVkNTIGRpcnMKLmdpdC8KLmdpdGlnbm9yZQouYnpyLwouYnpyaWdub3JlCi5oZy8KLmhnaWdub3JlCi5zdm4vCiMgQ29tbW9uIGJhY2t1cCBmaWxlcwoqLnN3cAoqLmJhawoqLnRtcAoqLm9yaWcKKn4KIyBWYXJpb3VzIElERXMKLnByb2plY3QKLmlkZWEvCioudG1wcm9qCi52c2NvZGUvCg=="}]},
				"manifest":"---\n#
					Source: testchart/templates/service.yaml\n
					apiVersion: v1\n
					kind: Service\nmetadata:\n
					creationTimestamp: null\n
					labels:\n
					app: nginx\n
					name: nginx\n
					spec:\n
					ports:\n
					- port: 80\n
					protocol: TCP\n
					targetPort: 80\n
					selector:\n
					app: nginx\n
					type: LoadBalancer\n
					status:\n  loadBalancer: {}\n---\n#

					Source: testchart/templates/deployment.yaml\n
					apiVersion: apps/v1\n
					kind: Deployment\n
					metadata:\n
					creationTimestamp: null\n
					labels:\n
					app: nginx\n
					name: nginx\nspec:\n
					replicas: 1\n
					selector:\n
					matchLabels:\n
					app: nginx\n
					strategy: {}\n
					template:\n
					metadata:\n
					creationTimestamp: null\n
					labels:\n
					app: nginx\n
					spec:\n
					containers:\n
					- image: nginx:1.17\n
					name: nginx\n
					resources: {}\n
					status: {}\n",
					"version":1,
					"namespace":"default"
			}
BOOM! That look like our deployment and service manifests! We can see all the information contained in our initial Helm release (confirmed as the container image is nginx:1.17)!
So by storing this information as secrets in the target Kubernetes cluster, Helm can rollback an upgrade even if the old replicaset has been deleted! Pretty cool!
Not very clean though, eh? And have a look at that data field…that looks suspiciously like more encrypted information (well, because it is 🙂 ).
Let’s decrypt it! This time on the command line: –
kubectl get secret sh.helm.release.v1.testchart.v1 -o jsonpath="{ .data.release }" | base64 -d | base64 -d | gunzip -c | jq '.chart.templates[].data' | tr -d '"' | base64 -d

Ha! There’s the deployment and service yaml files!
By using Helm we can rollback a release even if the old replicaset of the deployment has been deleted as Helm stores the history of a release in secrets in the target Kubernetes cluster. And by using the code above, we can decrypt those secrets and have a look at the information they contain.
Thanks for reading!